

I was originally using an XServer VPS, but due to lack of memory, I was incurring too much operating costs, so I'm planning to use my home PC as a server to publish it on Cloudflare Tunnel
The following PCs were used for my home server:
It's a mini PC that's become popular these days. It has a pretty specs for around 50,000 yen on sale, and it doesn't take up much space even when placed at home, so it's pretty good! (There are many different manufacturers, but MinisForum seems to be good.)
Register as a CloudFlare account
I won't explain this, but please register as a CloudFlare account.
If you're just using CloudFlare Tunnel, I think the Free plan would be fine.
Additionally, a separate domain is required.
If you have not yet registered your domain, please try registering via "Domain Registration>Register Domains."
It is fine to obtain a domain using Oname.com or XServer VPS.

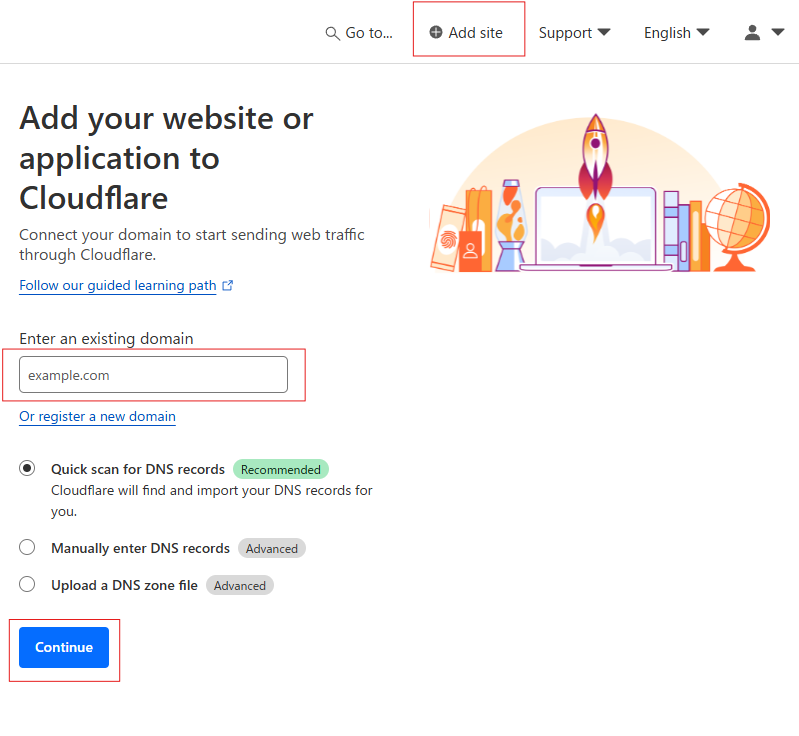
Register the site
Once you have obtained the domain, please link it to the domain from "Add site".
Install cloudflared on Ubuntu
From here, you will be working on the server you want to publish.
Install cloudflared on Ubuntu.
- Added Cloudflare package signing key
sudo mkdir -p --mode=0755 /usr/share/keyrings curl -fsSL https://pkg.cloudflare.com/cloudflare-main.gpg | sudo tee /usr/share/keyrings/cloudflare-main.gpg >/dev/null- Added Cloudflare apt repository
echo "deb [signed-by=/usr/share/keyrings/cloudflare-main.gpg] https://pkg.cloudflare.com/cloudflare jammy main" | sudo tee /etc/apt/sources.list.d/cloudflare.listError:10 https://pkg.cloudflare.com/cloudflare noble Release 404 Not Found [IP: 2606:4700::6812:176 443] Loading package list... Finished E: Repository https://pkg.cloudflare.com/cloudflare noble Release does not have a Release file. N: Updates are disabled by default because updates cannot be made safely from such a repository. N: For more information about creating a repository and setting up a user, see the apt-secure(8) man page.- Update the repository and install cloudflared
sudo apt-get update && sudo apt-get install cloudflaredLog in to CloudFlare
I think I was able to install cloudflared.
I want to create a Tunnel or something using a command, so I log in to cloudflare.
- Log in to Cloudflare
cloudflared tunnel loginThe browser will show you whether to allow it, so make sure to allow the target domain.
If allowed, I think it would look like this:
$ cloudflared tunnel login A browser window should have opened at the following URL: https://****** If the browser failed to open, please visit the URL above directly in your browser. You have successfully logged in. If you wish to copy your credentials to a server, they have been saved to: /home/********
Create a CloudFlare Tunnel
Once you're logged in, you'll start creating a Tunnel.
This can also be created with the command.
- Create a Cloudflare Tunnel
cloudflared tunnel create [any name] Tunnel credentials written to /home/****/****.json. cloudflared choose this file based on where your origin certificate was found. Keep this file secret. To revoke these credentials, delete the tunnel. Created tunnel ***** with id *****
Create a configuration file
Next, create a configuration file. Specifically, we will list the tunnel contents.
- Creating a configuration file (This time, Docker uses 81 ports, so tunnel localhost:81.)
$ sudo mkdir -p /etc/cloudflared $ cd cloudflared/ $ sudo nano config.yml $ cat config.yml url: http://localhost:81 tunnel: [id (created with cloudflared tunnel create)] credentials-file: [json path (created with cloudflared tunnel create)]Start Routing
- Assign records that direct CNAME traffic to the tunnel subdomain
cloudflared tunnel route dns [id] [domain] 2024-11-03T14:32:58Z INF Added CNAME [domain] which will route to this tunnel tunnelID=[id]
Start tunnel
Once you've done this, you can start the tunnel.
- Run cloudflared tunnel run
cloudflared tunnel run [id]I think your home server is now open to the public!
Start cloudflare with service
If this continues, the tunnel will not start unless the command is started, so register it as a service.
- Create a service configuration (Please enter the tunnel ID for [id]).
$ sudo nano /etc/systemd/system/cloudflared.service $ cat /etc/systemd/system/cloudflared.service [Unit] Description=Cloudflare Tunnel After=network.target [Service] Type=simple ExecStart=/usr/local/bin/cloudflared tunnel run [id] Restart=on-failure User=root [Install] WantedBy=multi-user.target
- Start the service
- Change service to enable
$ sudo systemctl daemon-reload $ sudo systemctl start cloudflared $ sudo systemctl enable cloudflaredNow, if the system is up, the tunnel will continue to work.
![[Super Easy] Guide to building the best automatic deployment environment starting with Coolify x Xserver VPS x Cloudflare](https://hack-lab-256.com/wp-content/uploads/2025/06/hack-lab-256-samnail-18-300x169.jpg)