Have you ever wanted to actually incorporate the recently talked about image generation AI
In this article, we will show you how to build a simple image generation app using Next.js (App Router) , Tailwind CSS , and OpenAI's Image Generation API (DALL·E 3)
those who find it a bit of a hassle to write code yourself or
want a template with a UI that works quickly, we also sell templates on the following platforms .
The templates introduced in this article are now on sale!
This chatbot UI template is available for sale on multiple platforms.
The structure is perfect for those who want to try something that works first, "I want to use it right away without building an environment," or "I want to check the entire code."
- The crisp typing feel that is unique to the capacitive non-contact system!
- REALFORCE's first wireless compatible device! Wired connection also available!
- Unlike the HHKB, the Japanese keyboard layout has no quirks and is easy for anyone to use!
- Equipped with a thumb wheel, horizontal scrolling is very easy!
- It also has excellent noise reduction performance, making it quiet and comfortable!
- Scrolling can be switched between high speed mode and ratchet mode!
About the technology used
This image generation app is built on the following technologies:
- Next.js (App Router configuration)
-
A React-based framework allows you to build unified pages and API routes. I use an App Router configuration starting from
src/app - Tailwind CSS
-
A utility-first CSS framework that allows you to efficiently organize your designs using classes. Quickly create a responsive and simple UI
- OpenAI API (Image Generation)
-
Use
OpenAI's/v1/images/generationsThe model (e.g.dall-e-3), image size, image quality, etc. can be flexibly changed using.env - API Routes + fetch
-
The client and OpenAI API communication is relayed on the server side through
/api/imagein Next.js. The client side has a simple configuration that simply POSTs usingfetch("/api/image")
Create an OpenAI API key
This time, we will be using the OpenAI API, so we will need to create an OpenAI API key.
You will be redirected to API keys in the OpenAI API dashboard. Select "Create new secret key."
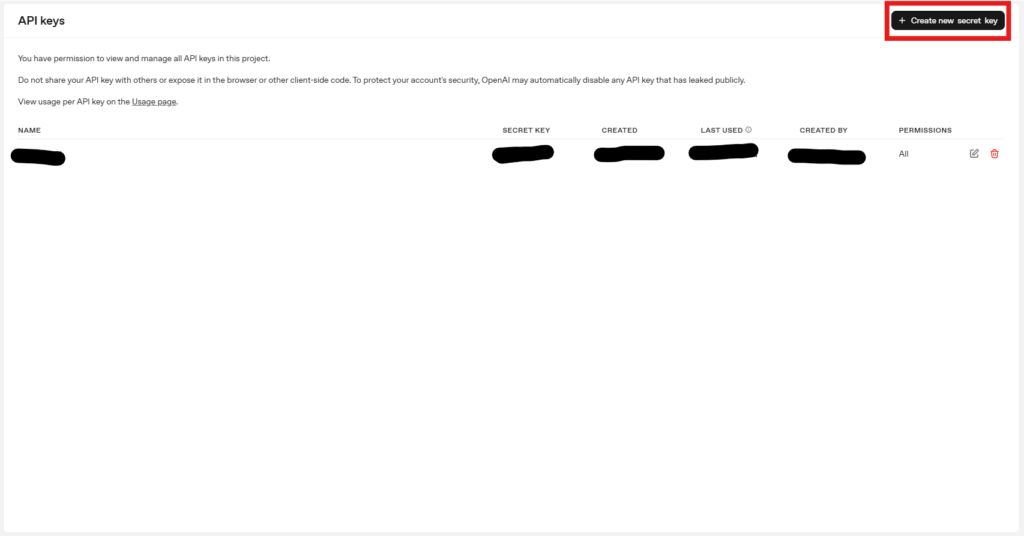
You can have the Project selected any way you like and select Permissions to suit the model you want to use, or select All to generate it.
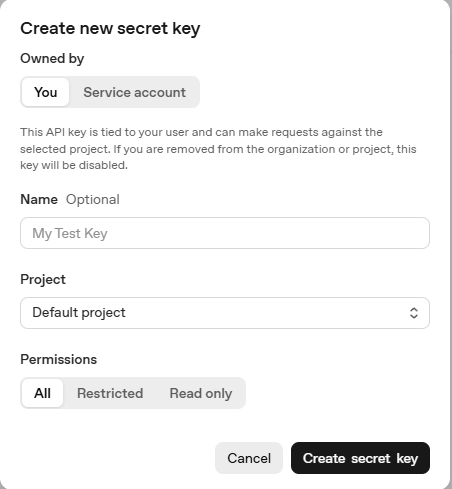
Once the creation is complete, a string starting with "sk-" will be created, so we will use it after this.
Please be careful not to let this key go.
Environmental construction
First, prepare a development environment for Next.js.
Creating a project
I'll create a project.
Basically, I think it's fine to leave everything at the defaults, but it's fine as long as you can change it as needed.
(This project uses Tailwind CSS, so it's best to set it to Yes. The default is Yes.)
$ npx create-next-app@latest image-generator-starter --typescript ✔ Would you like to use ESLint? … No / Yes ✔ Would you like to use Tailwind CSS? … No / Yes ✔ Would you like your code inside a `src/` directory? … No / Yes ✔ Would you like to use App Router? (recommended) … No / Yes ✔ Would you like to use Turbopack for `next dev`? … No / Yes ✔ Would you like to customize the import alias (`@/*` by default)? … No / Yes Creating a new Next.js app in /image-generator-starter. Using npm. Initializing project with template: app-tw Installing dependencies: - react - react-dom - next Installing devDependencies: - typescript - @types/node - @types/react - @types/react - @types/react-dom - @tailwindcss/postcss - tailwindcss - eslint - eslint-config-next - @eslint/eslintrc added 336 packages, and audited 337 packages in 16s 137 packages are looking for funding run `npm fund` for details found 0 vulnerabilities Initialized a git repository. Success! Created image-generator-starter at /image-generator-starterIf "Success! Created image-generator-starter at /image-generator-starter" appears, the project creation is complete.
Once you have created the project, move the directory.
cd image-generator-starterSet OpenAI API Key
Create a .env in the root
OPENAI_API_KEY=sk-... OPENAI_MODEL=dall-e-3 OPENAI_IMAGE_SIZE=1024x1024 OPENAI_IMAGE_QUALITY=standardShort description:
- OPENAI_API_KEY : Private key to access OpenAI image generation API (obtained from OpenAI management screen)
- OPENAI_MODEL : Image generation model to use. Currently,
dall-e-3is specified (future updates are also supported) - OPENAI_IMAGE_SIZE : The size of the image to be generated (e.g.
1024x1024). Can be changed as needed - OPENAI_IMAGE_QUALITY : Image quality. You can choose
standardorhdHDis high quality but can take a long time)
Start the development server
Running the following command will launch the template:
npm run devImplementing the UI (image generation screen)
The image generation user interface is organized into
src/app/page.tsx The total amount of source code is as follows:
"use client"; import { useState } from "react"; import Image from "next/image"; export default function Home() { // State for user input (image prompt) // The image generation prompt entered by the user const [prompt, setPrompt] = useState(""); // State to store generated image URL // URL of the generated image const [imageUrl, setImageUrl] = useState(""); // Loading indicator state // Loading flag const [loading, setLoading] = useState(false); // Error message state // For storing error messages const [error, setError] = useState(""); // Handle image generation request // Processing image generation request const generateImage = async () => { if (!prompt.trim()) return; // Reset state before request // Initialize state before request setLoading(true); setError(""); setImageUrl(""); try { // Send request to internal API // Send request to internal API (/api/image) const res = await fetch("/api/image", { method: "POST", headers: { "Content-Type": "application/json" }, body: JSON.stringify({ prompt }), }); const data = await res.json(); if (res.ok && data.imageUrl) { setImageUrl(data.imageUrl); } else { setError(data.error || "Failed to generate image."); } } catch (e) { console.error("Error:", e); setError("An unexpected error occurred."); } finally { setLoading(false); } }; return (<main className="min-h-screen bg-gray-900 text-gray-100 flex items-center justify-center px-4 py-8"><div className="w-full max-w-xl bg-gray-800 rounded-xl shadow-lg p-6 space-y-6"> {/* Title */}<h1 className="text-2xl font-bold text-center text-white"> AI Image Generator</h1> {/* Prompt Input / Prompt Input field */}<div className="space-y-2"> <label htmlFor="prompt" className="block text-sm font-medium text-gray-300" >Enter your image prompt</label><textarea id="prompt" rows={3} value={prompt} onChange={(e) => setPrompt(e.target.value)} className="w-full p-3 rounded-lg bg-gray-700 border border-gray-600 text-white focus:outline-none focus:ring-2 focus:ring-green-400 resize-none" placeholder="eg A futuristic cityscape at sunset, digital art" /> </div> {/* Generate Button / Generate button */} <button onClick={generateImage} disabled={loading} className="w-full py-3 rounded-lg bg-green-500 hover:bg-green-600 text-black font-semibold disabled:opacity-50 transition" > {loading ? "Generating..." : "Generate Image"} </button> {/* Error Message / Error Display */} {error && ( <div className="text-red-400 text-sm text-center">{error}</div> )} {/* Image Display / Image Display */} {imageUrl && ( <div className="mt-4 relative w-full h-[512px]"> <Image src={imageUrl} alt="Generated result" fill unoptimized className="rounded-lg object-contain border border-gray-700" /> </div> )} </div> </main> ); }
Message status management
const [prompt, setPrompt] = useState(""); const [imageUrl, setImageUrl] = useState(""); const [loading, setLoading] = useState(false); const [error, setError] = useState("");Short description:
prompt: Keeps the image generation description (prompt) entered by the userimageUrl: Keeps the URL of the generated imageloading: Indicates the status of waiting for API responseerror: Keeps messages to be displayed when an error occurs
Image generation transmission processing and API call
const generateImage = async () => { if (!prompt.trim()) return; setLoading(true); setError(""); setImageUrl(""); try { const res = await fetch("/api/image", { method: "POST", headers: { "Content-Type": "application/json" }, body: JSON.stringify({ prompt }), }); const data = await res.json(); if (res.ok && data.imageUrl) { setImageUrl(data.imageUrl); } else { setError(data.error || "Failed to generate image."); } } catch (e) { console.error("Error:", e); setError("An unexpected error occurred."); } finally { setLoading(false); } };Short description:
- Send the entered prompt
/api/image - When the image is returned from the OpenAI API, set the URL and it will be displayed on the screen.
- If an error occurs, a message will be displayed
Input form and buttons (Tailwind CSS)
<textarea id="prompt" rows={3} value={prompt} onChange={(e) =>setPrompt(e.target.value)} className="w-full p-3 rounded-lg bg-gray-700 border border-gray-600 text-white focus:outline-none focus:ring-2 focus:ring-green-400 resize-none" placeholder="eg A cat surfing on waves, digital art" /> <button onClick={generateImage} disabled={loading} className="w-full py-3 rounded-lg bg-green-500 hover:bg-green-600 text-black font-semibold disabled:opacity-50 transition" > {loading ? "Generating..." : "Generate Image"} </button>Short description:
- Enter the image description in the text area
- Click the button to start image generation ( button is disabled while
loading - Tailwind CSS makes it simple and easy to use
Image display, error, loading display
{error && (<div className="text-red-400 text-sm text-center"> {error}</div> )} {imageUrl && ( <div className="mt-4 relative w-full h-[512px]"><Image src={imageUrl} alt="Generated result" layout="fill" className="rounded-lg object-contain border border-gray-700" /></div> )}Short description:
- If there is
an error - If an image is generated, it will be displayed responsively on the screen ( optimized using
next/image
Server-side implementation (OpenAI API integration)
The process of image generation is that the client sends a request to
/api/image then relays and responses are returned to OpenAI's Chat API on the server.
The total amount of server-side source code is as follows:
// src/app/api/image/route.ts import { NextRequest, NextResponse } from "next/server"; // POST handler for image generation using OpenAI API // Generate images using OpenAI API POST handler export async function POST(req: NextRequest) { // Parse the prompt from the request body // Get the prompt from the request body const { prompt } = await req.json(); // Validate input // Check if the prompt is specified if (!prompt) { return NextResponse.json({ error: "Prompt is required" }, { status: 400 }); } try { // Load configuration from environment variables (with fallback values) // Load settings from environment variables (if not, the default value) const model = process.env.OPENAI_MODEL || "dall-e-3"; const size = process.env.OPENAI_IMAGE_SIZE || "1024x1024"; const quality = process.env.OPENAI_IMAGE_QUALITY || "standard"; // Send request to OpenAI's image generation endpoint // Send request to OpenAI's image generation endpoint const response = await fetch( "https://api.openai.com/v1/images/generations", { method: "POST", headers: { Authorization: `Bearer ${process.env.OPENAI_API_KEY}`, "Content-Type": "application/json", }, body: JSON.stringify({ model, // eg, "dall-e-3" prompt, // User's prompt for image generation size, // eg, "1024x1024" quality, // "standard" or "hd" n: 1, // Number of images to generate }), } ); const data = await response.json(); // Handle API error response // What to do if an API error is returned if (data.error) { console.error("OpenAI API error:", data.error); return NextResponse.json( { error: "Image generation failed" }, { status: 500 } ); } // Extract the generated image URL // Get the URL of the generated image const imageUrl = data.data?.[0]?.url; // Return the image URL to the client // Return the image URL to the client return NextResponse.json({ imageUrl }); } catch (error) { // Handle unexpected server errors // Handle unexpected server errors console.error("Server error:", error); return NextResponse.json( { error: "Internal server error" }, { status: 500 } ); } }
Basic configuration of route.ts
import { NextRequest, NextResponse } from "next/server"; export async function POST(req: NextRequest) { const { prompt } = await req.json();Short description:
- This is an API route that is limited to
POST - You receive
promptsent from the client side
Requests for OpenAI API
const response = await fetch("https://api.openai.com/v1/images/generations", { method: "POST", headers: { Authorization: `Bearer ${process.env.OPENAI_API_KEY}`, "Content-Type": "application/json", }, body: JSON.stringify({ model: process.env.OPENAI_MODEL || "dall-e-3", prompt, size: process.env.OPENAI_IMAGE_SIZE || "1024x1024", quality: process.env.OPENAI_IMAGE_QUALITY || "standard", n: 1, }), }); const data = await response.json();Short description:
- Dynamically loads
API keys,model names,image sizes, andimage qualityfrom environment variables - the OpenAI image generation API (
/v1/images/generations) and send an image generation request. n: 1is the specification that "only one sheet will be generated."
Response processing and error handling
if (data.error) { console.error(data.error); return NextResponse.json({ error: "Image generation failed" }, { status: 500 }); } const imageUrl = data.data?.[0]?.url; return NextResponse.json({ imageUrl }); }Short description:
- If the OpenAI API fails, the error is output to the console and returns with a 500 error.
- If the image URL is returned successfully, it will be returned to the client (
imageUrl).
[Bonus] Things to note
- Please manage
with.envso that you never publish them If the problem occurs, disable it or reissue it on the OpenAI management screen - Model name, image size and image quality are designed
to be dynamically switched with.envPlease adjust according to the purpose and cost (e.g.HDis higher quality and higher cost thanstandard - Image storage period and availability times may be limited , so if necessary, consider designing to perform storage processing immediately after acquisition.
Operation check
Let's make a quick check of its operation!
When you open "localhost:3000" in your browser, the following screen will appear.
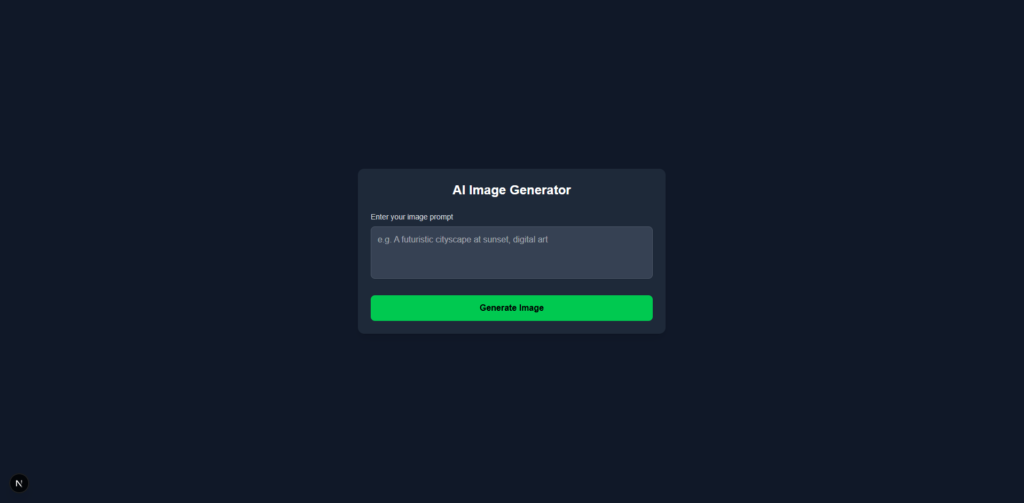
Try entering "a cute cat."
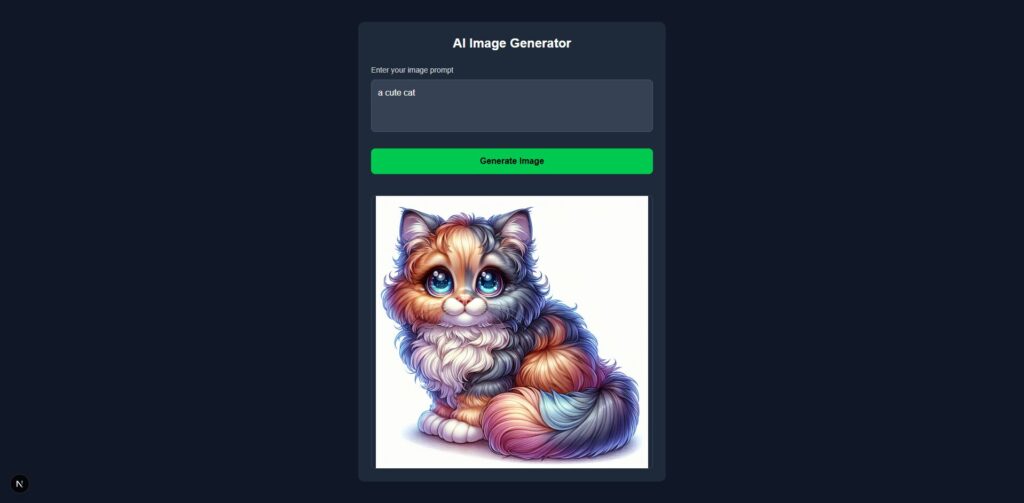
After waiting for a while, a cute cat image was generated and displayed!
It also displays without any problems in Japanese!
Information on template sales
The chatbot UI introduced in this article is also sold as a template that can be used for commercial purposes
Why sell templates?
We have prepared this for those who are experiencing the following needs:
- "Even if you follow the steps, the environment doesn't work out..."
- "I just want to start with a moving sample."
- "I looked at my blog and found it useful, so I would like to purchase it with the aim of supporting and donating."
Even those who are not used to developing the game are able to start up and try it out quickly with minimal effort
Examples of template use (customization ideas)
This template is perfect for personal development and learning purposes.
For example, we recommend modifying and expanding the following:
- Added preprocessor to translate input prompts English
- Expanded to allow download and save and share the generated images on SNS
- Add history management (most recent prompt + image) function locally
- Customize the theme colors and designs to make your own specifications
- Add processing to automatically save images to S3 etc. on the server side
It's also a good practice to try it out on a "serial basis" basis for programming beginners.
What's included in the template
contains
all the source code for the project we introduced here Therefore, you don't have to create or configure your own project from scratch, and you can start it immediately .
- UI implementation using Next.js (App Router)
- Server-side implementation with API integration
- Clean code structure with comments
- Simple and easy to improve design using Tailwind CSS
- Docker startup configuration files (
Dockerfile,docker-compose.yml)
The templates introduced in this article are now on sale!
This chatbot UI template is available for sale on multiple platforms.
The structure is perfect for those who want to try something that works first, "I want to use it right away without building an environment," or "I want to check the entire code."
summary
This time, we introduced how to build image generation app using OpenAI API x Next.js.
The key points in this article are as follows:
- OpenAI's Image API allows you to create image generation functions with just a little bit of code
- Next.js App Router + Tailwind CSS makes it easy to expand and customize UI
- Using templates, skip the environment construction and setup and check the operation immediately.
This template is perfect for
prototyping and personal development starter kits It is also recommended for those who want to quickly turn their ideas into reality, or for learning and verifying the OpenAI API.
![How to build a web app that automatically generates LPs in ChatGPT + Next.js [OpenAI API + Next.js + Tailwind CSS]](https://hack-lab-256.com/wp-content/uploads/2025/07/hack-lab-256-samnail-27-300x169.jpg)
![I tried creating a chatbot using the OpenAI API [Next.js + Tailwind CSS]](https://hack-lab-256.com/wp-content/uploads/2025/07/hack-lab-256-samnail-25-300x169.jpg)

![[For beginners] Introduction to React Three Fiber x Drei x TypeScript! Create pixel art and dynamic animations from images](https://hack-lab-256.com/wp-content/uploads/2025/02/hack-lab-256-samnail-16-300x169.jpg)
![[Complete explanation] Learn with React Three Fiber × TypeScript! Practical guide to Transform (Position, Rotation, Scale) for 3D Objects](https://hack-lab-256.com/wp-content/uploads/2025/02/hack-lab-256-samnail-15-300x169.png)
![[Super Easy] Introduction to React Three Fiber x Drei x TypeScript! Poke Poke style 3D background made with standard objects!](https://hack-lab-256.com/wp-content/uploads/2025/02/hack-lab-256-samnail-14-300x169.jpg)