![How to build a web app that automatically generates LPs in ChatGPT + Next.js [OpenAI API + Next.js + Tailwind CSS]](https://hack-lab-256.com/wp-content/uploads/2025/07/hack-lab-256-samnail-27.jpg)
no-code AI tools like "Readdy" have been attracting attention.
We are now in an age where anyone can easily use AI, but
have you ever thought, " I want to incorporate AI into my services " or " I want to customize it more freely
In this article, we will show you how to build
a web app that automatically generates LPs (landing pages) using Next.js (App Router) , Tailwind CSS , and OpenAI's Chat Completions API
those who find it a bit of a hassle to write code or
those who want a template with a UI that works quickly, we have also published templates on the following platforms.
The templates introduced in this article are now on sale!
This chatbot UI template is available for sale on multiple platforms.
The structure is perfect for those who want to try something that works first, "I want to use it right away without building an environment," or "I want to check the entire code."
- The crisp typing feel that is unique to the capacitive non-contact system!
- REALFORCE's first wireless compatible device! Wired connection also available!
- Unlike the HHKB, the Japanese keyboard layout has no quirks and is easy for anyone to use!
- Equipped with a thumb wheel, horizontal scrolling is very easy!
- It also has excellent noise reduction performance, making it quiet and comfortable!
- Scrolling can be switched between high speed mode and ratchet mode!
About the technology used
This LP generation app is built using the following technologies:
- Next.js (App Router configuration)
-
A React-based framework allows you to build unified pages and API routes. I use an App Router configuration starting from
src/app - Tailwind CSS
-
A utility-first CSS framework that allows you to efficiently organize your designs using classes. Quickly create a responsive and simple UI
- OpenAI API (Chat Completions)
-
This is a mechanism for interacting with GPT-based models using the
/v1/chat/completionswe've made it easy to switch between environment variablesgpt-4.1-miniandgpt-3.5-turbo - API Routes + fetch
-
I am writing server processing that relays between the browser and the OpenAI API using the Next.js API root (
/api/chatto clients usingfetch ("/api/chat")
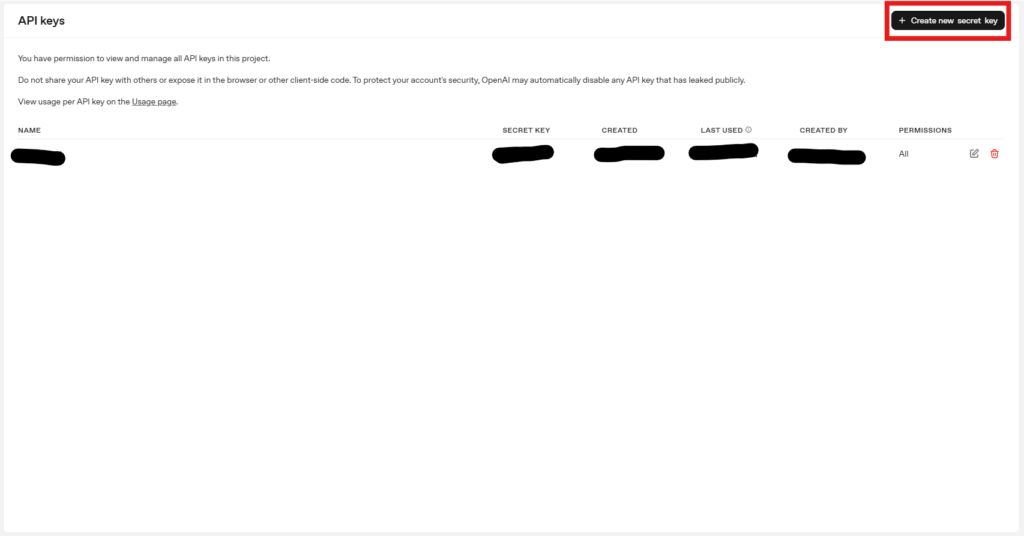
Create an OpenAI API key
This time, we will be using the OpenAI API, so we will need to create an OpenAI API key.
You will be redirected to API keys in the OpenAI API dashboard. Select "Create new secret key."
You can have the Project selected any way you like and select Permissions to suit the model you want to use, or select All to generate it.
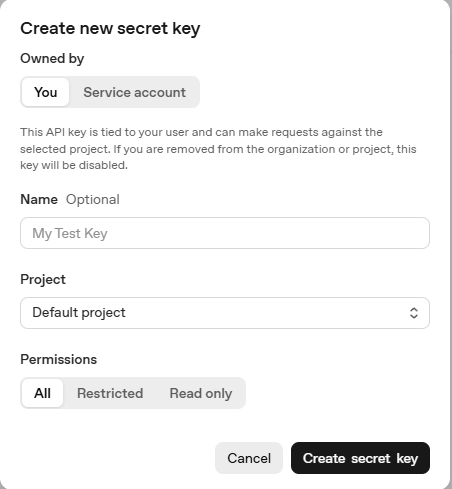
Once the creation is complete, a string starting with "sk-" will be created, so we will use it after this.
Please be careful not to let this key go.
Environmental construction
First, prepare a development environment for Next.js.
Creating a project
I'll create a project.
Basically, I think it's fine to leave everything at the defaults, but it's fine as long as you can change it as needed.
(This project uses Tailwind CSS, so it's best to set it to Yes. The default is Yes.)
$ npx create-next-app lp-generator-starter --app --typescript Need to install the following packages: create-next-app@15.4.4 Ok to proceed? (y) ✔ Would you like to use ESLint? … No / Yes ✔ Would you like to use Tailwind CSS? … No / Yes ✔ Would you like your code inside a `src/` directory? … No / Yes ✔ Would you like to use Turbopack for `next dev`? … No / Yes ✔ Would you like to customize the import alias (`@/*` by default)? … No / Yes Creating a new Next.js app in /lp-generator-starter. Using npm. Initializing project with template: app-tw Installing dependencies: - react - react-dom - next Installing devDependencies: - typescript - @types/node - @types/react - @types/react-dom - @tailwindcss/postcss - tailwindcss - eslint - eslint-config-next - @eslint/eslintrc added 336 packages, and audited 337 packages in 13s 137 packages are looking for funding run `npm fund` for details found 0 vulnerabilities Initialized a git repository. Success! Created lp-generator-starter at /lp-generator-starterIf "Success! Created lp-generator-starter at /lp-generator-starter" appears, the project creation is complete.
Once you have created the project, move the directory.
cd lp-generator-starterSet OpenAI API Key
Create a .env in the root
OPENAI_API_KEY=sk-... OPENAI_MODEL=gpt-4.1-mini SYSTEM_PROMPT=You are a helpful assistant for creating LPs.Short description:
- OPENAI_API_KEY: Private key required for OpenAI API access (issued by a personal account)
- OPENAI_MODEL: The model name to use. Depending on the purpose,
gpt-3.5-turbo,gpt-4.1-mini, etc. - SYSTEM_PROMPT: Initial message specifying the AI's personality and role (effective when chat starts)
Start the development server
Running the following command will launch the template:
npm run devImplementing the UI (Chat screen)
The chat user interface is consolidated in
src/app/page.tsx The total amount of source code is as follows:
"use client"; import { useState } from "react"; export default function Home() { // State management of input form // State for each input field const [productName, setProductName] = useState(""); const [category, setCategory] = useState("web"); const [description, setDescription] = useState(""); const [features, setFeatures] = useState(["", "", ""]); const [targetUser, setTargetUser] = useState(""); const [goal, setGoal] = useState(""); const [tone, setTone] = useState(""); const [style, setStyle] = useState(""); const [referenceUrl, setReferenceUrl] = useState(""); const [loading, setLoading] = useState(false); const [result, setResult] = useState(""); // LP generation process // Function to call API and generate landing page HTML const generateLP = async () => { setLoading(true); setResult(""); try { const res = await fetch("/api/generate-lp", { method: "POST", headers: { "Content-Type": "application/json" }, body: JSON.stringify({ productName, category, description, features, targetUser, goal, tone, style, referenceUrl, }), }); const data = await res.json(); setResult(data.html || "Failed to generate HTML."); } catch (err) { setResult("An error occurred."); } finally { setLoading(false); } }; // Download the generated HTML as a file const downloadHTML = () => { const blob = new Blob([result], { type: "text/html" }); const url = URL.createObjectURL(blob); const a = document.createElement("a"); a.href = url; a.download = "landing_page.html"; a.click(); URL.revokeObjectURL(url); }; // Preview in new window // Preview the generated HTML in a new browser window const openPreview = () => { const preview = window.open("", "_blank"); if (preview) { preview.document.write(result); preview.document.close(); } }; return ( <main className="min-h-screen bg-gray-900 text-white p-6"><div className="max-w-3xl mx-auto space-y-8"><h1 className="text-3xl font-bold text-center"> LP Generator</h1> {/* Form Inputs - Input field */} <Input label="Product Name" value={productName} onChange={setProductName} /><Select label="Category" value={category} onChange={setCategory} options={[ { value: "web", label: "Web Service" }, { value: "cafe", label: "Cafe / Restaurant" }, { value: "app", label: "Application" }, { value: "lesson", label: "Online Course" }, { value: "other", label: "Other" }, ]} /><Textarea label="Short Description" value={description} onChange={setDescription} /> <div> <label className="block text-sm mb-1">Key Features (up to 3)</label> {features.map((f, i) => ( <input key={i} value={f} onChange={(e) => { const newFeatures = [...features]; newFeatures[i] = e.target.value; setFeatures(newFeatures); }} placeholder={`Feature ${i + 1}`} className="w-full mb-2 p-2 rounded bg-gray-800 border border-gray-600" /> ))} </div> <Input label="Target Audience" value={targetUser} onChange={setTargetUser} /> <Input label="Call to Action / Goal" value={goal} onChange={setGoal} /> <Input label="Tone of Voice" value={tone} onChange={setTone} /> <Input label="Visual Style" value={style} onChange={setStyle} /> <Input label="Reference LP URL (optional)" value={referenceUrl} onChange={setReferenceUrl} /> {/* Generate Button */} <div className="text-center"> <button onClick={generateLP} disabled={loading} className="px-6 py-3 bg-green-500 rounded hover:bg-green-600 text-black font-semibold disabled:opacity-50" > {loading ? "Generating..." : "Generate LP"} </button> </div> {/* Result & Actions */} {result && ( <div className="space-y-4"> {/* Display result (plain text) */} <div className="whitespace-pre-wrap bg-gray-800 border border-gray-600 p-4 rounded max-h-[400px] overflow-y-auto text-sm"> {result} </div> {/* Preview Download */} <div className="flex gap-4 justify-center"> <button onClick={openPreview} className="px-4 py-2 bg-blue-500 hover:bg-blue-600 text-white rounded" > Preview </button> <button onClick={downloadHTML} className="px-4 py-2 bg-purple-500 hover:bg-purple-600 text-white rounded" > Download HTML </button> </div> </div> )} </div> </main> ); } // Common Input Form Component Component Input({ label, value, onChange, }: { label: string; value: string; onChange: (v: string) => void; }) { return ( <div> <label className="block text-sm mb-1">{label}</label> <input value={value} onChange={(e) => onChange(e.target.value)} className="w-full p-2 rounded bg-gray-800 border border-gray-600" /> </div> ); } // Common Select Box // Reusable Select Component function Select({ label, value, onChange, options, }: { label: string; value: string; onChange: (v: string) => void; options: { value: string; label: string }[]; }) { return ( <div> <label className="block text-sm mb-1">{label}</label> <select value={value} onChange={(e) => onChange(e.target.value)} className="w-full p-2 rounded bg-gray-800 border border-gray-600" > {options.map((opt) => ( <option key={opt.value} value={opt.value}> {opt.label} </option> ))} </select> </div> ); } // Common textarea // Reusable Textarea Component function Textarea({ label, value, onChange, }: { label: string; value: string; onChange: (v: string) => void; }) { return ( <div> <label className="block text-sm mb-1">{label}</label> <textarea value={value} onChange={(e) => onChange(e.target.value)} rows={3} className="w-full p-2 rounded bg-gray-800 border border-gray-600" /> </div> ); }
Controlling the status of the input form
const [productName, setProductName] = useState(""); const [category, setCategory] = useState(""); const [description, setDescription] = useState(""); const [features, setFeatures] = useState(["", "", ""]); const [targetUser, setTargetUser] = useState(""); const [goal, setGoal] = useState(""); const [tone, setTone] = useState(""); const [style, setStyle] = useState(""); const [referenceUrl, setReferenceUrl] = useState(""); const [loading, setLoading] = useState(false); const [result, setResult] = useState("");Short description:
productName: Product Namecategory: Genre (web, cafes, apps, etc.)description: Product description (short text)features: An array for entering up to three featurestargetUser: Target users (e.g., sole proprietors)goal: Purpose of LP (e.g. purchase, registration)tone: tonmana (friendliness, formal, etc.)style: The atmosphere of the design (cute, cool, etc.)referenceUrl: URL of reference LPloading: Whether or not you wait for API responseresult: generated HTML string
LP generation processing and API calls
const generateLP = async () => { setLoading(true); setResult(""); try { const res = await fetch("/api/generate-lp", { method: "POST", headers: { "Content-Type": "application/json" }, body: JSON.stringify({ productName, category, description, features, targetUser, goal, tone, style, referenceUrl, }), }); const data = await res.json(); setResult(data.html || "Failed to generate HTML."); } catch (err) { setResult("An error occurred."); } finally { setLoading(false); } };Short description:
- Send the input data
/api/generate-lp - If successful, the HTML will be stored in
the result
Preview display process
const openPreview = () => { const preview = window.open("", "_blank"); if (preview) { preview.document.write(result); preview.document.close(); } };Short description:
- Display the generated HTML in a new tab and preview the actual LP
HTML download processing
const downloadHTML = () => { const blob = new Blob([result], { type: "text/html" }); const url = URL.createObjectURL(blob); const a = document.createElement("a"); a.href = url; a.download = "landing_page.html"; a.click(); URL.revokeObjectURL(url); };Short description:
- Use
a Bloband allowa.downloadto save it as static HTML
Output Results + Preview Download Button
{result && ( <div className="space-y-4"><div className="whitespace-pre-wrap bg-gray-800 border border-gray-600 p-4 rounded max-h-[400px] overflow-y-auto text-sm"> {result}</div><div className="flex gap-4 justify-center"> <button onClick={openPreview} className="px-4 py-2 bg-blue-500 hover:bg-blue-600 text-white rounded" >Preview</button> <button onClick={downloadHTML} className="px-4 py-2 bg-purple-500 hover:bg-purple-600 text-white rounded" >Download HTML</button></div></div> )}Short description:
- The HTML of the generated LP is displayed directly on the screen.
- You can view it in the browser using "Preview" and save files using "Download"
Server-side implementation (OpenAI API integration)
The LP generation interaction sending a request from the client to
/api/generate-lp then returning a relay and response to OpenAI's Chat API on the server.
The total amount of server-side source code is as follows:
import { NextRequest, NextResponse } from "next/server"; // API endpoint (POST) // Automatically generates a Landing Page in HTML format // POST endpoint to generate landing page HTML based on user input export async function POST(req: NextRequest) { try { // Extract JSON body from client // Extract payload from request const { productName, category, description, features, targetUser, goal, tone, style, referenceUrl, } = await req.json(); // Validate required fields if (!productName || !description || !goal) { return NextResponse.json( { error: "Missing required fields: productName, description, or goal.", }, { status: 400 } ); } // Construct prompt to send to OpenAI API const prompt = `You are a professional copywriter and HTML developer. Your task is to generate a clean, full HTML landing page for the following product. Structure it based on three main sections: First View, Body, and Close. Instructions: - Output a complete and valid HTML document (include)<!DOCTYPE html> ,<html> ,<head> , and<body> ). - English only. - Do NOT format the result using Markdown. - Do NOT add any explanations before or after the code. - Use only raw HTML as the output. - Do not include JavaScript or external CSS frameworks. - Use inline styles or internal<style> for layout and design. - Use a clear, persuasive tone for copywriting. - Use semantic HTML elements (header, section, footer, etc.). Sections to include: 1. First View - Headline (h1) with the product name - Subheadline with a short summary - Prominent CTA button (e.g. "Start Now") 2. Body - Detailed product description - Bullet point list of key features - Optional paragraph about who it’s for 3. Closing - Final persuasive message - CTA button (again) - Optional tagline (e.g. “No credit card required”) Product Info: - Product Name: ${productName} - Category: ${category} - Description: ${description} - Key Features: ${features.filter(Boolean).join(" / ") || "None"} - Target Audience: ${targetUser || "Not specified"} - Goal or Call-to-Action: ${goal} - Tone of Voice: ${tone || "Neutral"} - Visual Style: ${style || "Clean"} - Reference URL: ${referenceUrl || "None"} Respond only with the HTML. Do not include markdown code blocks or explanations.`; // OpenAI APIを呼び出す // Call OpenAI Chat API const response = await fetch("https://api.openai.com/v1/chat/completions", { method: "POST", headers: { Authorization: `Bearer ${process.env.OPENAI_API_KEY}`, "Content-Type": "application/json", }, body: JSON.stringify({ model: process.env.OPENAI_MODEL || "gpt-4o", messages: [ { role: "system", content: "You are a helpful assistant and skilled HTML designer.", }, { role: "user", content: prompt, }, ], temperature: 0.8, }), }); const data = await response.json(); // エラーハンドリング(OpenAIの応答に問題がある場合) // Handle OpenAI error response if (data.error) { console.error("OpenAI API Error:", data.error); return NextResponse.json( { error: "Failed to generate landing page." }, { status: 500 } ); } // HTML出力を取得 // Extract the generated HTML content const html = data.choices?.[0]?.message?.content || ""; // クライアントへHTMLを返却 // Return HTML back to client return NextResponse.json({ html }); } catch (err) { // サーバー側の予期せぬエラー対応 // Catch any server-side error console.error("Server Error:", err); return NextResponse.json( { error: "Internal server error." }, { status: 500 } ); } }
Basic configuration (receiving requests using the POST method)
import { NextRequest, NextResponse } from "next/server"; export async function POST(req: NextRequest) { const { productName, category, description, features, targetUser, goal, tone, style, referenceUrl, } = await req.json();Short description:
- Defines API endpoints that are limited to
POST - Receives the parameters (product name, description, purpose, etc.) sent from the client side (
JSON
Check required fields
if (!productName || !description || !goal) { return NextResponse.json( { error: "Missing required fields: productName, description, or goal." }, { status: 400 } ); }Short description:
- If the product name, description, or purpose is not entered, a 400 error will be returned and processing will be suspended.
- Safety when passing through the validation on the front side
Prompt generation (instructions given to ChatGPT)
const prompt = `You are a professional copywriter and HTML developer. Your task is to generate a clean, full HTML landing page for the following product. Structure it based on three main sections: First View, Body, and Close. Instructions: - Output a complete and valid HTML document (include<!DOCTYPE html> ,<html> ,<head> , and<body> ). - English only. - Do NOT format the result using Markdown. - Do NOT add any explanations before or after the code. - Use only raw HTML as the output. - Do not include JavaScript or external CSS frameworks. - Use inline styles or internal<style> for layout and design. - Use a clear, persuasive tone for copywriting. - Use semantic HTML elements (header, section, footer, etc.). Sections to include: 1. First View - Headline (h1) with the product name - Subheadline with a short summary - Prominent CTA button (e.g. "Start Now") 2. Body - Detailed product description - Bullet point list of key features - Optional paragraph about who it’s for 3. Closing - Final persuasive message - CTA button (again) - Optional tagline (e.g. “No credit card required”) Product Info: - Product Name: ${productName} - Category: ${category} - Description: ${description} - Key Features: ${features.filter(Boolean).join(" / ") || "None"} - Target Audience: ${targetUser || "Not specified"} - Goal or Call-to-Action: ${goal} - Tone of Voice: ${tone || "Neutral"} - Visual Style: ${style || "Clean"} - Reference URL: ${referenceUrl || "None"} Respond only with the HTML. Do not include markdown code blocks or explanations.`;Short description:
- Dynamically generates an instruction (prompt) to send to ChatGPT
- embedding product information and specifying the configuration and output format in detail , you can generate high-quality HTML.
- Send a better prompt and you can generate better HTML, so try customizing it.
Send a request to the OpenAI API
const response = await fetch("https://api.openai.com/v1/chat/completions", { method: "POST", headers: { Authorization: `Bearer ${process.env.OPENAI_API_KEY}`, "Content-Type": "application/json", }, body: JSON.stringify({ model: process.env.OPENAI_MODEL || "gpt-4.1-mini", messages: [ { role: "system", content: process.env.SYSTEM_PROMPT || "You are a helpful assistant.", }, { role: "user", content: prompt, }, ], temperature: 0.8, }), }); const data = await response.json();Short description:
- Send an HTTP POST request to OpenAI API (Chat Completions)
Model,API_KEY,SYSTEM_PROMPTetc. are loaded from.envThe messagesarray has a system role (personality) and user role (instruction)
Check and return response or handle errors
if (data.error) { console.error("OpenAI API Error:", data.error); return NextResponse.json( { error: "Failed to generate landing page." }, { status: 500 } ); } const html = data.choices?.[0]?.message?.content || ""; return NextResponse.json({ html }); }Short description:
- If ChatGPT response is → Log output + 500 error returns
- If the response is normal, the HTML will be returned to the client using
jsonstored inthe html
[Bonus] Things to note
Make sure to manage
with .env so that they are never exposed If your API key is leaked, remove the API key from the OpenAI dashboard.
The model name is an environment variable, so please replace it according to the purpose.
The amount of money involved varies depending on the model, so be careful when selecting a model.
Prompts can change the generated content so be sure to customize your prompt.
Operation check
Once you've done this, let's check the operation!
You will see the screen below, so try adding the information to the input form and generating it!
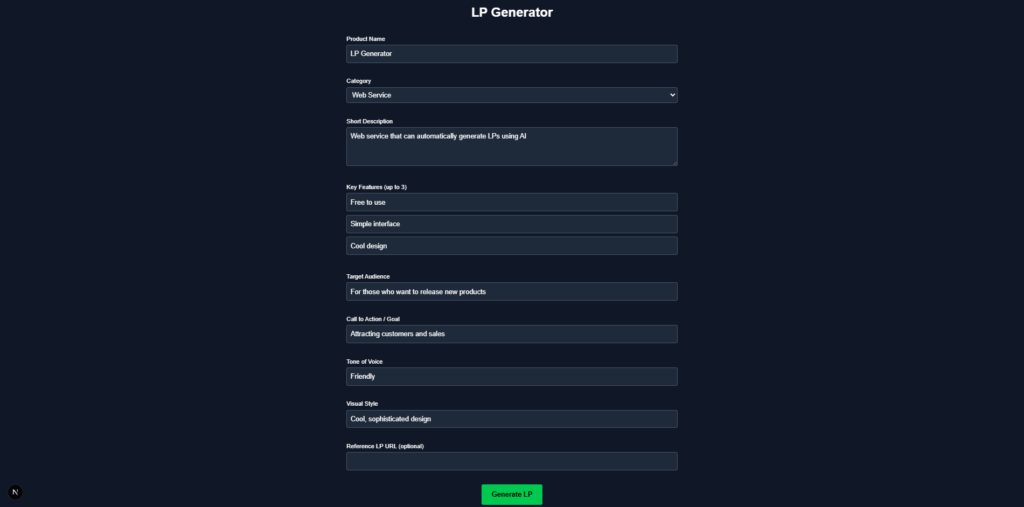
This LP was generated! ! Well, I generated it with gpt-4o, but I guess it's a compromise.
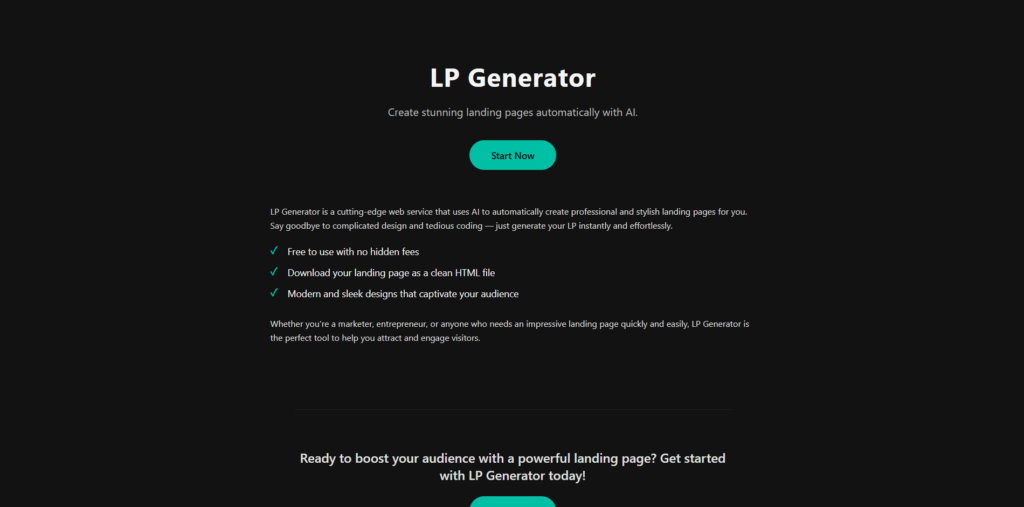
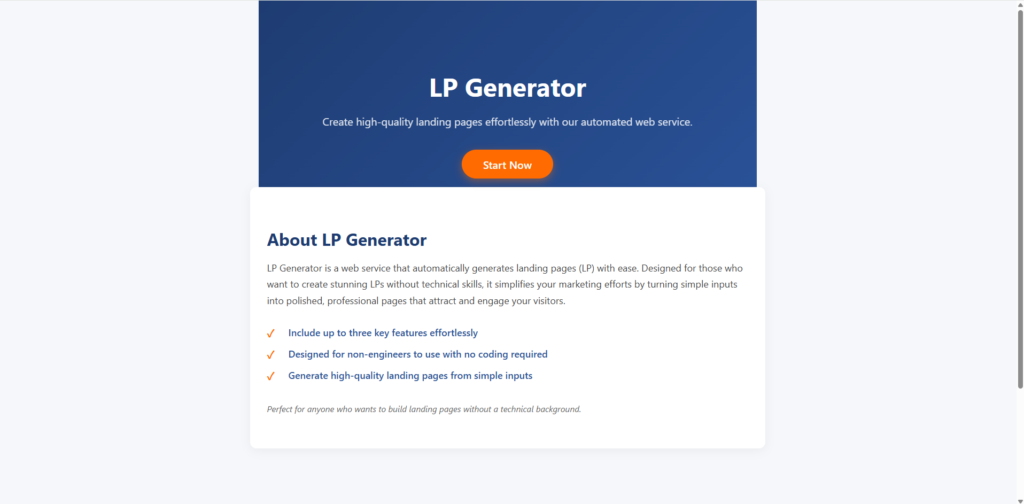
When I generated it with gpt-4.1-mini, it was generated like this!
I think that by making the prompt a little better or responding multiple times, we can achieve something a little more quality. (This was my limit...)
Information on template sales
The automatic LP generation app introduced in this article is sold as a template that can also be used for commercial purposes.
Why sell templates?
We have prepared this for those who are experiencing the following needs:
- "Even if you follow the steps, the environment doesn't work out..."
- "I just want to start with a moving sample."
- "I looked at my blog and found it useful, so I would like to purchase it with the aim of supporting and donating."
Even those who are not used to developing the game are able to start up and try it out quickly with minimal effort
Examples of template use (customization ideas)
This template is perfect for personal development and learning purposes.
For example, we recommend modifying and expanding the following:
- Allows images and logos to be inserted into the generated LP
- Add multilingual LP support (Japanese and English switching, etc.)
- Save and manage the generated results (remove history of past LPs)
- Create a feature that can be hosted as is
- Add a UI to choose prompts and design templates
It's also a good practice to try it out on a "serial basis" basis for programming beginners.
What's included in the template
contains
all the source code for the project we introduced here Therefore, you don't have to create or configure your own project from scratch, and you can start it immediately .
- LP input form and preview UI with Next.js (App Router)
- Server-side implementation with OpenAI API integration
- Easy to read source code with comments
- Simple and easy to improve style with Tailwind CSS
- Docker startup configuration files (Dockerfile, docker-compose.yml)
The templates introduced in this article are now on sale!
This chatbot UI template is available for sale on multiple platforms.
The structure is perfect for those who want to try something that works first, "I want to use it right away without building an environment," or "I want to check the entire code."
summary
This time, we introduced how to build
a simple, landing page (LP) auto-generating app using the OpenAI API and Next.js.
Looking back at the points:
- The Chat Completions API allows you to generate high-quality HTML with just a few prompts
- Next.js App Router + Tailwind CSS makes it simple and easy to customize
- Using templates allows you to start from a state where you can try it out quickly, eliminating the hassle of building an environment.
This template
is especially recommended for who want to quickly prototype LPs introducing products , or
want to experience LP automation
Try using it as a base to adjust the prompts and designs
to evolve into your own LP generator Not only is it recommended as a base for adding unique features and customizing UI.
The templates introduced in this article are now on sale!
This chatbot UI template is available for sale on multiple platforms.
The structure is perfect for those who want to try something that works first, "I want to use it right away without building an environment," or "I want to check the entire code."

![I tried creating a chatbot using the OpenAI API [Next.js + Tailwind CSS]](https://hack-lab-256.com/wp-content/uploads/2025/07/hack-lab-256-samnail-25-300x169.jpg)

![[For beginners] Introduction to React Three Fiber x Drei x TypeScript! Create pixel art and dynamic animations from images](https://hack-lab-256.com/wp-content/uploads/2025/02/hack-lab-256-samnail-16-300x169.jpg)
![[Complete explanation] Learn with React Three Fiber × TypeScript! Practical guide to Transform (Position, Rotation, Scale) for 3D Objects](https://hack-lab-256.com/wp-content/uploads/2025/02/hack-lab-256-samnail-15-300x169.png)
![[Super Easy] Introduction to React Three Fiber x Drei x TypeScript! Poke Poke style 3D background made with standard objects!](https://hack-lab-256.com/wp-content/uploads/2025/02/hack-lab-256-samnail-14-300x169.jpg)