Recently, it has become surprisingly easy to generate 3D models using AI. One such AI tool, Meshy, allows you to quickly generate high-quality 3D models with intuitive operation.
In this blog, we will explain how to display a 3D model generated with Meshy React and Three.js
📺 Check Mesh : You can check it on the official page from this link

even beginners can try it with confidence, so if you're interested in developing with React or Three.js, be sure to read to the end!
We will continue to create lessons and works from TypeScript x React Three Fiber in the future!
We will be making an announcement on YouTube, so please subscribe to our YouTube channel and wait for notifications!
📺 Watch YouTube : You can watch it from this link

If you'd like to know what React Three Fiber can do, please refer to the following!
We have easy-to-use works available!
- I tried making bears walk with React x Three.js!
- I tried making an old man dance on React x Three.js!
- I tried to display a 3D model with React x Three.js!
- I made a 3D button that explodes in React x Three.js!
- React Three Fiber x Drei x Introduction to TypeScript! Poke Poke style 3D background made with standard objects!
3D model display demo
You can see the demo of the finished product in the video below.
📺 Watch the demo on YouTube : You can watch it from this link

Additionally, the source code for this project is available on GitHub.
Please download the code and try it out!
💾 GitHub Repository : Check the source code at this link

If you're wondering, "I've seen it, how do I make it?", don't worry!
In this article, we will explain step-by-step how to view this 3D model.
Necessary Techniques and Key Library
This project uses the following technologies and libraries: Here is a brief explanation of each role.
- React
- Library for front-end development
- Efficient UI construction with component-based design
- Three.js
- A library for drawing 3D graphics on the web
- It makes it easy to handle complex WebGL operations
- React Three Fiber
- Wrapper library for handling Three.js in React
- You can take advantage of the powerful features of Three.js in React development style
- React Thee Drei
- React Three Fiber Extension Library
- React Three Fiber Extension Library
- Meshy
- A service that allows you to easily generate high-quality 3D models using AI
Overall implementation design
This project will achieve a simple process: "Use AI tools to generate a 3D model and display it in the browser using React and Three.js."
- Loading the model
-
- Using React and Three.js, we will import the generated 3D model into our project
- Use
OBJLoaderandMTLLoader
- Adding HTML elements (screen section)
-
- We will use the
Htmlfrom the Drei library - Forms are styled with HTML/CSS
- We will use the
- Camera operation and background design
-
- Restricts camera movement to horizontal only, allowing users to properly view the model
- Use a gradient background to enhance the visual appeal
Environmental preparation
This section provides the initial setup for your project. Create a React app using the npx command, install the required libraries and organize the folder structure.
Creating a React App
First, create a React app using the npx command.
npx create-react-app meshy-3d-model --template typescriptmeshy-3d-modelis the name of the project--templateUse a TypeScript-enabled template by specifying
Installing the required libraries
Install React Three Fiber and other libraries.
cd meshy-3d-model npm install three @react-three/fiber @react-three/drei- three : Three.js main body
- @react-three/fiber : A wrapper for using Three.js with React
- @react-three/drei : Useful helpers such as camera controls and text drawing
Reviewing folder structure and deleting unnecessary files
Organize and add folders from the initial state as follows:
Basically, it is the default value, but for files you don't know, please check out GitHub.
meshy-3d-model/ ├── node_modules/ ├── public/ │ ├── models/ // 3D model and related files │ │ ├── monitor.obj // OBJ file generated by Meshy │ │ ├── monitor.mtl // MTL file generated by Meshy │ │ └── texture.png // Texture to add, if necessary ├── src/ │ ├── components/ // Directory for adding other components │ ├── data/ // For files to manage data, if necessary │ ├── pages/ // Components to manage per page │ │ ├── Meshy3DModel/ │ │ │ ├── Meshy3DModelPage.tsx // Main page code │ │ │ └── Meshy3DModelPage.css // Stylesheet │ ├── App.tsx // Entry point of the app │ ├── index.tsx // React rendering │ ├── App.css // Global styles │ ├── index.css // Global CSS ├── package.json ├── tsconfig.json // TypeScript configuration └── README.md // Project overview
The files to be modified this time are as follows:
App.tsx: App entry pointspages/Meshy3DModel: The folder to be created this timeMeshy3DModelPage.tsx: The main page component.
Detailed explanation of the source code for each step
In the following sections, we will explain in detail the five parts below in order.
- Use Meshy to generate 3D models with AI
- Defines basic constants required for displaying 3D models and operating the camera, such as
CAMERA_POSITIONandMONITOR_SCALE -
HTML_POSITIONandHTML_ROTATION, the position and orientation of the HTML element (form) on the monitor is adjusted.
- Use
MTLLoaderandOBJLoader - Draw the model using
primitives -
Htmlfrom the Drei library and place a login form in the monitor section. - Tweak the appearance of HTML elements with
position,rotation, andscale
- Create a 3D scene using
Canvasin React Three Fiber - Render the model and set the camera settings
- Use CSS
linear-gradient OrbitControlsis used to restrict camera movement to horizontal (left and right) only.- This setting makes it easier to see the monitor from the front
Check the whole source
Below is the complete source code for the explosive 3D buttons created in this article. All the code is put together, so it's easy to get an idea of how it works.
If you would like to see other sources, please check on GitHub.
import './App.css'; import { Meshy3DModel } from './pages'; function App() { return (<div className="App"><Meshy3DModel /></div> ); } export default App;
import React from "react"; import { Canvas } from "@react-three/fiber"; import { OrbitControls, Html } from "@react-three/drei"; import { OBJLoader } from "three/examples/jsm/loaders/OBJLoader"; import { MTLLoader } from "three/examples/jsm/loaders/MTLLoader"; import { useLoader } from "@react-three/fiber"; import * as THREE from "three"; // ================================== // PART 1: Constant definitions // ==================================== const CAMERA_POSITION = new THREE.Vector3(0, 0, 3); // Define the camera position in Vector3 format const MONITOR_SCALE = 1; const MONITOR_ROTATION = [0, -Math.PI / 2, 0]; const HTML_POSITION = new THREE.Vector3(0, 0.15, 0.06); const HTML_ROTATION = new THREE.Euler(-0.075, 0, 0); const HTML_SCALE = new THREE.Vector3(2.45, 1.85, 0.5); // ================================== // PART 2: The Monitor Display Component // ===================================== const MonitorDisplay: React.FC = () => { const materials = useLoader(MTLLoader, "/models/monitor.mtl"); const obj = useLoader(OBJLoader, "/models/monitor.obj", (loader) => { materials.preload(); loader.setMaterials(materials); }); return ( <> {/* Monitor model */}<primitive object={obj} scale={MONITOR_SCALE} position={[0, 0, 0]} rotation={MONITOR_ROTATION} /> {/* HTML element (display part) */} <Html transform position={HTML_POSITION} distanceFactor={1} occlude scale={HTML_SCALE} rotation={HTML_ROTATION} ><div style={{ width: "300px", height: "200px", background: "white", borderRadius: "10px", boxShadow: "0 0 10px rgba(0,0,0,0.5)", display: "flex", flexDirection: "column", justifyContent: "center", alignItems: "center", padding: "10px", textAlign: "center", }} ><h2> Login </h2><input type="text" placeholder="Username" style={{ marginBottom: "10px", padding: "5px" }} /><input type="password" placeholder="Password" style={{ marginBottom: "10px", padding: "5px" }} /> <button style={{ padding: "10px 20px", background: "blue", color: "white", border: "none", borderRadius: "5px", cursor: "pointer", }} >Submit</button></div></Html></> ); }; // ================================= // PART 3: MAIN COMPONENT // =================================== const Meshy3DModel: React.FC = () => { return ( <div style={{ width: "100vw", height: "100vh", background: "linear-gradient(135deg, #1e3c72,rgb(78, 126, 211))", // グラデーション }} ><Canvas camera={{ position: CAMERA_POSITION, fov: 60 }}><ambientLight intensity={20} /><spotLight position={[10, 10, 10]} intensity={2} /> {/* monitor display */}<MonitorDisplay /> {/* Restrict camera operation */}<OrbitControls minPolarAngle={Math.PI / 2} maxPolarAngle={Math.PI / 2} /></Canvas></div> ); }; export default Meshy3DModel;
PART 1: Creating a 3D model with Meshy
This time, the 3D model will be using an AI automatic generation service called Meshy.
The link is below, so please refer to it.
200 credits per month are available for free.
📺 Check Mesh : You can check it on the official page from this link
Enter the 3D model you want to generate in Text Generation Model > Pronto and click the "Generate" button
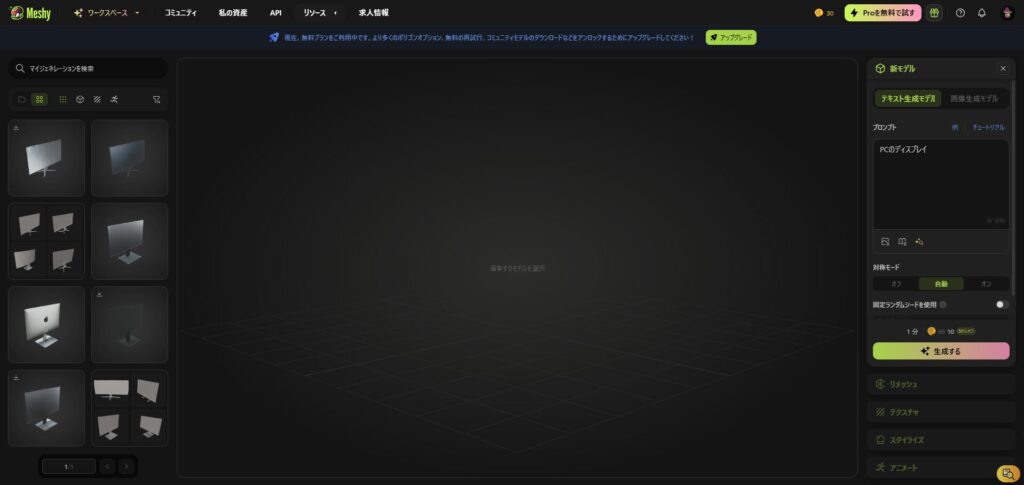
Once generated, four types of 3D models will be presented. If you find a 3D model you like, select "Select > Confirm."
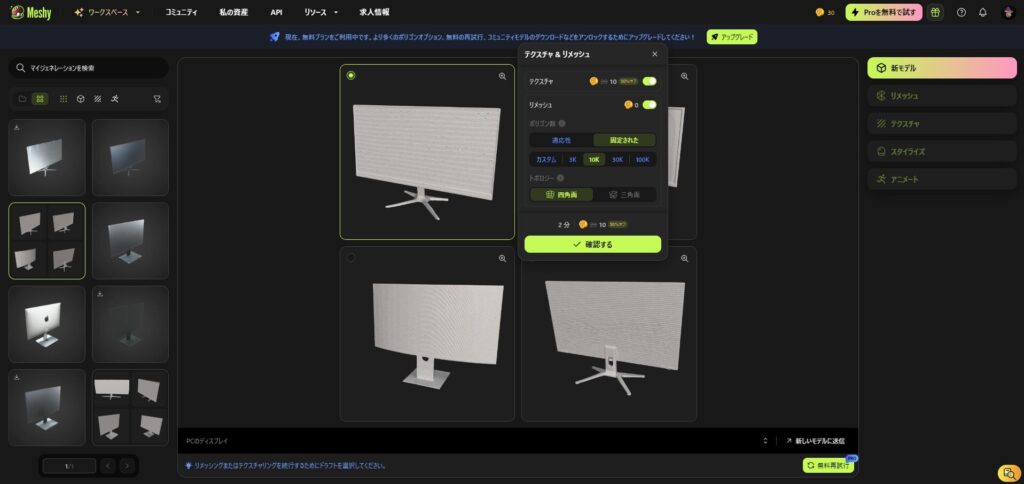
This will generate a 3D model with texture.
If there are no problems with this, you can download it, but this time we will try changing the texture.
From the right pane, set the desired texture in Texture > Prompt and click the "Texture" button
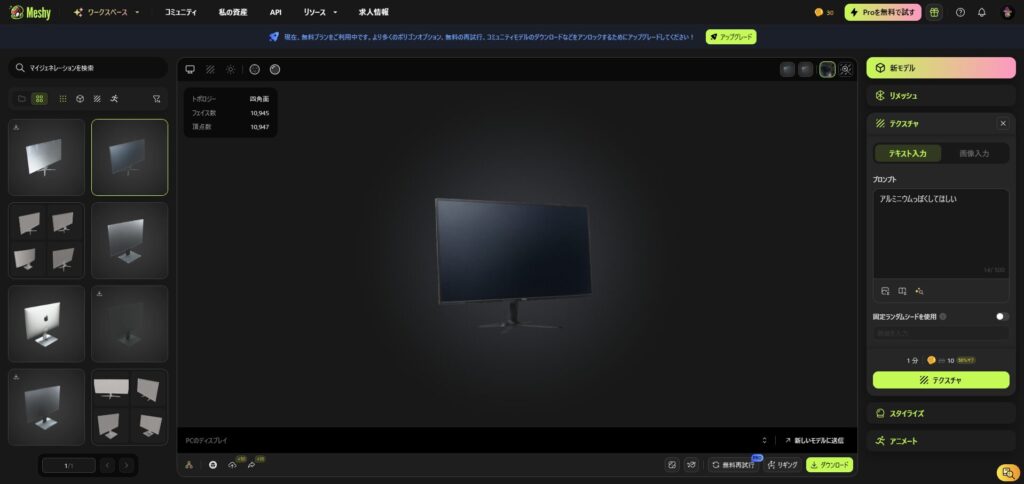
The screen is now aluminum, but we'll be adding HTML to the screen using Threejs, so this is OK.
Click the download button and download it in format: obj.
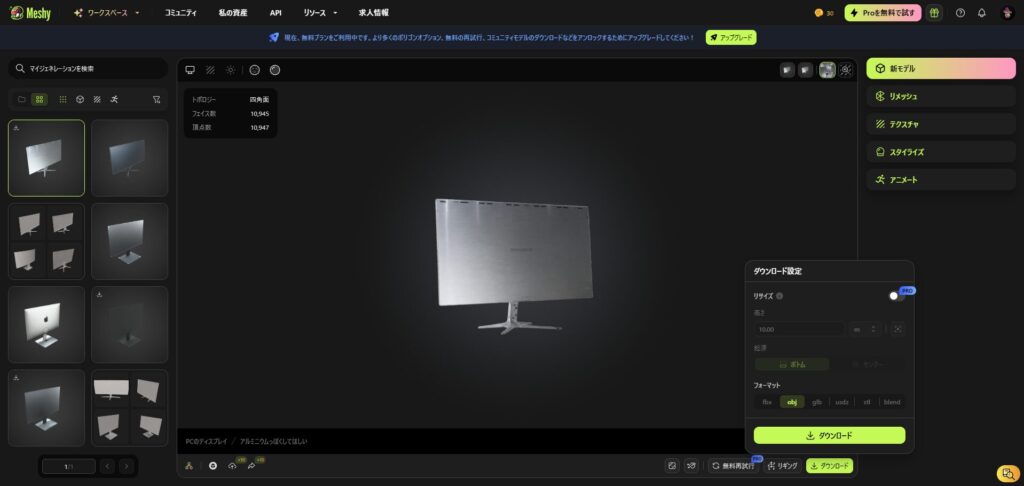
You should be able to download obj, mtl, and png.
If you download them in Japanese, please translate them into English.

If you change the file name, you will need to modify some of the obj and mtl files.
Replace the original file name with the modified file name.
# Blender 3.6.0 # www.blender.org mtllib monitor.mtl o monitor v 0.094246 -0.375423 0.989129 v 0.097641 -0.373034 0.989317 v -0.123948 -0.629135 0.100659 v -0.131537 -0.624742 0.092791 v -0.143337 -0.627172 0.117533 v -0.003185 0.139220 -0.023328 v -0.012956 0.138576 -0.022627 v -0.016497 0.138405 -0.006704 v -0.006145 0.139249 -0.006801 v -0.178673 -0.664484 -0.063357 v -0.171106 -0.666965 -0.065225 v -0.169799 -0.666526 -0.041548 v 0.026336 0.143811 -0.053985 v 0.042294 0.007904 0.501178 v 0.044668 -0.020894 0.503462 v 0.043755 -0.024969 0.525789..# Blender 3.6.0 MTL File: 'None' # www.blender.org newmtl Material.001 Ns 250.000000 Ka 1.000000 1.000000 1.000000 Ks 0.500000 0.500000 0.500000 Ke 0.000000 0.000000 0.000000 Ni 1.450000 d 1.000000 illum 2 map_Kd monitor.pngThis completes the generation of the 3D model
PART 1: Constant definition
First, we will look at the import of each library and the constant definitions.
import React from "react"; import { Canvas } from "@react-three/fiber"; import { OrbitControls, Html } from "@react-three/drei"; import { OBJLoader } from "three/examples/jsm/loaders/OBJLoader"; import { MTLLoader } from "three/examples/jsm/loaders/MTLLoader"; import { useLoader } from "@react-three/fiber"; import * as THREE from "three"; // ================================== // PART 1: Constant definitions // ==================================== const CAMERA_POSITION = new THREE.Vector3(0, 0, 3); // Define the camera position in Vector3 format const MONITOR_SCALE = 1; const MONITOR_ROTATION = [0, -Math.PI / 2, 0]; const HTML_POSITION = new THREE.Vector3(0, 0.15, 0.06); const HTML_ROTATION = new THREE.Euler(-0.075, 0, 0); const HTML_SCALE = new THREE.Vector3(2.45, 1.85, 0.5);Depending on the 3D model you generate, fine adjustments may be necessary, so please use the following as a reference to play around with the numbers.
- Define the camera position
CAMERA_POSITION: defines the initial position of the camera- To position the camera in front of the monitor, we set
new THREE.Vector3(0, 0, 3). - This allows the user to view the monitor properly from the front
- To position the camera in front of the monitor, we set
- Define monitor scale and rotation
MONITOR_SCALE: Adjust the zoom ratio for the entire monitor- You can easily change the size of the model by changing the values
MONITOR_ROTATION: Specify the monitor orientation[0, -Math.PI / 2, 0]and the monitor is facing forward.
- Define the position, rotation, and scale of an HTML element
HTML_POSITION: defines the location of the HTML element (login form)- The coordinates are adjusted to fit the monitor screen
HTML_ROTATION: Adjust the rotation of an HTML element- Even if your monitor is slightly tilted, adjust it so that it looks right on the screen
HTML_SCALE: defines the size of an HTML element- Scaled to fit the monitor screen
PART 2: Monitor Display Components
In PART 2, we will load the 3D model generated by Meshy, build a monitor and display, and use Html
// ================================ // PART 2: Monitor Display Component // ================================= const MonitorDisplay: React.FC = () => { const materials = useLoader(MTLLoader, "/models/monitor.mtl"); const obj = useLoader(OBJLoader, "/models/monitor.obj", (loader) => { materials.preload(); loader.setMaterials(materials); }); return ( <> {/* MonitorModel */}<primitive object={obj} scale={MONITOR_SCALE} position={[0, 0, 0]} rotation={MONITOR_ROTATION} /> {/* HTML element (display part) */} <Html transform position={HTML_POSITION} distanceFactor={1} occlude scale={HTML_SCALE} rotation={HTML_ROTATION} ><div style={{ width: "300px", height: "200px", background: "white", borderRadius: "10px", boxShadow: "0 0 10px rgba(0,0,0,0.5)", display: "flex", flexDirection: "column", justifyContent: "center", alignItems: "center", padding: "10px", textAlign: "center", }} ><h2> Login </h2><input type="text" placeholder="Username" style={{ marginBottom: "10px", padding: "5px" }} /><input type="password" placeholder="Password" style={{ marginBottom: "10px", padding: "5px" }} /> <button style={{ padding: "10px 20px", background: "blue", color: "white", border: "none", borderRadius: "5px", cursor: "pointer", }} >Submit</button></div></Html></> ); };- Loading the monitor model
- Use
OBJLoaderandMTLLoader - Integrating into a Three.js scene using
primitives
- Use
- Integrating HTML with 3D space
- Place HTML elements in 3D space with Drei's
Html - By adjusting
the positionandscale
- Place HTML elements in 3D space with Drei's
PART 3: Main Components
In PART 3, we will use React Three Fiber's Canvas to build a 3D scene and display the monitor display. We will also set up background design and camera operation restrictions to create an overall look and feel.
// ================================= // PART 3: MAIN COMPONENT // =================================== const Meshy3DModel: React.FC = () => { return ( <div style={{ width: "100vw", height: "100vh", background: "linear-gradient(135deg, #1e3c72,rgb(78, 126, 211))", // グラデーション }} ><Canvas camera={{ position: CAMERA_POSITION, fov: 60 }}><ambientLight intensity={20} /><spotLight position={[10, 10, 10]} intensity={2} /> {/* monitor display */}<MonitorDisplay /> {/* Restrict camera operation */}<OrbitControls minPolarAngle={Math.PI / 2} maxPolarAngle={Math.PI / 2} /></Canvas></div> ); }; export default Meshy3DModel;- Creating a 3D scene
cameraInitial settingsposition: UseCAMERA_POSITIONfov: Set the field of view (set to 60)
- Adding Lights
ambientLight(Ambient light)- Light that illuminates the entire scene evenly
-
the intensity(set it to 20) to bring out the details of the model.
spotLight(Spotlight)- A light that illuminates a model from a specific direction
- Adjust the light position to highlight the monitor properly
.
- Monitor display placement
-
the MonitorDisplaycreated in PART 2 to arrange the monitor and display.
-
- Camera operation restrictions
- Restrict operation to horizontal direction only
- Set
minPolarAngleandmaxPolarAngleMath.PI / 2to disable up and down camera movement (because the HTML was not properly hidden at the top and bottom) - Always keep your monitor in front of you
- Set
- Zoom adjustment
- This time we are using the default camera zoom function, but you can also enable/disable it using
enableZoom
- This time we are using the default camera zoom function, but you can also enable/disable it using
- Restrict operation to horizontal direction only
- Background settings
- CSS
linear-gradientto apply a gradient
- CSS
lastly
So far, we've explained the steps from generating a 3D model using Meshy to displaying it in the browser using React and Three.js. This project is designed to be easy to implement, even for those who are new to 3D modeling and Three.js
- Utilizing AI-generated 3D models with Meshy
- React x Three.js integration
- Adding interactive HTML elements
- Visual ingenuity
Use Meshy to view various 3D models!
📺 Watch the demo on YouTube : You can watch it from this link
If you found this tutorial helpful, please subscribe to our YouTube channel and give it a high rating!
Additionally, the source code for this project is available on GitHub.
Please download the code and try it out!
💾 GitHub Repository : Check the source code at this link
If you found this helpful, please subscribe to our channel!
We will continue to create lessons and works from TypeScript x React Three Fiber in the future!
We will be making an announcement on YouTube, so please subscribe to our YouTube channel and wait for notifications!
📺 Watch YouTube : You can watch it from this link
If you'd like to know what React Three Fiber can do, please refer to the following!
We have easy-to-use works available!
- I tried making bears walk with React x Three.js!
- I tried making an old man dance on React x Three.js!
- I tried to display a 3D model with React x Three.js!
- I made a 3D button that explodes in React x Three.js!
- React Three Fiber x Drei x Introduction to TypeScript! Poke Poke style 3D background made with standard objects!
![How to build a web app that automatically generates LPs in ChatGPT + Next.js [OpenAI API + Next.js + Tailwind CSS]](https://hack-lab-256.com/wp-content/uploads/2025/07/hack-lab-256-samnail-27-300x169.jpg)

![I tried creating a chatbot using the OpenAI API [Next.js + Tailwind CSS]](https://hack-lab-256.com/wp-content/uploads/2025/07/hack-lab-256-samnail-25-300x169.jpg)

![[For beginners] Introduction to React Three Fiber x Drei x TypeScript! Create pixel art and dynamic animations from images](https://hack-lab-256.com/wp-content/uploads/2025/02/hack-lab-256-samnail-16-300x169.jpg)
![[Complete explanation] Learn with React Three Fiber × TypeScript! Practical guide to Transform (Position, Rotation, Scale) for 3D Objects](https://hack-lab-256.com/wp-content/uploads/2025/02/hack-lab-256-samnail-15-300x169.png)
![[Super Easy] Introduction to React Three Fiber x Drei x TypeScript! Poke Poke style 3D background made with standard objects!](https://hack-lab-256.com/wp-content/uploads/2025/02/hack-lab-256-samnail-14-300x169.jpg)