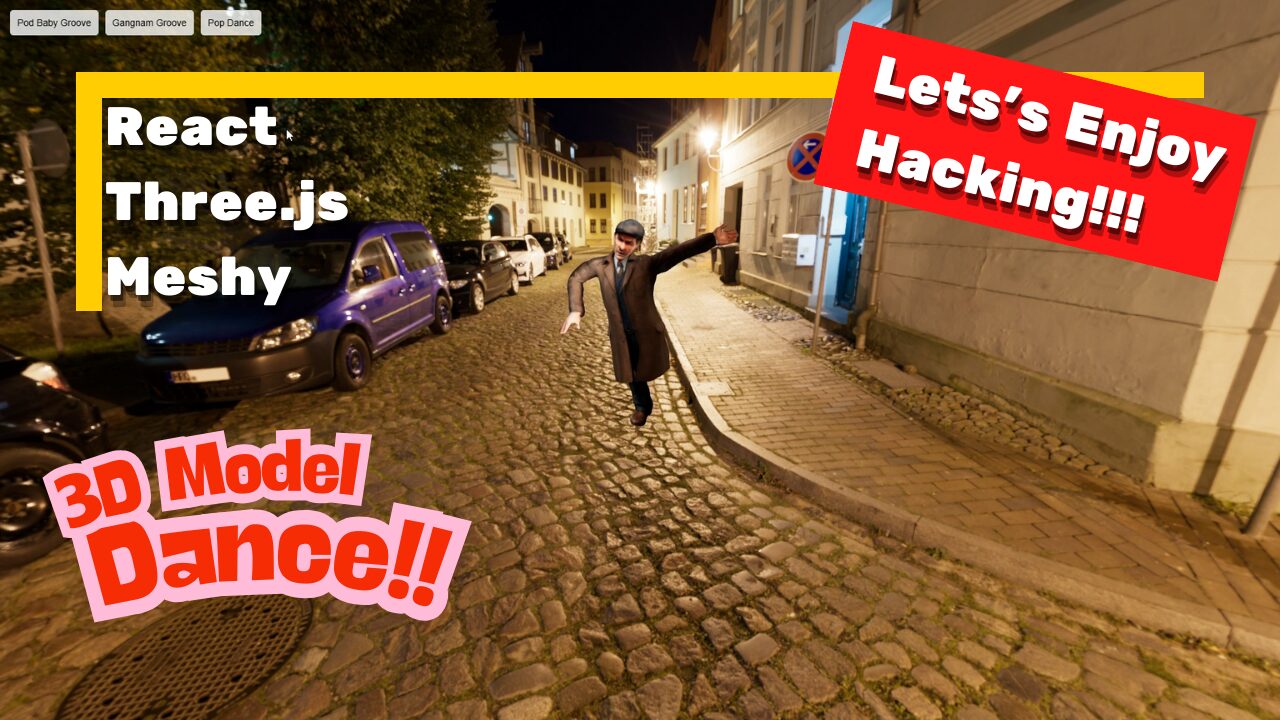
Are you interested in controlling animations for 3D models? Recently, there are an increasing number of 3D model generation tools that utilize AI, and among them Meshy AI is attracting attention as a tool that allows you to easily create high-quality 3D models.
However, in order to utilize the generated 3D models in real applications, you need to master specific libraries and tools. In this article, we will explain how to use React and Three.js
📺 Check Mesh : You can check it on the official page from this link
We will continue to create lessons and works from TypeScript x React Three Fiber in the future!
We will be making an announcement on YouTube, so please subscribe to our YouTube channel and wait for notifications!
📺 Watch YouTube : You can watch it from this link

If you'd like to know what React Three Fiber can do, please refer to the following!
We have easy-to-use works available!
- I tried making bears walk with React x Three.js!
- I tried making an old man dance on React x Three.js!
- I tried to display a 3D model with React x Three.js!
- I made a 3D button that explodes in React x Three.js!
- React Three Fiber x Drei x Introduction to TypeScript! Poke Poke style 3D background made with standard objects!
3D model display demo
You can see the demo of the finished product in the video below.
📺 Watch the demo on YouTube : You can watch it from this link

Additionally, the source code for this project is available on GitHub.
Please download the code and try it out!
💾 GitHub Repository : Check the source code at this link

If you're wondering, "I've seen it, how do I make it?", don't worry!
In this article, we will explain step-by-step how to view this 3D model.
Necessary Techniques and Key Library
This project uses the following technologies and libraries: Here is a brief explanation of each role.
- React
- Library for front-end development
- Efficient UI construction with component-based design
- Three.js
- A library for drawing 3D graphics on the web
- It makes it easy to handle complex WebGL operations
- React Three Fiber
- Wrapper library for handling Three.js in React
- You can take advantage of the powerful features of Three.js in React development style
- React Thee Drei
- React Three Fiber Extension Library
- React Three Fiber Extension Library
- Meshy
- A service that allows you to easily generate high-quality 3D models using AI
Environmental preparation
This section provides the initial setup for your project. Create a React app using the npx command, install the required libraries and organize the folder structure.
Creating a React App
First, create a React app using the npx command.
npx create-react-app meshy-3d-model-animation --template typescriptmeshy-3d-model-animathionis the name of the project--templateUse a TypeScript-enabled template by specifying
Installing the required libraries
Install React Three Fiber and other libraries.
cd meshy-3d-model-animathion npm install three @react-three/fiber @react-three/drei- three : Three.js main body
- @react-three/fiber : A wrapper for using Three.js with React
- @react-three/drei : Useful helpers such as camera controls and text drawing
Reviewing folder structure and deleting unnecessary files
Organize and add folders from the initial state as follows:
Basically, it is the default value, but for files you don't know, please check out GitHub.
meshy-3d-model-animation/ ├── node_modules/ ├── public/ ├── models/ // 3D models and related files ├── uncle_glb/ // 3D model folder ├── Animation_Gangnam_Groove_withSkin.glb // GLB files with dance animation ├── Animation_Pod_Baby_Groove_withSkin.glb // GLB files with dance animation ├── Animation_Superlove_Pop_Dance_withSkin.glb // GLB files with dance animation ├── src/ ├── components/ // Store common components if necessary │ ├── pages/ // Components managed on a page-by-page basis │ ├── ThreeDDancingUncle/ // Page-by-page folder │ │ └── ThreeDDancingUncle.tsx // 3D animation pages │ │ └── index.ts // Index file for exporting pages │ ├── App.tsx // App entry points │ ├── index.tsx // React rendering process │ ├── App.css // Global style │ ├── index.css // Global CSS ├── package.json // Project settings ├── tsconfig.json // TypeScript Settings └── README.md // Project Overview
The files to be modified this time are as follows:
App.tsx: App entry pointspages>index.ts: index file to export the page to.pages/ThreeDDancingUncle: The folder to be created this timeThreeDDancingUncle.tsx: Component of the main page.
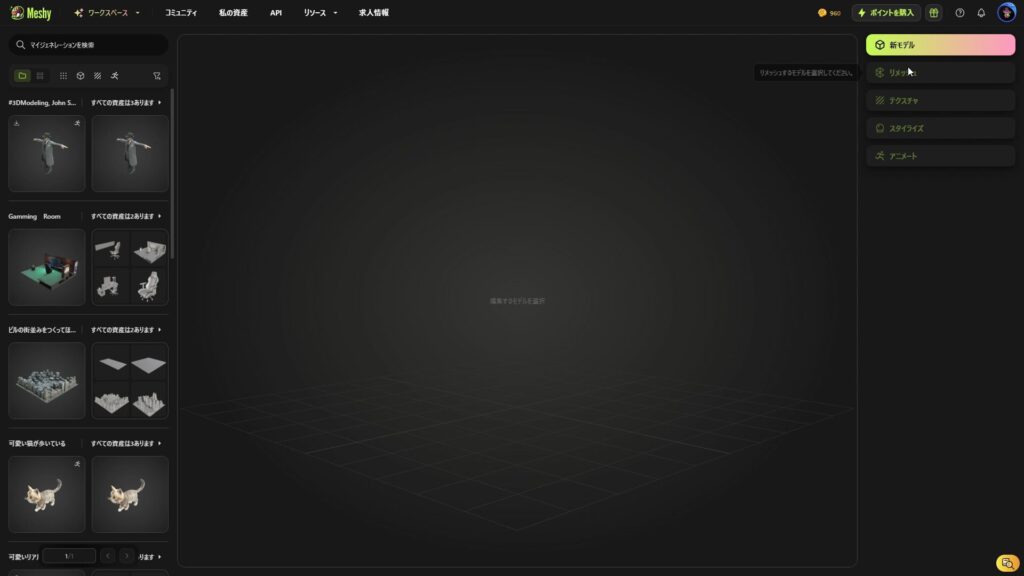
Generate 3D models with Meshy
This time, the 3D model will be using an AI automatic generation service called Meshy.
The link is below, so please refer to it.
200 credits per month are available for free.
📺 Check Mesh : You can check it on the official page from this link
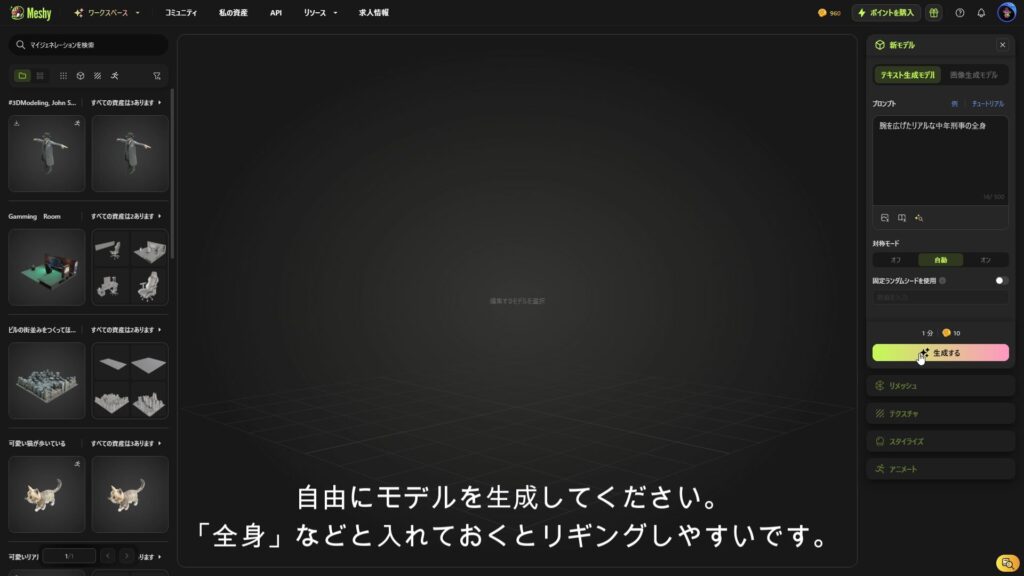
Generate 3D models with text generation models
This time, we will generate a model with text.
Please select "New model."
I wanted to have my man dance, so I decided to "the whole body of a real middle-aged detective with his arms spread out."
After this, you will need to set up your joints and other things, so it is best to keep your arms as far as possible from your body.
This time I'll try using the top left.
Select and select Check Texture & Remesh.
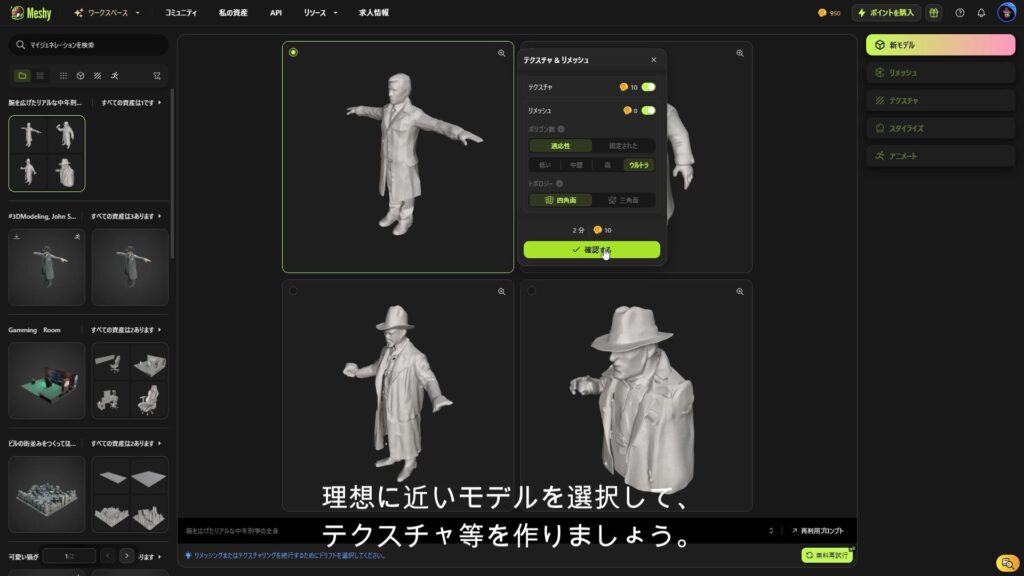
This will generate a model similar to the model you selected.
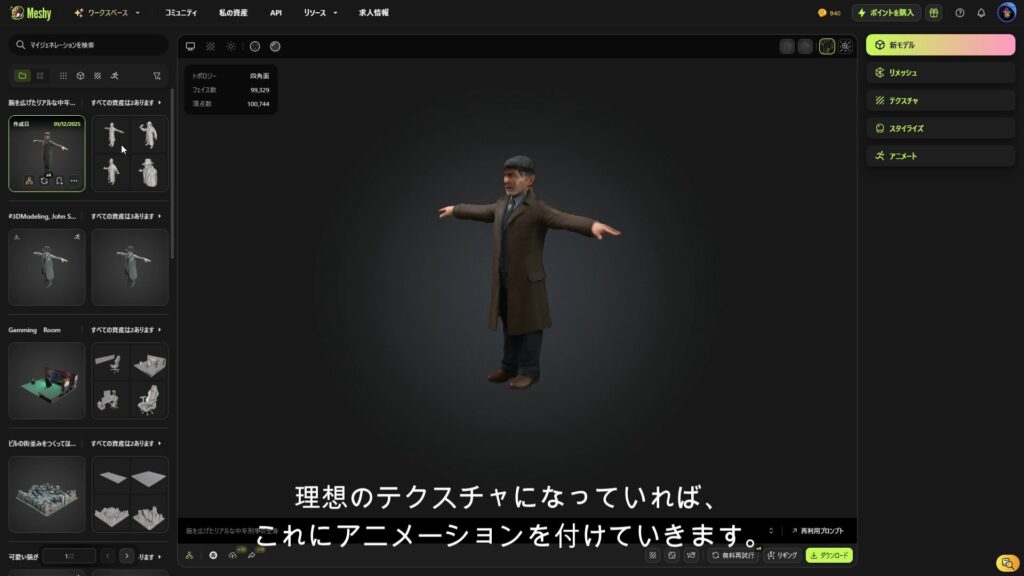
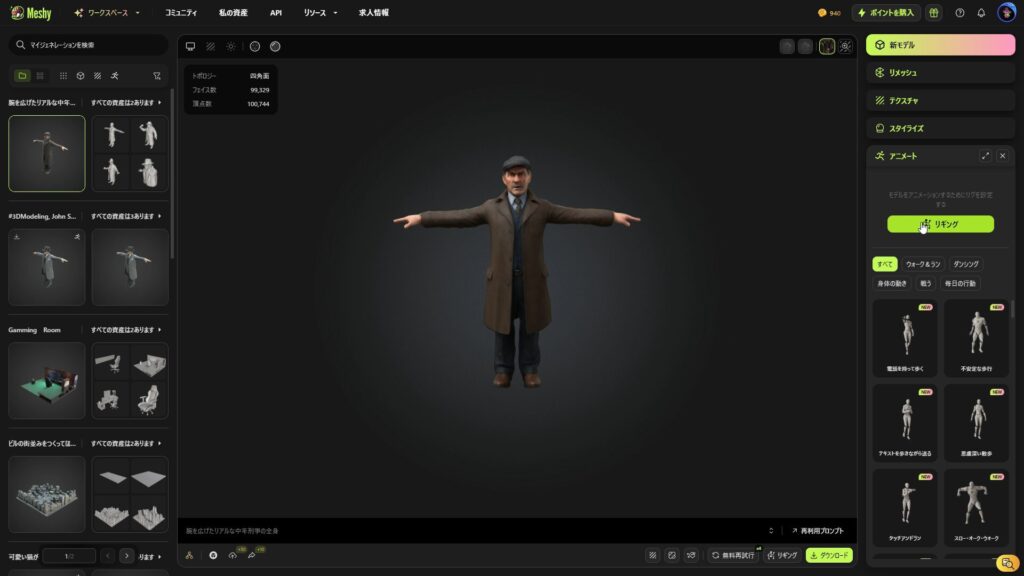
Next, select Animate > Rigging to add animation.
This time, since we are human, we should choose humanoids.
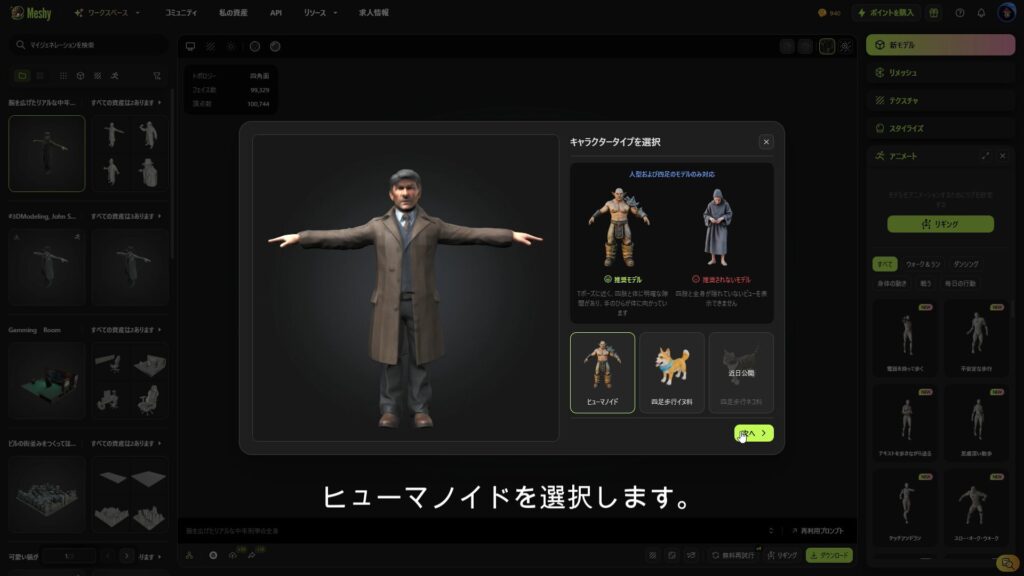
I don't think there's any need to change the next screen, but I messed around with my height a little.
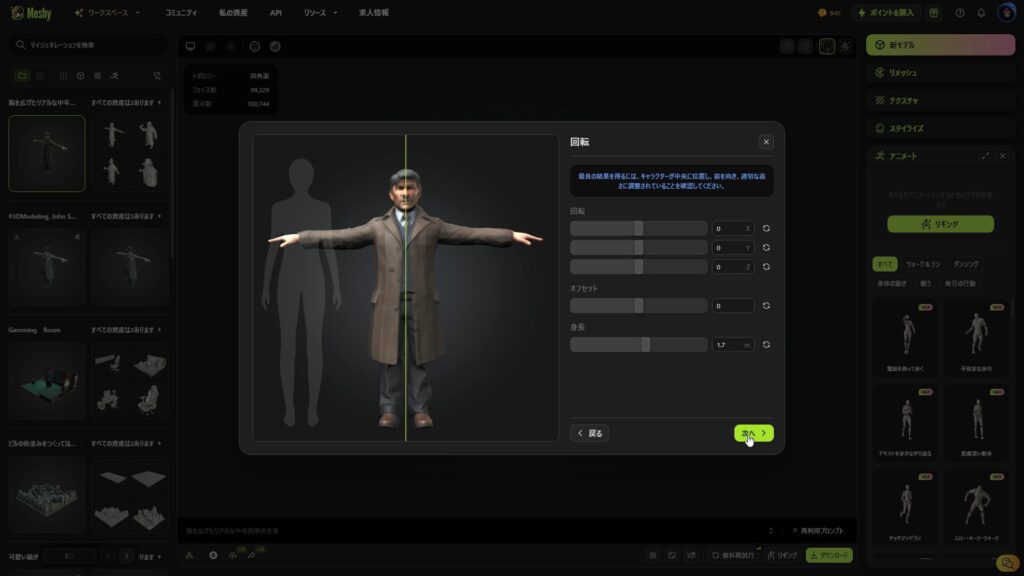
If you set this well, the animation will be beautiful.
Once you have set up the joints, check it.
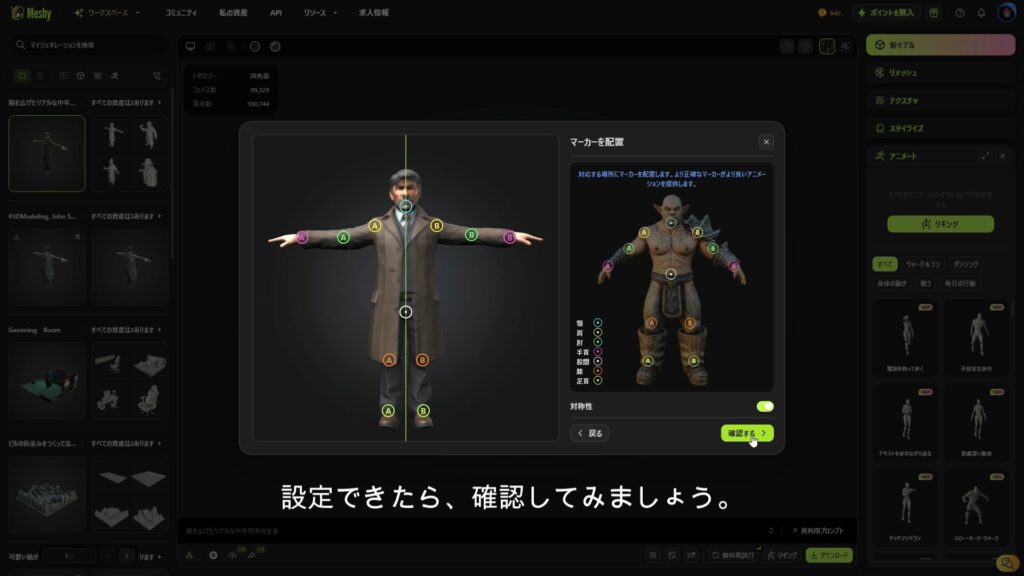
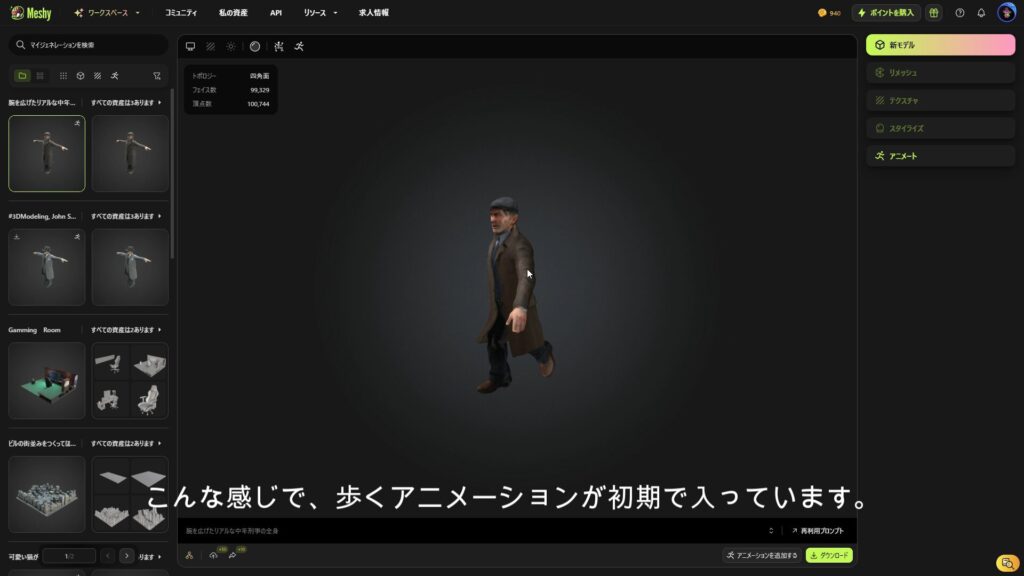
This will generate an animated 3D model.
By default, there is a walking animation.
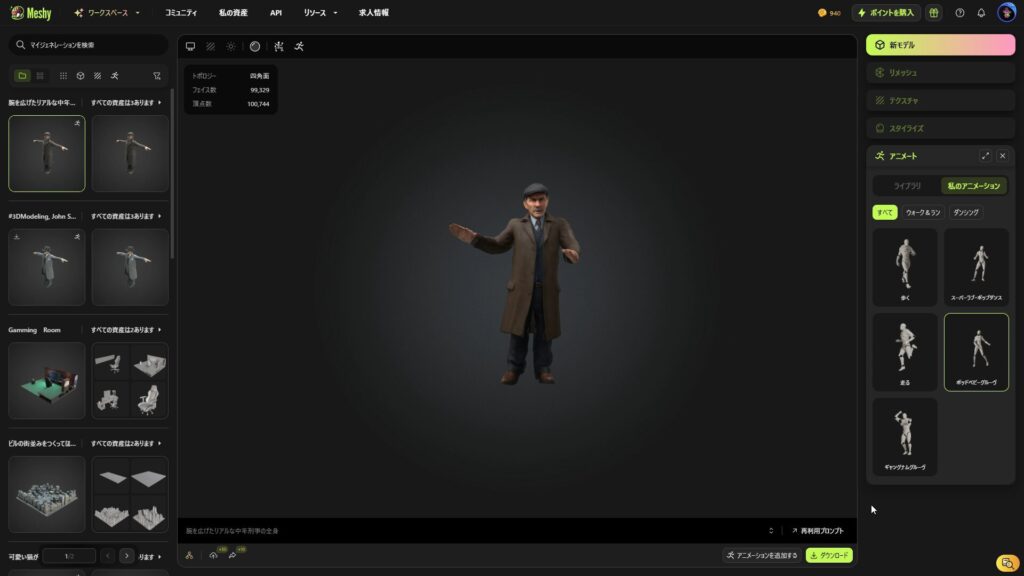
Adding animations
This time, we will add multiple dance animations.
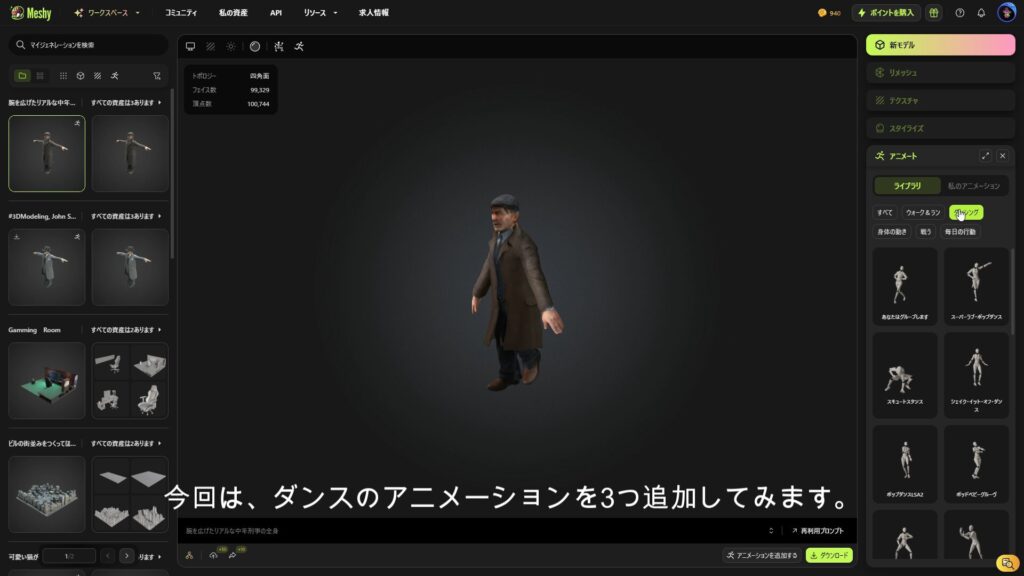
Add multiple dances of your choice using the Add button.
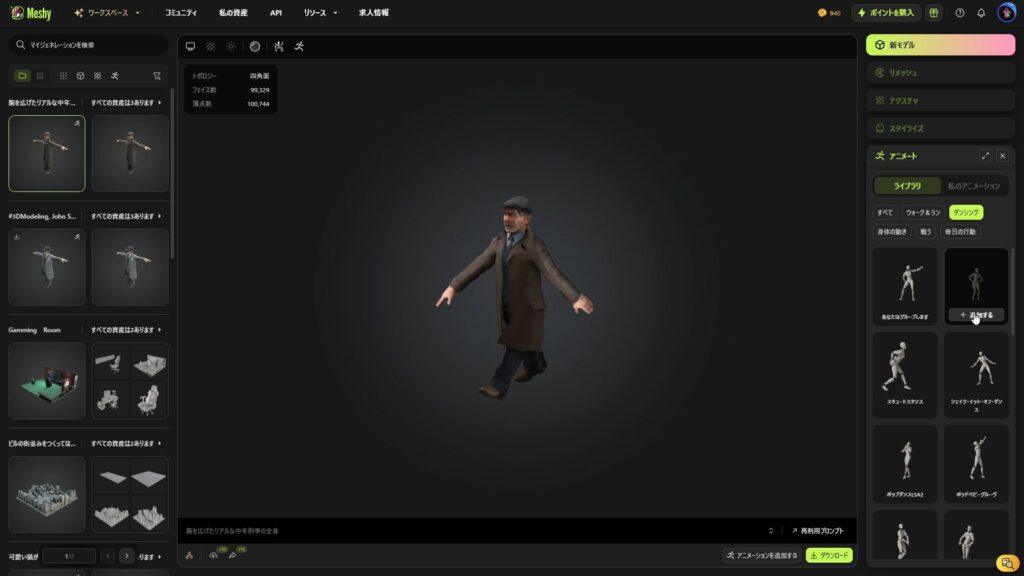
By default, Running is included, but you can see that there are three other dances in addition to that.
Download in GLB format
Once you have created a 3D model and added animations, download it using glb.
At this time, check all animations.
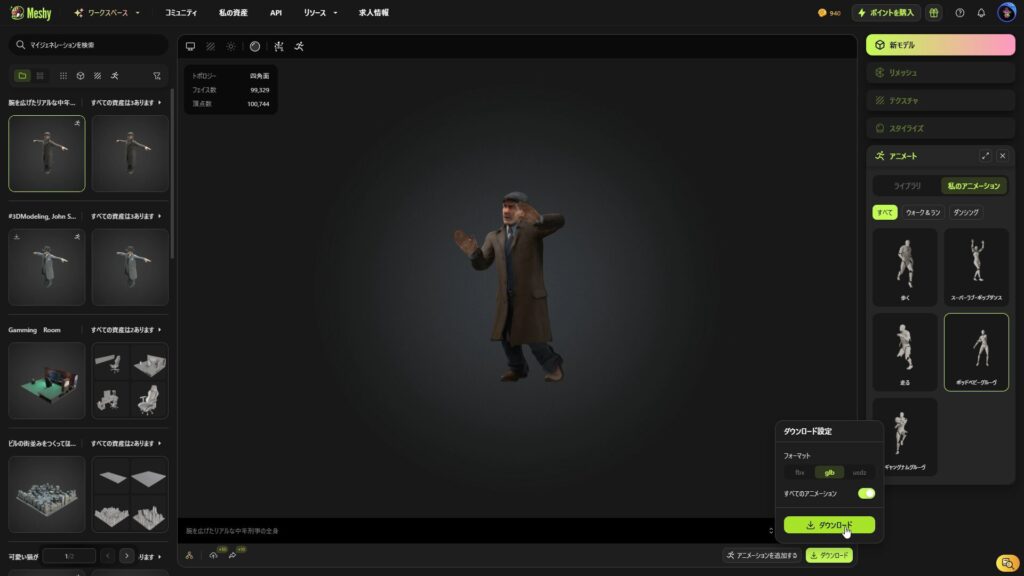
This will output a glb file for each animation as shown below.
The glb file comes with a set of 3D models and animations, so the model file does not exist.
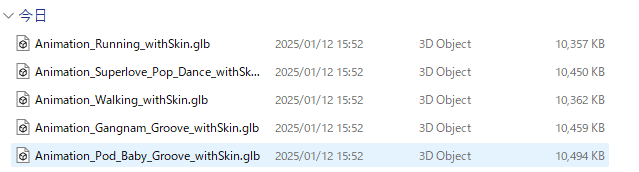
Make sure to store glb files under public.
This time, it is stored below.
meshy-3d-model-animation/ ├── node_modules/ └── public/ └── models/ // 3D models and related files └── uncle_glb/ // 3D model folder ├── Animation_Gangnam_Groove_withSkin.glb // GLB files with dance animation ├── Animation_Pod_Baby_Groove_withSkin.glb // GLB files with dance animation └── Animation_Superlove_Pop_Dance_withSkin.glb // GLB files with dance animationDetailed explanation of the source code for each step
In the following sections, we will explain in detail the five parts below in order.
- Import basic modules for React and Three.js.
- Import
GLTFLoaderandEXRLoader - Use
OrbitControls
- Constant data related to models and animations .
- Define the following:
- List of animation files : Keeps the names and paths of multiple animation files in a list format.
- Camera Default : Defines the camera position so that you can see the entire model.
- Light Settings : Set the intensity and position of ambient light, directional light, and point light.
- HDRI background path : Specify the HDRI image file for the background.
- Load HDRI images using
EXRLoader - Apply the loaded HDRI as follows:
scene.background: Set an HDRI image to the background of the entire scene.scene.environment: HDRI is used for model reflection and lighting.
GLTFLoaderLoad the model using- Load the initial animation (
DEFAULT_ANIMATION_FILE - Scale, rotate, and position the imported model and place it in the scene
- Load the initial animation (
AnimationMixerUse to manage animations- Apply animation to imported models
- The currently playing animation React's state (
useState) and switchable using user operations.
- Use
useFrame
- Configuring the entire application with React
- Draw the following elements in Canvas
- Background component
- Models and animations (
Modelcomponents) - Lights (ambient light, directional light, point light)
- Background component
- Place animation toggle button
- Pressing the button will switch to the specified animation file.
Check the whole source
Below is the complete source code that controls the 3D model in glb format generated using Meshy AI, which is created in this article, using React and Three.js All the code is put together, so it's easy to get an idea of how it works.
If you would like to see other sources, please check on GitHub.
💾 GitHub Repository : Check the source code at this link
import './App.css'; import { ThreeDDancingUncle } from './pages'; function App() { return (<div className="App"><ThreeDDancingUncle /></div> ); } export default App;import ThreeDDancingUncle from "./ThreeDDancingUncle/ThreeDDancingUncle"; export {ThreeDDancingUncle}// ==== // PART 1: Import the required modules // ==== import React, { useState, useEffect } from "react"; import { Canvas, useFrame, useThree } from "@react-three/fiber"; import { OrbitControls } from "@react-three/drei"; import { GLTFLoader } from "three/examples/jsm/loaders/GLTFLoader"; import { EXRLoader } from "three/examples/jsm/loaders/EXRLoader"; import * as THREE from "three"; // ==== // PART 2: Defining constants // ==== // List of animation files // Store the name and path of each animation const ANIMATION_FILES = [ { name: "Pod Baby Groove", path: "/models/uncle_glb/Animation_Pod_Baby_Groove_withSkin.glb" }, { name: "Gangnam Groove", path: "/models/uncle_glb/Animation_Gangnam_Groove_withSkin.glb" }, { name: "Pop Dance", path: "/models/uncle_glb/Animation_Superlove_Pop_Dance_withSkin.glb" }, ]; // Path to model file const DEFAULT_ANIMATION_FILE = ANIMATION_FILES[0].path; // Path to HDRI image (for background) const HDRI_FILE = "/hdri/cobblestone_street_night_4k.exr"; // Initial camera position (x, y, z) const INITIAL_CAMERA_POSITION = new THREE.Vector3(10, 4, 10); // Model scale magnification const MODEL_SCALE = 4; // Initial model rotation angle (about the y-axis, in radians) const MODEL_ROTATION_Y = -1; // Initial model position (x, y, z) const MODEL_POSITION = new THREE.Vector3(0, -2, 0); // Light settings // Define the ambient, directional, and point light position and intensity const LIGHT_SETTINGS = { ambient: { intensity: 0.5 }, // Ambient light intensity directional: { position: new THREE.Vector3(10, 20, 10), intensity: 1.5 }, // // The position and intensity of the directional light point: { position: new THREE.Vector3(0, 10, 0), intensity: 1.5 }, // The position and intensity of the point light }; // ===== // PART 3: Background settings // ===== // Set the scene background with HDRI image const Background: React.FC = () => { const { gl, scene } = useThree(); useEffect(() => { const hdrLoader = new EXRLoader(); const pmremGenerator = new THREE.PMREMGenerator(gl); pmremGenerator.compileEquirectangularShader(); hdrLoader.load(HDRI_FILE, (texture) => { texture.mapping = THREE.EquirectangularReflectionMapping; const envMap = pmremGenerator.fromEquirectangular(texture).texture; scene.background = envMap; // Set the entire scene background scene.environment = envMap; // Set the environment map // Free memory texture.dispose(); pmremGenerator.dispose(); }); }, [gl, scene]); return null; // No rendering target }; // ==== // PART 4: Models and animations // ==== // Loading the main model and managing animation const Model: React.FC<{ currentAnimation: string }> = ({ currentAnimation }) => { const { camera } = useThree(); const [model, setModel] = useState<THREE.Group | null> (null); const [mixer, setMixer] = useState<THREE.AnimationMixer | null> (null); // Load model useEffect(() => { const loader = new GLTFLoader(); loader.load(DEFAULT_ANIMATION_FILE, (gltf) => { const { scene: loadedScene } = gltf; loadedScene.scale.set(MODEL_SCALE, MODEL_SCALE, MODEL_SCALE); // Set the model size loadedScene.rotateY(MODEL_ROTATION_Y); // Set the model's initial rotation loadedScene.position.copy(MODEL_POSITION); // Set the initial position of the model setModel(loadedScene); const animationMixer = new THREE.AnimationMixer(loadedScene); setMixer(animationMixer); // Set the initial position of the camera camera.position.copy(INITIAL_CAMERA_POSITION); camera.lookAt(0, 4, 0); // View the center of the model }); }, [camera]); // Toggle animation useEffect(() => { if (!model || !mixer) return; const loader = new GLTFLoader(); loader.load(currentAnimation, (gltf) => { const newAnimation = gltf.animations[0]; if (newAnimation) { const action = mixer.clipAction(newAnimation); mixer.stopAllAction(); // Stop existing action action.reset().fadeIn(0.5).play(); // Play new action } }); }, [currentAnimation, model, mixer]); // Update animation useFrame((_, delta) => { if (mixer) mixer.update(delta); }); return model ?<primitive object={model} /> : null; // Show model }; // ==== // PART 5: Main Components // ==== // Configuring the entire application const ThreeDDancingUncle: React.FC = () => { const [currentAnimation, setCurrentAnimation] = useState(ANIMATION_FILES[0].path); return (<div style={{ width: "100vw", height: "100vh", position: "relative" }}> {/* Animation Select Button */} <div style={{ position: "absolute", top: "10px", left: "10px", zIndex: 10, // ボタンをCanvasの上に表示 }} > {ANIMATION_FILES.map((anim, index) => ( <button key={index} onClick={() =>setCurrentAnimation(anim.path)} // Toggle animation style={{ margin: "5px", padding: "10px", fontSize: "14px", background: "rgba(255, 255, 255, 0.8)", border: "1px solid #ccc", borderRadius: "5px", cursor: "pointer", }} > {anim.name}</button> ))}</div><Canvas> {/* Background Component */}<Background /> {/* Models and Animations */}<Model currentAnimation={currentAnimation} /> {/* Light Settings */} <ambientLight intensity={LIGHT_SETTINGS.ambient.intensity} /><directionalLight position={LIGHT_SETTINGS.directional.position} intensity={LIGHT_SETTINGS.directional.intensity} /><pointLight position={LIGHT_SETTINGS.point.position} intensity={LIGHT_SETTINGS.point.intensity} /> {/* Camera operation */}<OrbitControls /></Canvas></div> ); }; export default ThreeDDancingUncle;
PART 1: Importing required modules
This will prepare the modules needed to build a 3D scene using React and Three.js.
// ==== // PART 1: Import the required modules // ==== import React, { useState, useEffect } from "react"; import { Canvas, useFrame, useThree } from "@react-three/fiber"; import { OrbitControls } from "@react-three/drei"; import { GLTFLoader } from "three/examples/jsm/loaders/GLTFLoader"; import { EXRLoader } from "three/examples/jsm/loaders/EXRLoader"; import * as THREE from "three";- React
useState: Switch animations and manage state.useEffect: Runs when initializing a model or background.
- React Three Fiber
Canvas: A container for drawing 3D scenes.useFrame: Performs animation update processing for each frame.useThree: Access cameras, scenes and renderers in Three.js.
- @react-three/drei
OrbitControls: A convenient component that allows the user to freely control (rotate, zoom, move) the camera.
- Three.js
GLTFLoader: Loader for loading 3D models in glb format.EXRLoader: Loads HDRI images and uses them as background and ambient light.THREE.Vector3: Vector operation (e.g. camera or light position).THREE.PMREMGenerator: Converts HDRI as an environment map to achieve realistic lighting.
PART 2: Constant definition
Next is the constant definition.
Defining constants centrally manages the values used within your application, improving reusability and readability. Since setting values for 3D models and scenes are used everywhere in the code, making them constants easier to maintain.
// ==== // PART 2: Defining constants // ==== // List of animation files // Store the name and path of each animation const ANIMATION_FILES = [ { name: "Pod Baby Groove", path: "/models/uncle_glb/Animation_Pod_Baby_Groove_withSkin.glb" }, { name: "Gangnam Groove", path: "/models/uncle_glb/Animation_Gangnam_Groove_withSkin.glb" }, { name: "Pop Dance", path: "/models/uncle_glb/Animation_Superlove_Pop_Dance_withSkin.glb" }, ]; // Path to the model file const DEFAULT_ANIMATION_FILE = ANIMATION_FILES[0].path; // Path to the HDRI image (for background) const HDRI_FILE = "/hdri/cobblestone_street_night_4k.exr"; // Initial camera position (x, y, z) const INITIAL_CAMERA_POSITION = new THREE.Vector3(10, 4, 10); // Model scale magnification const MODEL_SCALE = 4; // Initial rotation angle of the model (about the y-axis, in radians) const MODEL_ROTATION_Y = -1; // Model initial position (x, y, z) const MODEL_POSITION = new THREE.Vector3(0, -2, 0); // Light settings // Define the position and intensity of ambient, directional, and point light const LIGHT_SETTINGS = { ambient: { intensity: 0.5 }, // Ambient light intensity directional: { position: new THREE.Vector3(10, 20, 10), intensity: 1.5 }, // / The position and intensity of the directional light point: { position: new THREE.Vector3(0, 10, 0), intensity: 1.5 }, // The position and intensity of the point light };Depending on the 3D model you generate, fine adjustments may be necessary, so please use the following as a reference to play around with the numbers.
- List of animation files
- Define animation names and paths in pairs to manage multiple animations.
- HDRI image path for background
- Specify the path to the HDRI image to be used as the background of the scene or the environment map.
- Camera initial settings
- Define the initial position and orientation of the camera and adjust the entire model to make it look appropriate.
- Model Settings
- Defines the scale (magnitude), rotation angle and initial position of the model.
- Light settings
- Define the position and intensity of ambient, directional, and point lights to properly illuminate the entire scene.
PART 3: Background settings
Use HDRI images to apply realistic, natural backgrounds and ambient light to your scene.
HDRI images can be downloaded for free from Poly Haven You should choose your favorite background.

// ==== // PART 3: Setting the background // ==== // Set the scene background with HDRI image const Background: React.FC = () => { const { gl, scene } = useThree(); useEffect(() => { const hdrLoader = new EXRLoader(); const pmremGenerator = new THREE.PMREMGenerator(gl); pmremGenerator.compileEquirectangularShader(); hdrLoader.load(HDRI_FILE, (texture) => { texture.mapping = THREE.EquirectangularReflectionMapping; const envMap = pmremGenerator.fromEquirectangular(texture).texture; scene.background = envMap; // Set the entire scene background scene.environment = envMap; // Set the environment map // Free memory texture.dispose(); pmremGenerator.dispose(); }); }, [gl, scene]); return null; // No rendering target };- Loading HDRI images
- Load HDRI images using
EXRLoader - Convert HDRI to environment maps using
PMREMGenerator
- Load HDRI images using
- Applying backgrounds
- the loaded HDRI image as the scene background (
scene.background). - an environment map (
scene.environment) and used for reflecting and lighting models.
- the loaded HDRI image as the scene background (
- Memory Management
- After applying HDRI images to the scene, properly free up unnecessary resources (textures and generators).
PART 4: Ground setting
Loads 3D models into the scene, allowing you to control and toggle multiple animations.
The animation is updated smoothly for each frame, allowing for real-time movements.
// ==== // PART 4: Models and Animation // ==== // Loading the main model and managing animation const Model: React.FC<{ currentAnimation: string }> = ({ currentAnimation }) => { const { camera } = useThree(); const [model, setModel] = useState<THREE.Group | null> (null); const [mixer, setMixer] = useState<THREE.AnimationMixer | null> (null); // Load model useEffect(() => { const loader = new GLTFLoader(); loader.load(DEFAULT_ANIMATION_FILE, (gltf) => { const { scene: loadedScene } = gltf; loadedScene.scale.set(MODEL_SCALE, MODEL_SCALE, MODEL_SCALE); // Set the model size loadedScene.rotateY(MODEL_ROTATION_Y); // Set the model's initial rotation loadedScene.position.copy(MODEL_POSITION); // Set the initial position of the model setModel(loadedScene); const animationMixer = new THREE.AnimationMixer(loadedScene); setMixer(animationMixer); // Set the initial position of the camera camera.position.copy(INITIAL_CAMERA_POSITION); camera.lookAt(0, 4, 0); // View the center of the model }); }, [camera]); // Toggle animation useEffect(() => { if (!model || !mixer) return; const loader = new GLTFLoader(); loader.load(currentAnimation, (gltf) => { const newAnimation = gltf.animations[0]; if (newAnimation) { const action = mixer.clipAction(newAnimation); mixer.stopAllAction(); // Stop existing action action.reset().fadeIn(0.5).play(); // Play new action } }); }, [currentAnimation, model, mixer]); // Update animation useFrame((_, delta) => { if (mixer) mixer.update(delta); }); return model ?<primitive object={model} /> : null; // View model };- Loading the model
- Load a 3D model in glb format using
GLTFLoader - Set the model's scale, position and rotation appropriately and add it to the scene.
- Load a 3D model in glb format using
- Managing animations
- Animation is applied to the model using
AnimationMixer - An animation switching function has been implemented according to user operations.
- Animation is applied to the model using
- Frame-by-frame updates
- Use
useFrame - Smoothly progress through animation based on elapsed time (delta).
- Use
- Status Management
- Use React's
useState - Reflects user-selected animations in real time.
- Use React's
PART 5: Main Component
Use React to configure the entire application and integrate each feature (background, model, animation, light settings).
We will also list user-operable UIs (such as animation switching buttons) here.
// ==== // PART 5: Main Component // ==== // Configuring the entire application const ThreeDDancingUncle: React.FC = () => { const [currentAnimation, setCurrentAnimation] = useState(ANIMATION_FILES[0].path); return (<div style={{ width: "100vw", height: "100vh", position: "relative" }}> {/* Animation Select Button */} <div style={{ position: "absolute", top: "10px", left: "10px", zIndex: 10, // ボタンをCanvasの上に表示 }} > {ANIMATION_FILES.map((anim, index) => ( <button key={index} onClick={() =>setCurrentAnimation(anim.path)} // Toggle animation style={{ margin: "5px", padding: "10px", fontSize: "14px", background: "rgba(255, 255, 255, 0.8)", border: "1px solid #ccc", borderRadius: "5px", cursor: "pointer", }} > {anim.name}</button> ))}</div><Canvas> {/* Background Component */}<Background /> {/* Models and Animations */}<Model currentAnimation={currentAnimation} /> {/* Light Settings */} <ambientLight intensity={LIGHT_SETTINGS.ambient.intensity} /><directionalLight position={LIGHT_SETTINGS.directional.position} intensity={LIGHT_SETTINGS.directional.intensity} /><pointLight position={LIGHT_SETTINGS.point.position} intensity={LIGHT_SETTINGS.point.intensity} /> {/* Camera operation */}<OrbitControls /></Canvas></div> ); }; export default ThreeDDancingUncle;- Installing Canvas
- Create a framework for drawing a 3D scene using
the Canvas
- Create a framework for drawing a 3D scene using
- Integrating each feature
- Add a background (
the Background - Draw models and animations (
Model - Light settings (ambient light, directional light, point light) are placed in the scene.
- Add a background (
- UI placement
- Implements a button that toggles user-selected animations using React's state management (
useState - The UI is
Canvas, making it a design that is easy to operate.
- Implements a button that toggles user-selected animations using React's state management (
- User Action
- You can switch animations using the buttons and play the selected animation in real time.
lastly
All steps of "Control 3D models in glb format generated with Meshy AI using React and Three.js" have been completed. Now you can experience the fun of running 3D models generated using AI tool (Meshy) using React and Three.js!
Use Meshy to view various 3D models!
📺 Watch the demo on YouTube : You can watch it from this link
If you found this tutorial helpful, please subscribe to our YouTube channel and give it a high rating!
Additionally, the source code for this project is available on GitHub.
Please download the code and try it out!
💾 GitHub Repository : Check the source code at this link
If you found this helpful, please subscribe to our channel!
We will continue to create lessons and works from TypeScript x React Three Fiber in the future!
We will be making an announcement on YouTube, so please subscribe to our YouTube channel and wait for notifications!
📺 Watch YouTube : You can watch it from this link
If you'd like to know what React Three Fiber can do, please refer to the following!
We have easy-to-use works available!
- I tried making bears walk with React x Three.js!
- I tried making an old man dance on React x Three.js!
- I tried to display a 3D model with React x Three.js!
- I made a 3D button that explodes in React x Three.js!
- React Three Fiber x Drei x Introduction to TypeScript! Poke Poke style 3D background made with standard objects!
![How to build a web app that automatically generates LPs in ChatGPT + Next.js [OpenAI API + Next.js + Tailwind CSS]](https://hack-lab-256.com/wp-content/uploads/2025/07/hack-lab-256-samnail-27-300x169.jpg)

![I tried creating a chatbot using the OpenAI API [Next.js + Tailwind CSS]](https://hack-lab-256.com/wp-content/uploads/2025/07/hack-lab-256-samnail-25-300x169.jpg)

![[For beginners] Introduction to React Three Fiber x Drei x TypeScript! Create pixel art and dynamic animations from images](https://hack-lab-256.com/wp-content/uploads/2025/02/hack-lab-256-samnail-16-300x169.jpg)
![[Complete explanation] Learn with React Three Fiber × TypeScript! Practical guide to Transform (Position, Rotation, Scale) for 3D Objects](https://hack-lab-256.com/wp-content/uploads/2025/02/hack-lab-256-samnail-15-300x169.png)
![[Super Easy] Introduction to React Three Fiber x Drei x TypeScript! Poke Poke style 3D background made with standard objects!](https://hack-lab-256.com/wp-content/uploads/2025/02/hack-lab-256-samnail-14-300x169.jpg)