As AI technology evolves, 3D modeling has become easier and more enjoyable.
With the introduction of "Meshy AI," which can be easily used by beginners of programming, 3D modeling, which we have previously found difficult, has suddenly lowered the hurdle.
📺 Check Mesh : You can check it on the official page from this link
In this article, we will explain in detail how to run a 3D bear model created with Meshy AI using React x Three.js
The way the bear starts moving on the screen is fun to watch and should also be an opportunity to expand the possibilities of web development.
Even beginners should definitely try it out and try creating your own original 3D animation!
We will continue to create lessons and works from TypeScript x React Three Fiber in the future!
We will be making an announcement on YouTube, so please subscribe to our YouTube channel and wait for notifications!
📺 Watch YouTube : You can watch it from this link

If you'd like to know what React Three Fiber can do, please refer to the following!
We have easy-to-use works available!
- I tried making bears walk with React x Three.js!
- I tried making an old man dance on React x Three.js!
- I tried to display a 3D model with React x Three.js!
- I made a 3D button that explodes in React x Three.js!
- React Three Fiber x Drei x Introduction to TypeScript! Poke Poke style 3D background made with standard objects!
3D model display demo
You can see the demo of the finished product in the video below.
📺 Watch the demo on YouTube : You can watch it from this link

Additionally, the source code for this project is available on GitHub.
Please download the code and try it out!
💾 GitHub Repository : Check the source code at this link

If you're wondering, "I've seen it, how do I make it?", don't worry!
In this article, we will explain step-by-step how to view this 3D model.
Necessary Techniques and Key Library
This project uses the following technologies and libraries: Here is a brief explanation of each role.
- React
- Library for front-end development
- Efficient UI construction with component-based design
- Three.js
- A library for drawing 3D graphics on the web
- It makes it easy to handle complex WebGL operations
- React Three Fiber
- Wrapper library for handling Three.js in React
- You can take advantage of the powerful features of Three.js in React development style
- React Thee Drei
- React Three Fiber Extension Library
- React Three Fiber Extension Library
- Meshy
- A service that allows you to easily generate high-quality 3D models using AI
Overall implementation design
This project will achieve a simple process: "Use AI tools to generate a 3D model and display it in the browser using React and Three.js."
- Loading the model
-
- Import a 3D bear model generated with Meshy AI using FBXLoader
- Adjust scale , initial position and rotation
- Managing animations
-
- Play "walking" animation of bears using AnimationMixer in Three.js
- Status Management:
isPlayingControls animation playback and stopping using the state variableisPlaying = true: The animation is playedisPlaying = false: animation stops
- Frame-by-frame updates
-
- React Three Fiber**
useFrame**Use hooks to update the following behavior per frame- Model advance Increase the
z-as the bear walks on the screen - Animation Update : Advance current animation frames with
AnimationMixer
- Model advance Increase the
- React Three Fiber**
- Button operation
-
- Using the React button,
isPlayingIt allows you to switch the status of- A simple UI that switches animation playback/stop when you press a button
- Using the React button,
- Building the environment
-
- Background : Set the sky color in Three.js
- Light : Place ambient light and point light sources to make 3D models easier to view
Environmental preparation
This section provides the initial setup for your project. Create a React app using the npx command, install the required libraries and organize the folder structure.
Creating a React App
First, create a React app using the npx command.
npx create-react-app meshy-3d-model-animation --template typescriptmeshy-3d-model-animathionis the name of the project--templateUse a TypeScript-enabled template by specifying
Installing the required libraries
Install React Three Fiber and other libraries.
cd meshy-3d-model-animathion npm install three @react-three/fiber @react-three/drei- three : Three.js main body
- @react-three/fiber : A wrapper for using Three.js with React
- @react-three/drei : Useful helpers such as camera controls and text drawing
Reviewing folder structure and deleting unnecessary files
Organize and add folders from the initial state as follows:
Basically, it is the default value, but for files you don't know, please check out GitHub.
meshy-3d-model-animation/ ├── node_modules/ ├── public/ ├── models/ // 3D models and related files │ ├── cuddly_bear/ // Bear's 3D model folder │ │ ├── Animation_Walking_withSkin.fbx // FBX files with walking animation │ │ │ │ │ │ │ │ │ │ │ │ │ │ │ │ │ │ │ │ │ │ │ │ │ ThreeDModelAnimation/ // FBX files for other purposes │ │ │ │ │ │ │ ThreeDModelAnimation/ // 3D animation page │ │ │ │ │ │ │ │ │ │ │ │ │ │ ThreeDModelAnimation.tsx // Main React component │ │ │ │ │ ThreeDModelAnimation.css // Page style sheet │ │ │ │── index.ts // Index file for exporting pages │ │── App.tsx // App entry points │ │── index.ts x // React rendering processing │ │── App.css // Global style │ │── index.css // Global CSS │── package.json // Project settings │── tsconfig.json // TypeScript settings └── README.md // Project overview
The files to be modified this time are as follows:
App.tsx: App entry pointspages>index.ts: index file to export the page to.pages/ThreeDModelAnimation: The folder to be created this timeThreeDModelAnimation.tsx: Component of the main page.ThreeDModelAnimation.css: Page Stylesheet
Detailed explanation of the source code for each step
In the following sections, we will explain in detail the five parts below in order.
- Generate 3D bear models with AI using Meshy AI
- Export in FBX format and place it in the
public/models/cuddly_bear
- Defines the scale, initial position, rotation angle, etc. of the 3D model
- Set the constants that manage the size of the ground and random stones, and the initial settings for the camera and light.
- By converting constants, it makes it easier to adjust and manage later.
- Loading the bear model generated in Meshy using FBXLoader
- Manage animations using AnimationMixer
- Draw a model using primitive
- Implement playback/stop switching using React's status management
- Use PlaneGeometry to generate ground
- Use meshStandardMaterial to set the color and texture of the ground
- It plays a role in keeping the ground still and highlighting the background and models
- UseState to generate stones of random positions and sizes at first rendering
- Creating stones with sphereGeometry and meshStandardMaterial
- Integrate the animation models of ground, stones and bears using Canvas
- Use OrbitControls from the Drei Library to enable camera operation
- Add buttons, toggle isPlaying state to play/stop animation
Check the whole source
Below is the complete source code for running the 3D bear model created using Meshy AI created in this article using React x Three.js All the code is put together, so it's easy to get an idea of how it works.
If you would like to see other sources, please check on GitHub.
import './App.css'; import { ThreeDModelAnimation } from './pages'; function App() { return (<div className="App"><ThreeDModelAnimation /></div> ); } export default App;
import ExplodingButtonPage from "./ExplodingButtonPage/ExplodingButtonPage"; import GamingRoomLogin from "./GamingRoomLogin/GamingRoomLogin"; import Meshy3DModel from "./Meshy3DModel/Meshy3DModel"; import ThreeDModelAnimation from "./ThreeDModelAnimation/ThreeDModelAnimation"; export {ExplodingButtonPage, GamingRoomLogin, Meshy3DModel, ThreeDModelAnimation}// 3DModelAnimation.tsx // ==== // PART 1: Generate a model with Meshy // ==== // Generate a 3D model using Meshy AI // ==== // PART 2: Constant definition // ==== import React, { useRef, useEffect, useState } from 'react'; import { Canvas, useFrame } from '@react-three/fiber'; import { OrbitControls } from '@react-three/drei'; import { FBXLoader } from 'three/examples/jsm/loaders/FBXLoader'; import { AnimationMixer, Clock, DoubleSide, Vector3 } from 'three'; import './ThreeDModelAnimation.css'; // Constant definition // Model related settings const MODEL_SCALE = 0.1; // Model scale const MODEL_INITIAL_POSITION = new Vector3(0, 0.5, 0); // Initial position of the model const MODEL_ROTATION_X = -0.3; // X-axis rotation of the model // Ground setting const GROUND_COLOR = 'green'; const GROUND_POSITION = new Vector3(0, 0, 0); const GROUND_SIZE = 200; // Ground size const GROUND_SEGMENTS = 50; // Ground divisions // Stone setting const STONE_COUNT = 50; // Number of stones const STONE_SCALE_MIN = 0.1; // Minimum Scale const STONE_SCALE_MAX = 0.6; // Maximum Scale // Camera and Light Settings const CAMERA_POSITION = new Vector3(0, 20, 50); const AMBIENT_LIGHT_INTENSITY = 0.7; // Ambient Light Intensity const POINT_LIGHT_POSITION = new Vector3(10, 20, 10); const POINT_LIGHT_INTENSITY = 1; // Point light source strength // Background setting const BACKGROUND_COLOR = 'skyblue'; // Background color interface AnimatedFBXModelProps { path: string; isPlaying?: boolean; } // ==== // PART 3: Animated Model // ===== const AnimatedFBXModel: React.FC<AnimatedFBXModelProps> = ({ path, isPlaying = false }) => { const mixer = useRef<AnimationMixer | null> (null); const clock = useRef(new Clock()); const [model, setModel] = useState<any> (null); const [action, setAction] = useState<any> (null); // Update the model position and animation for each frame useFrame(() => { if (model && isPlaying) { model.position.z += 0.05; // Move the model forward } if (mixer.current && isPlaying) { const delta = clock.current.getDelta(); mixer.current.update(delta); // Update the animation } }); // Load FBX model useEffect(() => { const loader = new FBXLoader(); loader.load( path, (fbx) => { if (!model) { fbx.scale.set(MODEL_SCALE, MODEL_SCALE, MODEL_SCALE); fbx.position.copy(MODEL_INITIAL_POSITION); fbx.rotateX(MODEL_ROTATION_X); } mixer.current = new AnimationMixer(fbx); // Set if animation if (fbx.animations.length > 0) { const newAction = mixer.current.clipAction(fbx.animations[0]); newAction.paused = !isPlaying; setAction(newAction); } setModel(fbx); }, undefined, (error) => { console.error('Error loading FBX model:', error); } ); }, [path]); // Toggle playback/stop animation useEffect(() => { if (action) { action.paused = !isPlaying; if (isPlaying) { action.play(); } else { action.stop(); } } }, [isPlaying, action]); return model ?<primitive object={model} /> : null; }; // ==== // PART 4: Ground settings // ===== const Ground: React.FC = () => { return ( <mesh rotation={[-Math.PI / 2, 0, 0]} position={GROUND_POSITION}><planeGeometry args={[GROUND_SIZE, GROUND_SIZE, GROUND_SEGMENTS, GROUND_SEGMENTS]} /><meshStandardMaterial color={GROUND_COLOR} side={DoubleSide} /></mesh> ); }; // ==== // PART 5: Random Stone Arrangement // ===== const RandomStones: React.FC = () => { // Generate stones at random positions and scales on first rendering const [stones] = useState(() => { return Array.from({ length: STONE_COUNT }, () => { const x = Math.random() * GROUND_SIZE - GROUND_SIZE / 2; const y = GROUND_POSITION.y; const z = Math.random() * GROUND_SIZE - GROUND_SIZE / 2; const scale = Math.random() * (STONE_SCALE_MAX - STONE_SCALE_MIN) + STONE_SCALE_MIN; return ( <mesh key={`${x}-${z}`} position={[x, y, z]} scale={[scale, scale, scale]}><sphereGeometry args={[1, 8, 8]} /><meshStandardMaterial color="gray" /></mesh> ); }); return <>{stones}</> ; }; // ==== // PART 6: Main Components // ===== const ThreeDModelAnimation: React.FC = () => { const [isPlaying, setIsPlaying] = useState(false); return (<div className="canvas-container"> <button style={{ position: 'absolute', top: '10px', left: '10px', zIndex: 100 }} onClick={() =>setIsPlaying(!isPlaying)} > {isPlaying ? 'Pause Animation' : 'Play Animation'}</button> <Canvas camera={{ position: CAMERA_POSITION.toArray() }}><ambientLight intensity={AMBIENT_LIGHT_INTENSITY} /><pointLight position={POINT_LIGHT_POSITION.toArray()} intensity={POINT_LIGHT_INTENSITY} /><OrbitControls /> {/* Ground display */}<Ground /> {/* Random stone arrangement */}<RandomStones /> {/* Background color setting */}<color attach="background" args={[BACKGROUND_COLOR]} /> {/* Animation model */}<AnimatedFBXModel path="/models/cuddly_bear/Animation_Walking_withSkin.fbx" isPlaying={isPlaying} /></Canvas></div> ); }; export default ThreeDModelAnimation;
/* 3DModelAnimation.css */ .canvas-container { width: 100vw; height: 100vh; display: flex; justify-content: center; align-items: center; background-color: #000; }
PART 1: Model generation in Meshy
This time, the 3D model will be using an AI automatic generation service called Meshy.
The link is below, so please refer to it.
200 credits per month are available for free.
📺 Check Mesh : You can check it on the official page from this link
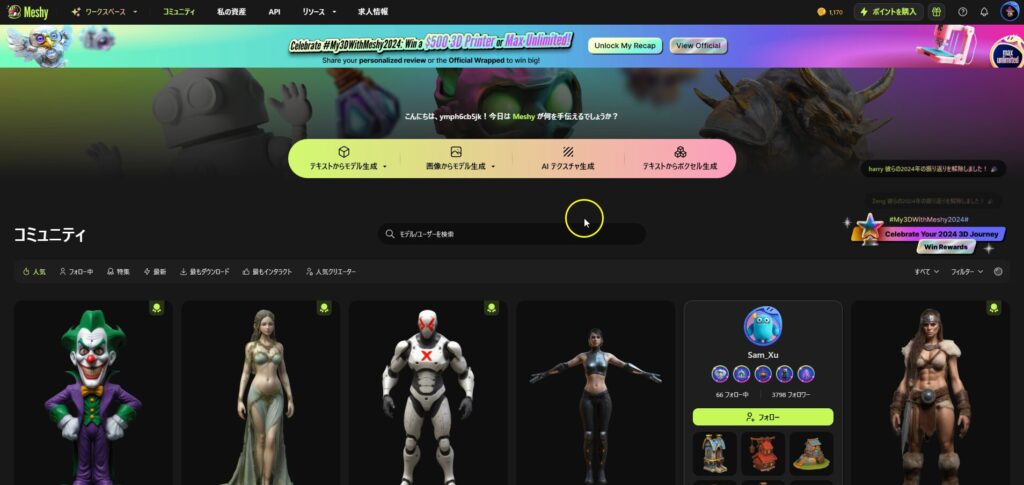
Select a community and select a model that has already been created.
You can generate this by yourself from text or images.
This time, we chose the 3D bear model below.
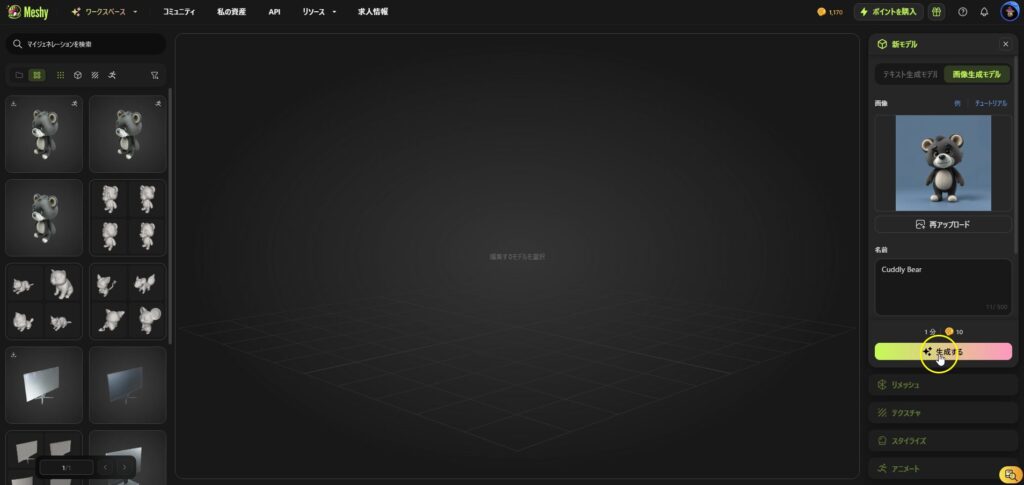
When you hover over the cursor, you will see a button called "Regenerate Model" so select it.
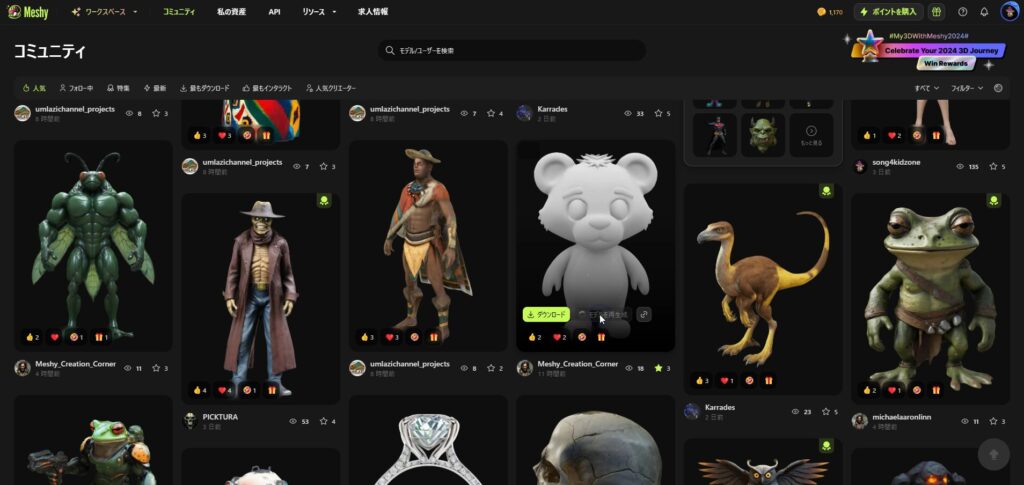
You will likely be redirected to the workspace, so just select the "Generate" button.
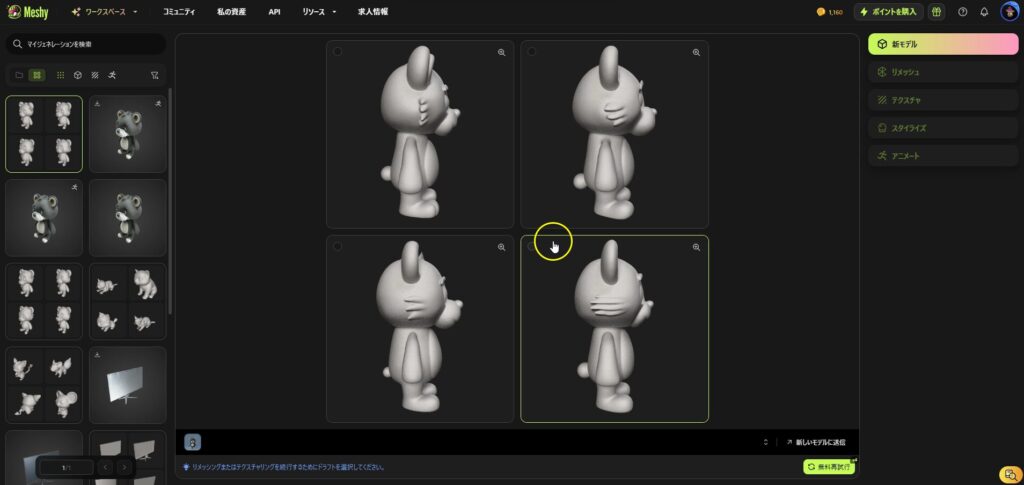
There will be four 3D bear models, so choose the model you like.
Select "Confirm Texture & Remesh as is."
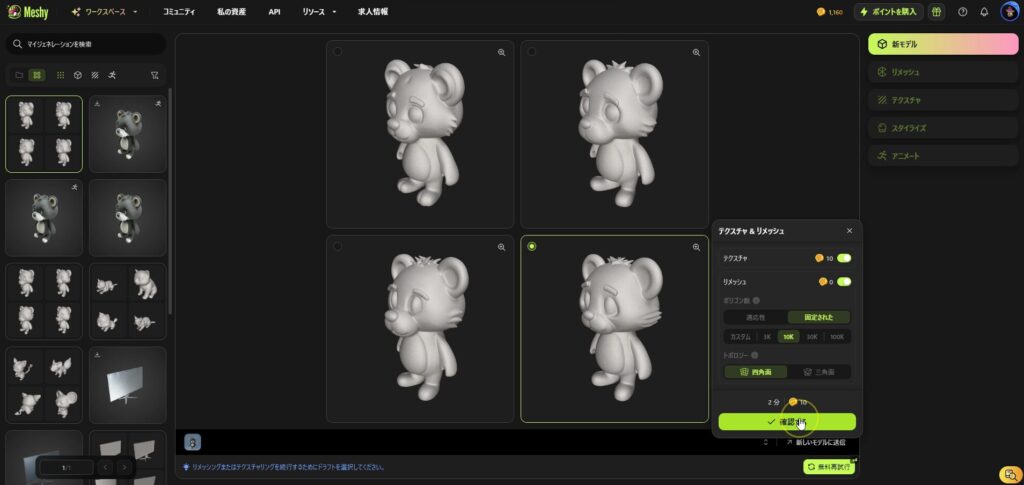
This will generate a model similar to the model you selected.
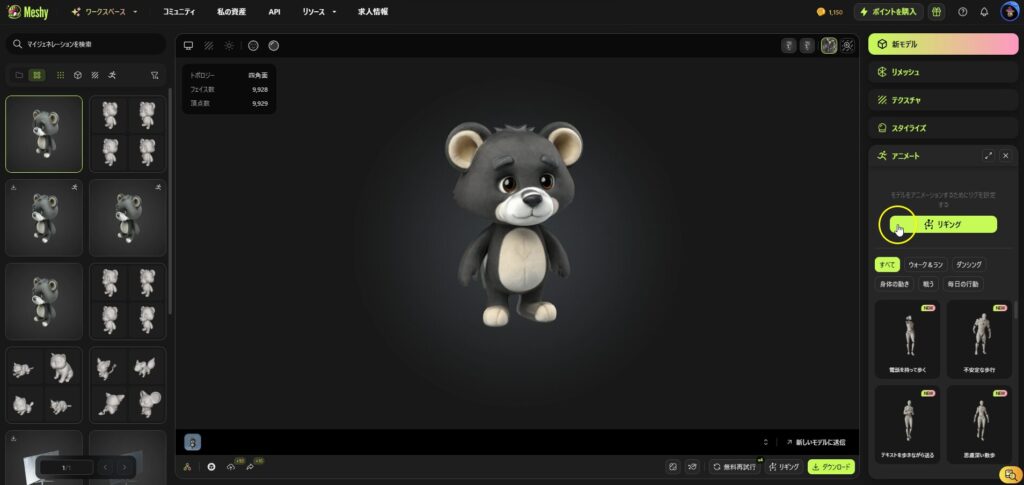
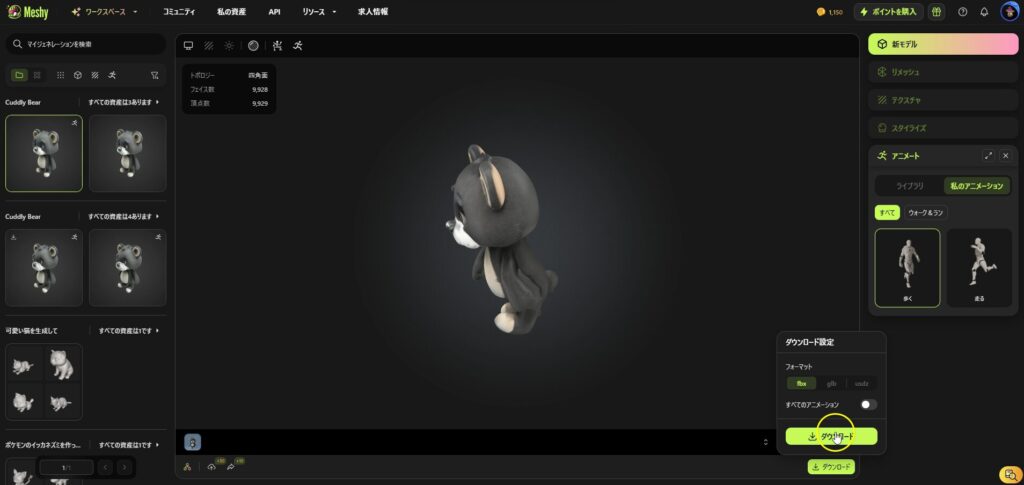
Next, select Animate > Rigging to add animation.
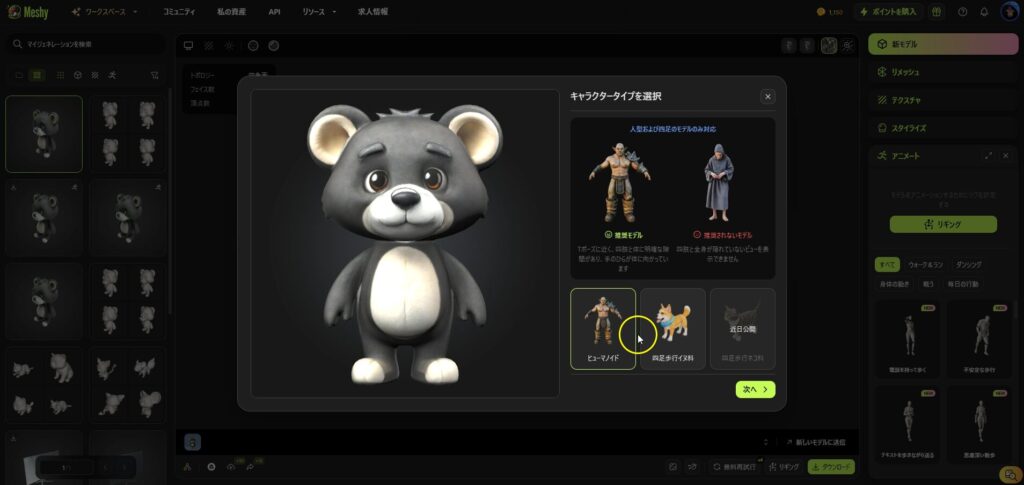
This time, although it's a little difficult, since the humanoid is close, I'll choose the humanoid.
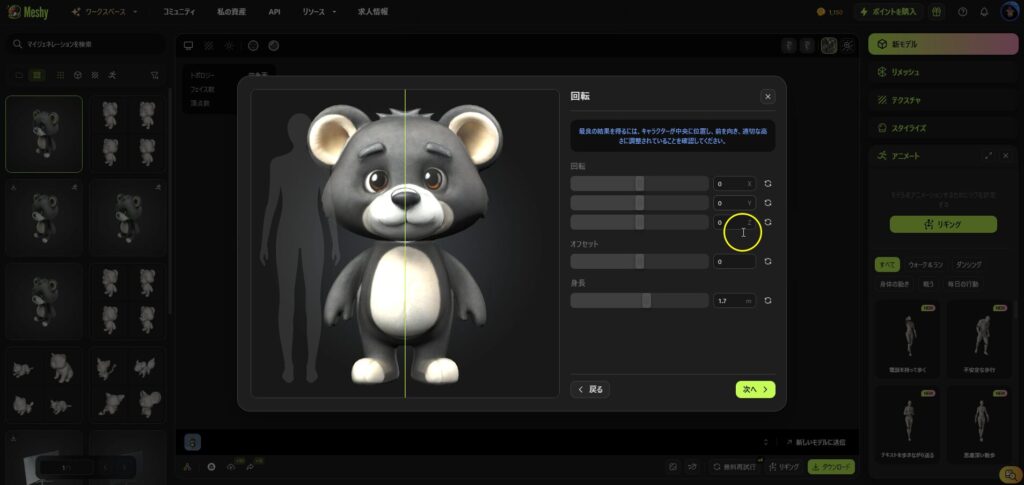
I don't think there is any need to change the next screen, so just continue to the next page.
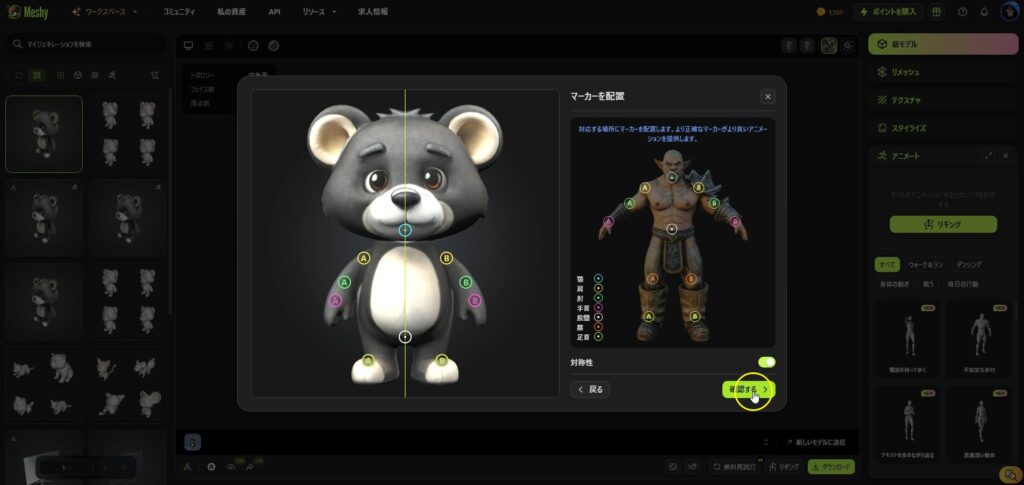
This will be the marker layout. This time my knees are difficult, but I ended up stacking them on my ankles.
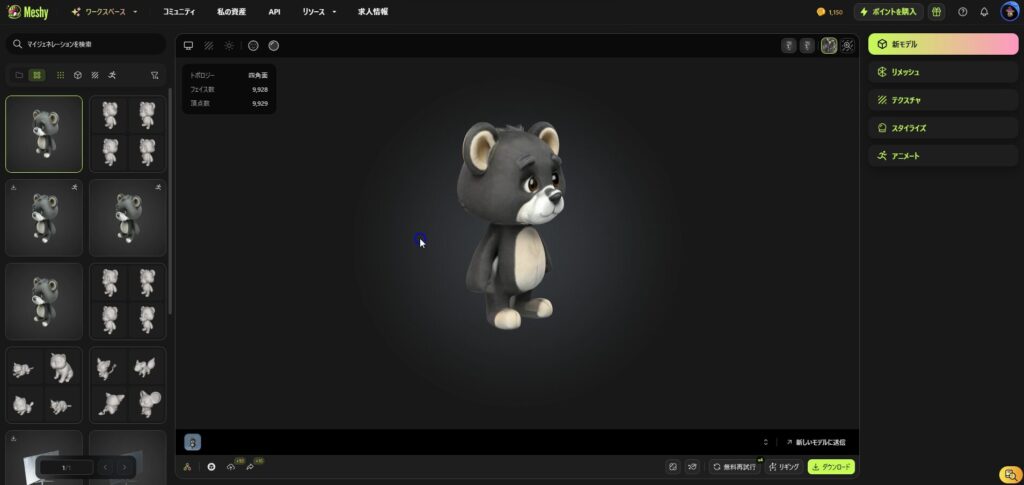
This will generate an animated 3D model.
The way I walk is awkward, but this is enough for me, character-wise. (lol)

If the movement is not working, export it using fbx or something similar.
This time I will explain it on FBX, but since GLB is lighter, it may be good for web use.
PART 2: Constant definition
First, we will look at the import of each library and the constant definitions.
Defining constants centrally manages the values used within your application, improving reusability and readability. Since setting values for 3D models and scenes are used everywhere in the code, making them constants easier to maintain.
// ==== // PART 2: Constant definition // ==== import React, { useRef, useEffect, useState } from 'react'; import { Canvas, useFrame } from '@react-three/fiber'; import { OrbitControls } from '@react-three/drei'; import { FBXLoader } from 'three/examples/jsm/loaders/FBXLoader'; import { AnimationMixer, Clock, DoubleSide, Vector3 } from 'three'; import './ThreeDModelAnimation.css'; // Constant definition // Model related settings const MODEL_SCALE = 0.1; // Model scale const MODEL_INITIAL_POSITION = new Vector3(0, 0.5, 0); // Initial position of model const MODEL_ROTATION_X = -0.3; // Model X-axis rotation // Ground setting const GROUND_COLOR = 'green'; const GROUND_POSITION = new Vector3(0, 0, 0); const GROUND_SIZE = 200; // Ground size const GROUND_SEGMENTS = 50; // Number of ground divisions // Stone settings const STONE_COUNT = 50; // Number of stones const STONE_SCALE_MIN = 0.1; // Minimum scale of stones const STONE_SCALE_MAX = 0.6; // Maximum scale of stones // Camera and light settings const CAMERA_POSITION = new Vector3(0, 20, 50); const AMBIENT_LIGHT_INTENSITY = 0.7; // Ambient light intensity const POINT_LIGHT_POSITION = new Vector3(10, 20, 10); const POINT_LIGHT_INTENSITY = 1; // Point light source strength // Background setting const BACKGROUND_COLOR = 'skyblue'; // Background color interface AnimatedFBXModelProps { path: string; isPlaying?: boolean; }Depending on the 3D model you generate, fine adjustments may be necessary, so please use the following as a reference to play around with the numbers.
- Model-related settings
MODEL_SCALE- Specifies the size of the model. Set to
0.1 - Example: Adjust the bear model to display the appropriate size for the screen.
- Specifies the size of the model. Set to
MODEL_INITIAL_POSITION- Specifies the initial position of the model.
- Example: Place it slightly above the ground with
new Vector3(0, 0.5, 0)
MODEL_ROTATION_X- Specifies the initial rotation angle of the model.
- Example:
-0.3to lean forward slightly.
- Ground setting
GROUND_COLOR- Specify the ground color. Specify
greenhere
- Specify the ground color. Specify
GROUND_POSITION- Specifies the ground position. Placed at the origin with
new Vector3(0, 0, 0)
- Specifies the ground position. Placed at the origin with
GROUND_SIZE- Specify the size of the ground (width and height). 200 square size.
GROUND_SEGMENTS- Specifies the number of ground to be split. Set to moderate fineness at 50.
- Stone settings
STONE_COUNT- Specifies the number of stones to be placed. 50 pieces are arranged.
STONE_SCALE_MIN- Specifies the minimum scale (size) of the stone.
0.1represents a small stone.
- Specifies the minimum scale (size) of the stone.
STONE_SCALE_MAX- Specifies the maximum scale (size) of the stone.
0.6represents a slightly larger stone.
- Specifies the maximum scale (size) of the stone.
- Camera and light settings
CAMERA_POSITION- Specifies the initial position of the camera.
New Vector3 (0, 20, 50)gives a slightly higher perspective of looking down at the bear.
- Specifies the initial position of the camera.
AMBIENT_LIGHT_INTENSITY- Specifies the intensity of the ambient light. Natural brightness at
0.7
- Specifies the intensity of the ambient light. Natural brightness at
POINT_LIGHT_POSITION- Specifies the location of the point light source. Illuminate the model from above with
new Vector3 (10, 20, 10)
- Specifies the location of the point light source. Illuminate the model from above with
POINT_LIGHT_INTENSITY- Specifies the intensity of the point light source. Set the brightness to
1
- Specifies the intensity of the point light source. Set the brightness to
- Background settings
BACKGROUND_COLOR- Specifies the background color for the scene. Specify
skybluehere
- Specifies the background color for the scene. Specify
PART 3: Animation Model
Loads the 3D model generated with Meshy and uses Three.js' animation function to run it. Combining animation management with React's state management provides the ability to move and stop the model.
// ==== // PART 3: Animated Model // ===== const AnimatedFBXModel: React.FC<AnimatedFBXModelProps> = ({ path, isPlaying = false }) => { const mixer = useRef<AnimationMixer | null> (null); const clock = useRef(new Clock()); const [model, setModel] = useState<any> (null); const [action, setAction] = useState<any> (null); // Update the model position and animation for each frame useFrame(() => { if (model && isPlaying) { model.position.z += 0.05; // Move the model forward } if (mixer.current && isPlaying) { const delta = clock.current.getDelta(); mixer.current.update(delta); // Update the animation } }); // Load FBX model useEffect(() => { const loader = new FBXLoader(); loader.load( path, (fbx) => { if (!model) { fbx.scale.set(MODEL_SCALE, MODEL_SCALE, MODEL_SCALE); fbx.position.copy(MODEL_INITIAL_POSITION); fbx.rotateX(MODEL_ROTATION_X); } mixer.current = new AnimationMixer(fbx); // Set if animation if (fbx.animations.length > 0) { const newAction = mixer.current.clipAction(fbx.animations[0]); newAction.paused = !isPlaying; setAction(newAction); } setModel(fbx); }, undefined, (error) => { console.error('Error loading FBX model:', error); } ); }, [path]); // Toggle playback/stop animation useEffect(() => { if (action) { action.paused = !isPlaying; if (isPlaying) { action.play(); } else { action.stop(); } } }, [isPlaying, action]); return model ?<primitive object={model} /> : null; };
- Loading the model
- Load
public/models/cuddly_bear/Animation_Walking_withSkin.fbxusing FBXLoader - Draw the imported 3D model using
the primitivein Three.js
- Load
- Managing animations
- Use AnimationMixer
- To switch between playback and stopping animations, use
isPlayingis managed usinguseState
- Model advancement
- Use
the useFramein Three.jsthe z-axis value per frame, achieving a moving movement that advances the model.
- Use
PART 4: Ground setting
Set the ground where the bears will walk. The ground is expressed using simple planar geometry and is positioned in harmony with the camera and model. The ground allows for realistic movements of bears.
This time, we'll simply use a whole color of green, but I think it will become more realistic if you use textures and other things.
// ==== // PART 4: Ground settings // ===== const Ground: React.FC = () => { return ( <mesh rotation={[-Math.PI / 2, 0, 0]} position={GROUND_POSITION}><planeGeometry args={[GROUND_SIZE, GROUND_SIZE, GROUND_SEGMENTS, GROUND_SEGMENTS]} /><meshStandardMaterial color={GROUND_COLOR} side={DoubleSide} /></mesh> ); };- Ground generation
- Create a plane using
PlaneGeometryin React Three Fiber - Set the width, height, and number of divisions of the plane using predefined constants.
- Create a plane using
- The appearance of the ground
- Use
meshStandardMaterial - The ground color is specified as
GROUND_COLORgreen
- Use
- Placement
- To level the plane, rotate it 90 degrees with respect to the X-axis.
- Set the ground position as
GROUND_POSITIONnew Vector3(0, 0, 0)
PART 5: Random Stone Arrangement
Place stones of random size and position on the ground to add a natural feel to the scene. The whole green color was too simple, so by randomly placing the stones, we create a more realistic scene.
// ===== // PART 5: Random Stone Arrangement // ===== const RandomStones: React.FC = () => { // Generate stones at random positions and scales on first rendering const [stones] = useState(() => { return Array.from({ length: STONE_COUNT }, () => { const x = Math.random() * GROUND_SIZE - GROUND_SIZE / 2; const y = GROUND_POSITION.y; const z = Math.random() * GROUND_SIZE - GROUND_SIZE / 2; const scale = Math.random() * (STONE_SCALE_MAX - STONE_SCALE_MIN) + STONE_SCALE_MIN; return ( <mesh key={`${x}-${z}`} position={[x, y, z]} scale={[scale, scale, scale]}><sphereGeometry args={[1, 8, 8]} /><meshStandardMaterial color="gray" /></mesh> ); }); return <>{stones}</> ; };- Stone generation
- Use React's
useState - Placement data includes multiple stones with random positions and scales.
- Use React's
- Random placement
- Using
Math.randomwe randomly generatethe xandz - Randomly set the scale within the ranges of
STONE_SCALE_MINandSTONE_SCALE_MAX
- Using
- The appearance of the stone
- Use
sphereGeometry -
meshStandardMaterialto reproduce the texture of the stone.
- Use
- Prevent redrawing
UseStategenerates stones and fixes them during the first rendering.- Performance is improved by maintaining the same stone arrangement when redrawing.
PART 6: Main Component
It integrates the ground, random stones, and bear animation models and creates the main component that manages the entire scene. In addition, it implements an operation UI (button) that allows users to switch between playback and stopping animations.
// ==== // PART 6: Main Component // ===== const ThreeDModelAnimation: React.FC = () => { const [isPlaying, setIsPlaying] = useState(false); return (<div className="canvas-container"> <button style={{ position: 'absolute', top: '10px', left: '10px', zIndex: 100 }} onClick={() =>setIsPlaying(!isPlaying)} > {isPlaying ? 'Pause Animation' : 'Play Animation'}</button> <Canvas camera={{ position: CAMERA_POSITION.toArray() }}><ambientLight intensity={AMBIENT_LIGHT_INTENSITY} /><pointLight position={POINT_LIGHT_POSITION.toArray()} intensity={POINT_LIGHT_INTENSITY} /><OrbitControls /> {/* Ground display */}<Ground /> {/* Random stone arrangement */}<RandomStones /> {/* Background color setting */}<color attach="background" args={[BACKGROUND_COLOR]} /> {/* Animation model */}<AnimatedFBXModel path="/models/cuddly_bear/Animation_Walking_withSkin.fbx" isPlaying={isPlaying} /></Canvas></div> ); }; export default ThreeDModelAnimation;- Building the scene
- Draw an entire 3D scene using
the Canvasof React Three Fiber - Place
ground, random stonesand animatedFBXModelwithin theCanvas.
- Draw an entire 3D scene using
- Light and camera settings
- Add ambient light and pointLight to brighten
theentire scene. - Enable camera operations using
OrbitControlsfrom the Drei library
- Add ambient light and pointLight to brighten
- Animation Operations UI
- Create a button toggle between play and stop, and manage the
isPlayingusingthe useState - Dynamically change the button label
the isPlaying
- Create a button toggle between play and stop, and manage the
lastly
All steps in the "Let the Bears Walk with React x Three.js" project have been completed. Now you can experience the fun of running 3D models generated using AI tool (Meshy) using React and Three.js!
Use Meshy to view various 3D models!
📺 Watch the demo on YouTube : You can watch it from this link
If you found this tutorial helpful, please subscribe to our YouTube channel and give it a high rating!
Additionally, the source code for this project is available on GitHub.
Please download the code and try it out!
💾 GitHub Repository : Check the source code at this link
If you found this helpful, please subscribe to our channel!
We will continue to create lessons and works from TypeScript x React Three Fiber in the future!
We will be making an announcement on YouTube, so please subscribe to our YouTube channel and wait for notifications!
📺 Watch YouTube : You can watch it from this link
If you'd like to know what React Three Fiber can do, please refer to the following!
We have easy-to-use works available!
- I tried making bears walk with React x Three.js!
- I tried making an old man dance on React x Three.js!
- I tried to display a 3D model with React x Three.js!
- I made a 3D button that explodes in React x Three.js!
- React Three Fiber x Drei x Introduction to TypeScript! Poke Poke style 3D background made with standard objects!
![How to build a web app that automatically generates LPs in ChatGPT + Next.js [OpenAI API + Next.js + Tailwind CSS]](https://hack-lab-256.com/wp-content/uploads/2025/07/hack-lab-256-samnail-27-300x169.jpg)

![I tried creating a chatbot using the OpenAI API [Next.js + Tailwind CSS]](https://hack-lab-256.com/wp-content/uploads/2025/07/hack-lab-256-samnail-25-300x169.jpg)

![[For beginners] Introduction to React Three Fiber x Drei x TypeScript! Create pixel art and dynamic animations from images](https://hack-lab-256.com/wp-content/uploads/2025/02/hack-lab-256-samnail-16-300x169.jpg)
![[Complete explanation] Learn with React Three Fiber × TypeScript! Practical guide to Transform (Position, Rotation, Scale) for 3D Objects](https://hack-lab-256.com/wp-content/uploads/2025/02/hack-lab-256-samnail-15-300x169.png)
![[Super Easy] Introduction to React Three Fiber x Drei x TypeScript! Poke Poke style 3D background made with standard objects!](https://hack-lab-256.com/wp-content/uploads/2025/02/hack-lab-256-samnail-14-300x169.jpg)