最近、「Readdy」のようなノーコードで使えるAIツールが注目を集めています。
誰でも簡単にAIを活用できる時代になりましたが、
「自分のサービスにAIを組み込んでみたい」「もっと自由にカスタマイズしたい」と思ったことはありませんか?
この記事では、Next.js(App Router)、Tailwind CSS、そして OpenAIのChat Completions API を使って、
LP(ランディングページ)を自動生成するWebアプリをゼロから構築する方法を紹介します。
「コードを書くのはちょっと面倒…」という方や
「すぐに動くUI付きテンプレートが欲しい」という方のために、以下のプラットフォームでテンプレートも公開しています。
本記事で紹介しているテンプレートを販売中!
このチャットボットUIテンプレートは、複数のプラットフォームで販売中です。
「まずは動くものを試したい」「環境構築なしですぐに使いたい」「コード全体を確認したい」
そんな方にぴったりの構成になっています。
- 静電容量無接点方式ならではのスコスコとした打鍵感!
- REALFORCE初のワイヤレス対応!有線接続も可能!
- HHKBと違って、日本語配列に癖がなく誰でも使いやすい!
- サムホイールが搭載、横スクロールがかなり楽に!
- 静音性能も高く、静かで快適!
- スクロールは、高速モードとラチェットモードを使い分け可能!
使用している技術について
このLP生成アプリは、以下の技術を使って構築されています。
- Next.js(App Router構成)
-
Reactベースのフレームワークで、ページやAPIルートを統一的に構築できます。
src/appを起点としたApp Router構成を使っています。 - Tailwind CSS
-
ユーティリティファーストなCSSフレームワークで、クラスを使って効率よくデザインを整えられます。レスポンシブでシンプルなUIが素早く作れます
- OpenAI API(Chat Completions)
-
/v1/chat/completionsエンドポイントを使って、GPT系モデルと対話する仕組みです。今回は環境変数でgpt-4.1-miniやgpt-3.5-turboなどを簡単に切り替えられるようにしています。 - API Routes + fetch
-
Next.jsのAPIルート (
/api/chat) を使って、ブラウザとOpenAI APIの間を中継するサーバー処理を書いています。クライアントからはfetch("/api/chat")で使えるようにしてあります。
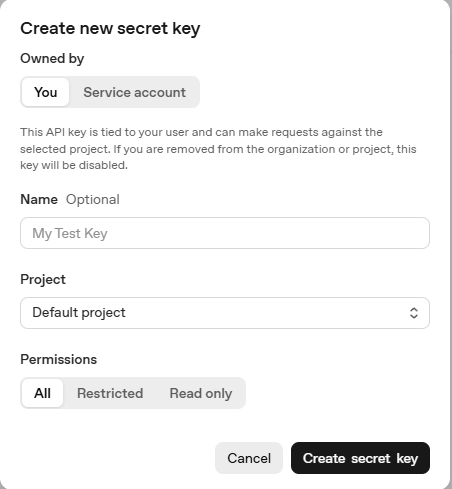
OpenAI API keyを作成
今回は、OpenAI APIを利用しますので、OpenAI API keyを作成する必要があります。
OpenAI APIのダッシュボードでAPI keysに遷移します。「Create new secret key」を選択します。
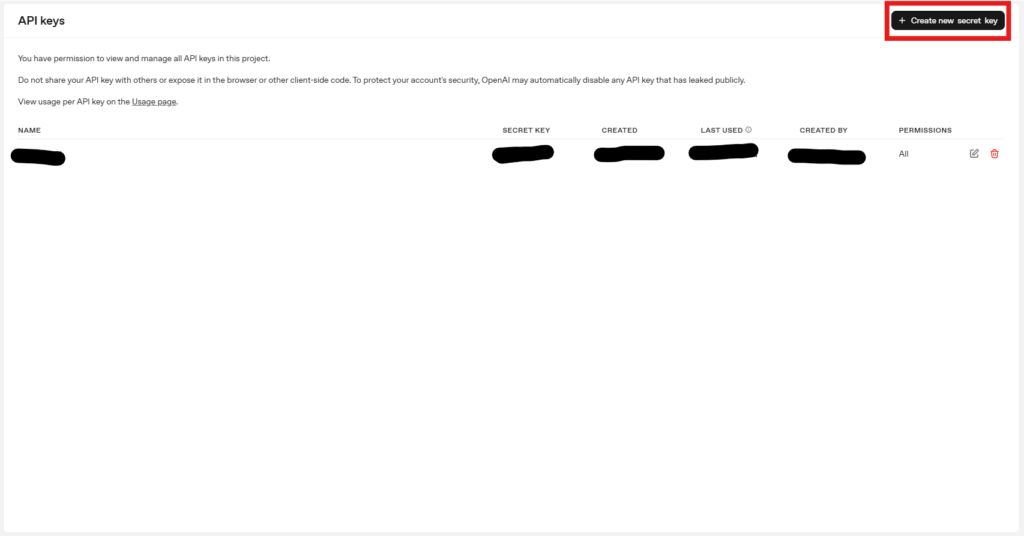
Projectは、任意に選んでもらい、Permissionsを使いたいモデルに合わせて選択するか、Allを選択して生成します。
作成が終わると「sk-」から始まる文字列が作成されるので、それをこの後利用します。
くれぐれもこのkeyが漏れないように注意してください。
環境構築
まずは Next.js の開発環境を用意します。
プロジェクトの作成
プロジェクトを作成していきます。
基本的には、全てデフォルトのままでいいかなと思いますが、必要に応じて変更してもらえれば問題ないです。
(今回のプロジェクトは、Tailwind CSSを利用しますので、Yesにしておくと良いかと思います。デフォルトはYesです。)
$ npx create-next-app lp-generator-starter --app --typescript
Need to install the following packages:
create-next-app@15.4.4
Ok to proceed? (y)

✔ Would you like to use ESLint? … No / Yes
✔ Would you like to use Tailwind CSS? … No / Yes
✔ Would you like your code inside a `src/` directory? … No / Yes
✔ Would you like to use Turbopack for `next dev`? … No / Yes
✔ Would you like to customize the import alias (`@/*` by default)? … No / Yes
Creating a new Next.js app in /lp-generator-starter.

Using npm.

Initializing project with template: app-tw


Installing dependencies:
- react
- react-dom
- next

Installing devDependencies:
- typescript
- @types/node
- @types/react
- @types/react-dom
- @tailwindcss/postcss
- tailwindcss
- eslint
- eslint-config-next
- @eslint/eslintrc


added 336 packages, and audited 337 packages in 13s

137 packages are looking for funding
  run `npm fund` for details

found 0 vulnerabilities
Initialized a git repository.

Success! Created lp-generator-starter at /lp-generator-starter
「Success! Created lp-generator-starter at /lp-generator-starter」が出ていれば、プロジェクト作成は完了です。
プロジェクトが作成できたら、ディレクトリは移動しておきましょう。
cd lp-generator-starterOpenAI APIキーを設定
ルートに .env ファイルを作成します。
OPENAI_API_KEY=sk-...
OPENAI_MODEL=gpt-4.1-mini
SYSTEM_PROMPT=You are a helpful assistant for creating LPs.
簡単な説明:
- OPENAI_API_KEY:OpenAIのAPIアクセスに必要な秘密鍵(個人アカウントで発行)
- OPENAI_MODEL:利用するモデル名。用途に応じて
gpt-3.5-turboやgpt-4.1-miniなど - SYSTEM_PROMPT:AIの性格や役割を指定する初期メッセージ(チャット開始時に効く)
開発サーバーを起動
下記のコマンドを実行することで、ひな形が起動します。
npm run devUIの実装(チャット画面)
チャットのユーザーインターフェースは、src/app/page.tsx に集約する形にしています。
ソースコードの全量は下記になります。
"use client";

import { useState } from "react";

export default function Home() {
  // 入力フォームの状態管理
  // State for each input field
  const [productName, setProductName] = useState("");
  const [category, setCategory] = useState("web");
  const [description, setDescription] = useState("");
  const [features, setFeatures] = useState(["", "", ""]);
  const [targetUser, setTargetUser] = useState("");
  const [goal, setGoal] = useState("");
  const [tone, setTone] = useState("");
  const [style, setStyle] = useState("");
  const [referenceUrl, setReferenceUrl] = useState("");
  const [loading, setLoading] = useState(false);
  const [result, setResult] = useState("");

  // LP生成処理
  // Function to call API and generate landing page HTML
  const generateLP = async () => {
    setLoading(true);
    setResult("");

    try {
      const res = await fetch("/api/generate-lp", {
        method: "POST",
        headers: { "Content-Type": "application/json" },
        body: JSON.stringify({
          productName,
          category,
          description,
          features,
          targetUser,
          goal,
          tone,
          style,
          referenceUrl,
        }),
      });

      const data = await res.json();
      setResult(data.html || "Failed to generate HTML.");
    } catch (err) {
      setResult("An error occurred.");
    } finally {
      setLoading(false);
    }
  };

  // 生成されたHTMLをダウンロード
  // Download the generated HTML as a file
  const downloadHTML = () => {
    const blob = new Blob([result], { type: "text/html" });
    const url = URL.createObjectURL(blob);
    const a = document.createElement("a");
    a.href = url;
    a.download = "landing_page.html";
    a.click();
    URL.revokeObjectURL(url);
  };

  // 新しいウィンドウでプレビュー表示
  // Preview the generated HTML in a new browser window
  const openPreview = () => {
    const preview = window.open("", "_blank");
    if (preview) {
      preview.document.write(result);
      preview.document.close();
    }
  };

  return (
    <main className="min-h-screen bg-gray-900 text-white p-6">
      <div className="max-w-3xl mx-auto space-y-8">
        <h1 className="text-3xl font-bold text-center">LP Generator</h1>

        {/* Form Inputs - 入力項目 */}
        <Input
          label="Product Name"
          value={productName}
          onChange={setProductName}
        />
        <Select
          label="Category"
          value={category}
          onChange={setCategory}
          options={[
            { value: "web", label: "Web Service" },
            { value: "cafe", label: "Cafe / Restaurant" },
            { value: "app", label: "Application" },
            { value: "lesson", label: "Online Course" },
            { value: "other", label: "Other" },
          ]}
        />
        <Textarea
          label="Short Description"
          value={description}
          onChange={setDescription}
        />

        <div>
          <label className="block text-sm mb-1">Key Features (up to 3)</label>
          {features.map((f, i) => (
            <input
              key={i}
              value={f}
              onChange={(e) => {
                const newFeatures = [...features];
                newFeatures[i] = e.target.value;
                setFeatures(newFeatures);
              }}
              placeholder={`Feature ${i + 1}`}
              className="w-full mb-2 p-2 rounded bg-gray-800 border border-gray-600"
            />
          ))}
        </div>

        <Input
          label="Target Audience"
          value={targetUser}
          onChange={setTargetUser}
        />
        <Input label="Call to Action / Goal" value={goal} onChange={setGoal} />
        <Input label="Tone of Voice" value={tone} onChange={setTone} />
        <Input label="Visual Style" value={style} onChange={setStyle} />
        <Input
          label="Reference LP URL (optional)"
          value={referenceUrl}
          onChange={setReferenceUrl}
        />

        {/* Generate Button */}
        <div className="text-center">
          <button
            onClick={generateLP}
            disabled={loading}
            className="px-6 py-3 bg-green-500 rounded hover:bg-green-600 text-black font-semibold disabled:opacity-50"
          >
            {loading ? "Generating..." : "Generate LP"}
          </button>
        </div>

        {/* Result & Actions */}
        {result && (
          <div className="space-y-4">
            {/* 表示結果(プレーンテキスト) */}
            <div className="whitespace-pre-wrap bg-gray-800 border border-gray-600 p-4 rounded max-h-[400px] overflow-y-auto text-sm">
              {result}
            </div>

            {/* プレビュー・ダウンロード */}
            <div className="flex gap-4 justify-center">
              <button
                onClick={openPreview}
                className="px-4 py-2 bg-blue-500 hover:bg-blue-600 text-white rounded"
              >
                Preview
              </button>
              <button
                onClick={downloadHTML}
                className="px-4 py-2 bg-purple-500 hover:bg-purple-600 text-white rounded"
              >
                Download HTML
              </button>
            </div>
          </div>
        )}
      </div>
    </main>
  );
}

// 共通の入力フォームコンポーネント(テキスト)
// Reusable Input Component
function Input({
  label,
  value,
  onChange,
}: {
  label: string;
  value: string;
  onChange: (v: string) => void;
}) {
  return (
    <div>
      <label className="block text-sm mb-1">{label}</label>
      <input
        value={value}
        onChange={(e) => onChange(e.target.value)}
        className="w-full p-2 rounded bg-gray-800 border border-gray-600"
      />
    </div>
  );
}

// 共通のセレクトボックス
// Reusable Select Component
function Select({
  label,
  value,
  onChange,
  options,
}: {
  label: string;
  value: string;
  onChange: (v: string) => void;
  options: { value: string; label: string }[];
}) {
  return (
    <div>
      <label className="block text-sm mb-1">{label}</label>
      <select
        value={value}
        onChange={(e) => onChange(e.target.value)}
        className="w-full p-2 rounded bg-gray-800 border border-gray-600"
      >
        {options.map((opt) => (
          <option key={opt.value} value={opt.value}>
            {opt.label}
          </option>
        ))}
      </select>
    </div>
  );
}

// 共通のテキストエリア
// Reusable Textarea Component
function Textarea({
  label,
  value,
  onChange,
}: {
  label: string;
  value: string;
  onChange: (v: string) => void;
}) {
  return (
    <div>
      <label className="block text-sm mb-1">{label}</label>
      <textarea
        value={value}
        onChange={(e) => onChange(e.target.value)}
        rows={3}
        className="w-full p-2 rounded bg-gray-800 border border-gray-600"
      />
    </div>
  );
}
入力フォームの状態管理
const [productName, setProductName] = useState("");
const [category, setCategory] = useState("web");
const [description, setDescription] = useState("");
const [features, setFeatures] = useState(["", "", ""]);
const [targetUser, setTargetUser] = useState("");
const [goal, setGoal] = useState("");
const [tone, setTone] = useState("");
const [style, setStyle] = useState("");
const [referenceUrl, setReferenceUrl] = useState("");
const [loading, setLoading] = useState(false);
const [result, setResult] = useState("");
簡単な説明:
productName: 商品名category: ジャンル(Web・カフェ・アプリ等)description: 商品の説明(短文)features: 特長を最大3つまで入力するための配列targetUser: 対象ユーザー(例:個人経営者など)goal: LPの目的(例:購入、登録)tone: トンマナ(親しみやすさ・フォーマルなど)style: デザインの雰囲気(かわいい・クールなど)referenceUrl: 参考LPのURLloading: API応答待ちかどうかresult: 生成されたHTML文字列
LP生成処理とAPI呼び出し
const generateLP = async () => {
  setLoading(true);
  setResult("");

  try {
    const res = await fetch("/api/generate-lp", {
      method: "POST",
      headers: { "Content-Type": "application/json" },
      body: JSON.stringify({
        productName,
        category,
        description,
        features,
        targetUser,
        goal,
        tone,
        style,
        referenceUrl,
      }),
    });

    const data = await res.json();
    setResult(data.html || "Failed to generate HTML.");
  } catch (err) {
    setResult("An error occurred.");
  } finally {
    setLoading(false);
  }
};
簡単な説明:
- 入力されたデータを
/api/generate-lpにPOSTで送信します - 成功すれば
resultにHTMLが格納され、失敗時はエラーメッセージを表示します
プレビュー表示処理
const openPreview = () => {
  const preview = window.open("", "_blank");
  if (preview) {
    preview.document.write(result);
    preview.document.close();
  }
};
簡単な説明:
- 生成されたHTMLを新しいタブに表示して、実際のLPをプレビューします
HTMLダウンロード処理
const downloadHTML = () => {
  const blob = new Blob([result], { type: "text/html" });
  const url = URL.createObjectURL(blob);
  const a = document.createElement("a");
  a.href = url;
  a.download = "landing_page.html";
  a.click();
  URL.revokeObjectURL(url);
};
簡単な説明:
Blobを使ってHTMLをファイル化し、a.downloadで静的HTMLとして保存できるようにします
出力結果 + プレビュー・ダウンロードボタン
{result && (
  <div className="space-y-4">
    <div className="whitespace-pre-wrap bg-gray-800 border border-gray-600 p-4 rounded max-h-[400px] overflow-y-auto text-sm">
      {result}
    </div>

    <div className="flex gap-4 justify-center">
      <button
        onClick={openPreview}
        className="px-4 py-2 bg-blue-500 hover:bg-blue-600 text-white rounded"
      >
        Preview
      </button>

      <button
        onClick={downloadHTML}
        className="px-4 py-2 bg-purple-500 hover:bg-purple-600 text-white rounded"
      >
        Download HTML
      </button>
    </div>
  </div>
)}
簡単な説明:
- 生成されたLPのHTMLをそのまま画面に表示
- 「Preview」でブラウザに表示、「Download」でファイル保存できるようにしています
サーバー側の実装(OpenAI API 連携)
LP生成のやりとりは、クライアントから /api/generate-lp にリクエストを送り、
サーバー側で OpenAI の Chat API に中継・レスポンスを返すという流れです。
サーバー側のソースコードの全量は下記になります。
import { NextRequest, NextResponse } from "next/server";

// APIエンドポイント(POST)
// Landing Page を HTML形式で自動生成します
// POST endpoint to generate landing page HTML based on user input

export async function POST(req: NextRequest) {
  try {
    // クライアントからのJSONボディを抽出
    // Extract payload from request
    const {
      productName,
      category,
      description,
      features,
      targetUser,
      goal,
      tone,
      style,
      referenceUrl,
    } = await req.json();

    // 必須項目のバリデーション
    // Validate required fields
    if (!productName || !description || !goal) {
      return NextResponse.json(
        {
          error: "Missing required fields: productName, description, or goal.",
        },
        { status: 400 }
      );
    }

    // OpenAIに送るプロンプトの構築
    // Construct prompt to send to OpenAI API
    const prompt = `You are a professional copywriter and HTML developer.

Your task is to generate a clean, full HTML landing page for the following product.
Structure it based on three main sections: First View, Body, and Closing.

Instructions:

- Output a complete and valid HTML document (include <!DOCTYPE html>, <html>, <head>, and <body>).
- English only.
- Do NOT format the result using Markdown.
- Do NOT add any explanations before or after the code.
- Use only raw HTML as the output.
- Do not include JavaScript or external CSS frameworks.
- Use inline styles or internal <style> for layout and design.
- Use a clear, persuasive tone for copywriting.
- Use semantic HTML elements (header, section, footer, etc.).

Sections to include:

1. First View
   - Headline (h1) with the product name
   - Subheadline with a short summary
   - Prominent CTA button (e.g. "Start Now")

2. Body
   - Detailed product description
   - Bullet point list of key features
   - Optional paragraph about who it’s for

3. Closing
   - Final persuasive message
   - CTA button (again)
   - Optional tagline (e.g. “No credit card required”)

Product Info:

- Product Name: ${productName}
- Category: ${category}
- Description: ${description}
- Key Features: ${features.filter(Boolean).join(" / ") || "None"}
- Target Audience: ${targetUser || "Not specified"}
- Goal or Call-to-Action: ${goal}
- Tone of Voice: ${tone || "Neutral"}
- Visual Style: ${style || "Clean"}
- Reference URL: ${referenceUrl || "None"}

Respond only with the HTML. Do not include markdown code blocks or explanations.`;

    // OpenAI APIを呼び出す
    // Call OpenAI Chat API
    const response = await fetch("https://api.openai.com/v1/chat/completions", {
      method: "POST",
      headers: {
        Authorization: `Bearer ${process.env.OPENAI_API_KEY}`,
        "Content-Type": "application/json",
      },
      body: JSON.stringify({
        model: process.env.OPENAI_MODEL || "gpt-4o",
        messages: [
          {
            role: "system",
            content: "You are a helpful assistant and skilled HTML designer.",
          },
          {
            role: "user",
            content: prompt,
          },
        ],
        temperature: 0.8,
      }),
    });

    const data = await response.json();

    // エラーハンドリング(OpenAIの応答に問題がある場合)
    // Handle OpenAI error response
    if (data.error) {
      console.error("OpenAI API Error:", data.error);
      return NextResponse.json(
        { error: "Failed to generate landing page." },
        { status: 500 }
      );
    }

    // HTML出力を取得
    // Extract the generated HTML content
    const html = data.choices?.[0]?.message?.content || "";

    // クライアントへHTMLを返却
    // Return HTML back to client
    return NextResponse.json({ html });
  } catch (err) {
    // サーバー側の予期せぬエラー対応
    // Catch any server-side error
    console.error("Server Error:", err);
    return NextResponse.json(
      { error: "Internal server error." },
      { status: 500 }
    );
  }
}
基本構成(POSTメソッドでリクエストを受ける)
import { NextRequest, NextResponse } from "next/server";

export async function POST(req: NextRequest) {
  const {
    productName,
    category,
    description,
    features,
    targetUser,
    goal,
    tone,
    style,
    referenceUrl,
  } = await req.json();
簡単な説明:
POSTメソッドに限定した APIエンドポイント を定義しています- クライアント側から送られた、LP生成に必要なパラメータ(商品名、説明、目的など)を
JSONで受け取ります
必須項目チェック
  if (!productName || !description || !goal) {
    return NextResponse.json(
      { error: "Missing required fields: productName, description, or goal." },
      { status: 400 }
    );
  }
簡単な説明:
- 商品名・説明・目的が未入力だった場合は 400エラー を返して処理を中断します
- フロント側のバリデーションをすり抜けた場合のセーフティ
プロンプト生成(ChatGPTに与える命令文)
const prompt = `You are a professional copywriter and HTML developer.

Your task is to generate a clean, full HTML landing page for the following product.
Structure it based on three main sections: First View, Body, and Closing.

Instructions:

- Output a complete and valid HTML document (include <!DOCTYPE html>, <html>, <head>, and <body>).
- English only.
- Do NOT format the result using Markdown.
- Do NOT add any explanations before or after the code.
- Use only raw HTML as the output.
- Do not include JavaScript or external CSS frameworks.
- Use inline styles or internal <style> for layout and design.
- Use a clear, persuasive tone for copywriting.
- Use semantic HTML elements (header, section, footer, etc.).

Sections to include:

1. First View
   - Headline (h1) with the product name
   - Subheadline with a short summary
   - Prominent CTA button (e.g. "Start Now")

2. Body
   - Detailed product description
   - Bullet point list of key features
   - Optional paragraph about who it’s for

3. Closing
   - Final persuasive message
   - CTA button (again)
   - Optional tagline (e.g. “No credit card required”)

Product Info:

- Product Name: ${productName}
- Category: ${category}
- Description: ${description}
- Key Features: ${features.filter(Boolean).join(" / ") || "None"}
- Target Audience: ${targetUser || "Not specified"}
- Goal or Call-to-Action: ${goal}
- Tone of Voice: ${tone || "Neutral"}
- Visual Style: ${style || "Clean"}
- Reference URL: ${referenceUrl || "None"}

Respond only with the HTML. Do not include markdown code blocks or explanations.`;
簡単な説明:
- ChatGPT に送る命令文(プロンプト)を動的に生成しています
- 商品情報を埋め込み、構成や出力形式を詳細に指定することでクオリティの高いHTMLを生成できます。
- もっといいプロンプトを送ることで、よりよいHTMLを生成できますので、カスタマイズしてみてください。
OpenAI API にリクエストを送信
const response = await fetch("https://api.openai.com/v1/chat/completions", {
    method: "POST",
    headers: {
      Authorization: `Bearer ${process.env.OPENAI_API_KEY}`,
      "Content-Type": "application/json",
    },
    body: JSON.stringify({
      model: process.env.OPENAI_MODEL || "gpt-4.1-mini",
      messages: [
        {
          role: "system",
          content: process.env.SYSTEM_PROMPT || "You are a helpful assistant.",
        },
        {
          role: "user",
          content: prompt,
        },
      ],
      temperature: 0.8,
    }),
  });

  const data = await response.json();
簡単な説明:
- OpenAI の API(Chat Completions)に HTTP POST リクエスト を送ります
model,API_KEY,SYSTEM_PROMPTなどは.envから読み込んでいますmessages配列には system role(性格)と user role(命令文)をセット
応答をチェックして返す or エラー処理
  if (data.error) {
    console.error("OpenAI API Error:", data.error);
    return NextResponse.json(
      { error: "Failed to generate landing page." },
      { status: 500 }
    );
  }

  const html = data.choices?.[0]?.message?.content || "";

  return NextResponse.json({ html });
}
簡単な説明:
- ChatGPTの応答が エラーだった場合 → ログ出力 + 500エラーを返す
- 正常応答なら HTMLを
jsonでクライアントに返します(htmlキーに格納)
【おまけ】注意点
APIキーは絶対に公開しないように .env で管理するようにしてください。
仮に、APIキーが漏れてしまった場合は、OpenAIのダッシュボードからAPIキーを削除するようにしましょう。
モデル名は環境変数化しているので、用途に応じて差し替えをしてください。
モデルによってかかる金額が変わるため、モデル選定には気を付けるようにしてください。
プロンプトにより、生成されるものが大きく変わるため、プロンプトをぜひカスタマイズしてみてください。
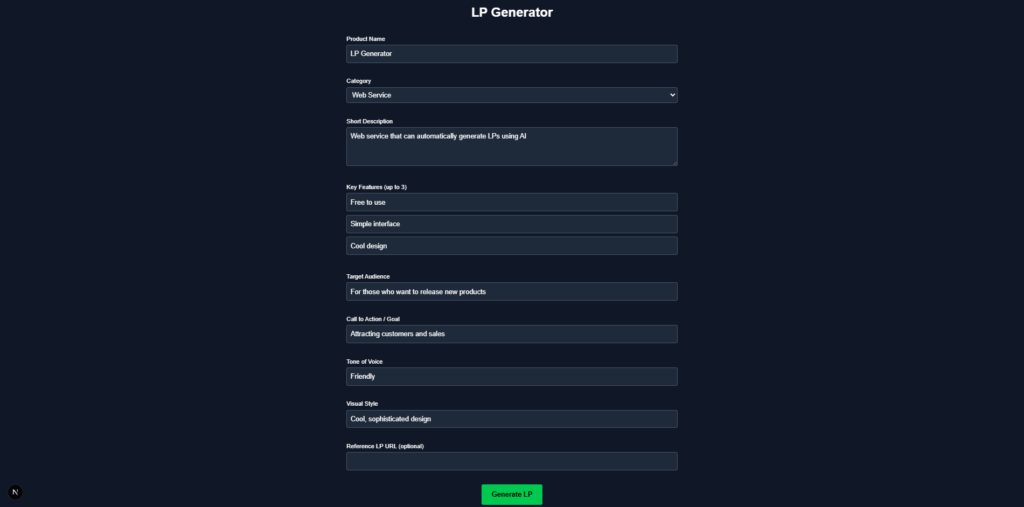
動作確認
ここまでできたら、一度動作確認してみましょう!
下記のような画面がでてくるので、入力フォームに情報を入れて生成してみてください!
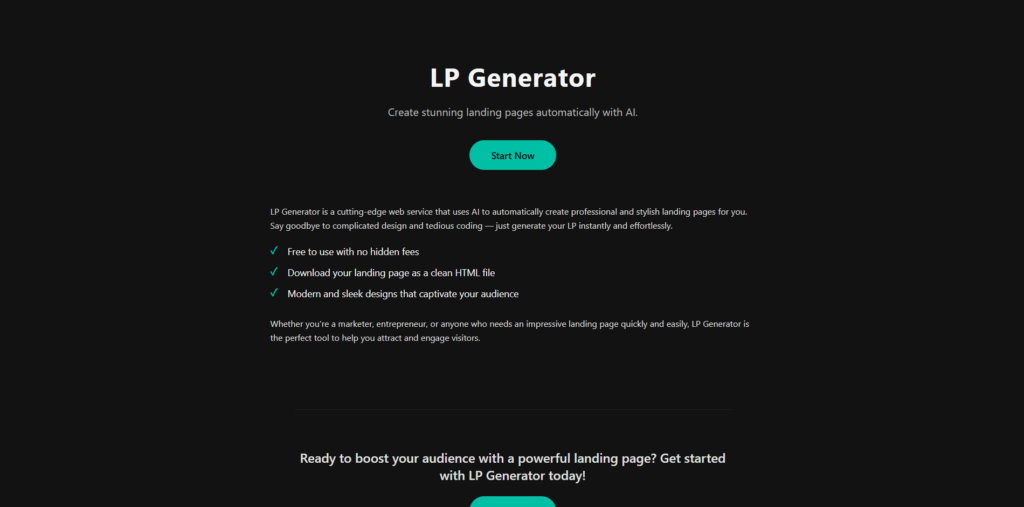
こんな感じのLPが生成されました!!まあ、gpt-4oで生成したのですが、妥協点って感じですかね。
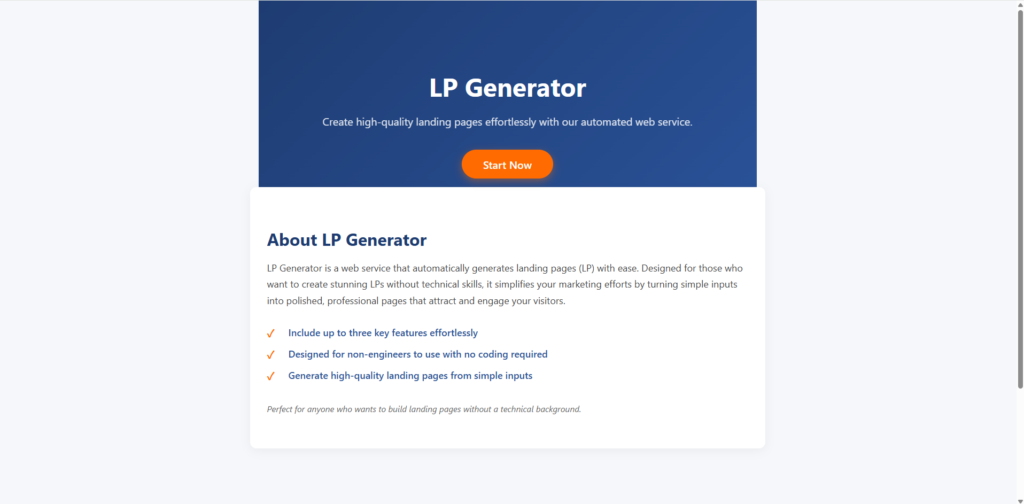
gpt-4.1-miniで生成するとこんな感じで生成されました!
プロンプトをもう少しいい感じにしてあげたり、複数回対応することで、もう少しクオリティの高いものができるかなと思います。(私にはこれが限界でした。。。)
テンプレート販売のご案内
本記事で紹介した LP自動生成アプリは、商用利用も可能なテンプレートとして販売しています。
なぜテンプレートを販売するのか
以下のようなニーズを感じている方向けにご用意しました。
- 「手順どおりやっても環境構築がうまくいかない…」
- 「とにかく動くサンプルから試したい」
- 「ブログを見て便利そうだったので、応援・寄付の意味も込めて購入したい」
開発に慣れていない方でも、最小限の手間でサクッと起動して試せる構成にしてあります。
テンプレートの活用例(カスタマイズアイデア)
このテンプレートは、個人開発や学習用途にぴったりです。
たとえば次のような改造・拡張をしてみるのもおすすめです。
- 生成されたLPに画像やロゴを挿入できるようにする
- LPの多言語対応(日本語・英語切り替えなど)を追加する
- 生成結果の保存・管理画面を作る(過去のLPの履歴を残す)
- そのままホスティングできる機能を作成する
- プロンプトやデザインのテンプレートを選べるUIを追加する
プログラミング初学者向けに「課題ベース」で触ってみるのも良い練習になります。
テンプレートに含まれる内容
テンプレートには、今回紹介したプロジェクトのすべてのソースコードが含まれています。
そのため、自分でプロジェクトを一から作成・設定する必要はなく、すぐに起動可能です。
- Next.js(App Router)による LP入力フォームとプレビューUI
- OpenAI API連携済みのサーバー側実装
- コメント付きで読みやすいソースコード
- Tailwind CSS によるシンプルで改良しやすいスタイル
- Docker 起動に対応した構成ファイル(Dockerfile, docker-compose.yml)
本記事で紹介しているテンプレートを販売中!
このチャットボットUIテンプレートは、複数のプラットフォームで販売中です。
「まずは動くものを試したい」「環境構築なしですぐに使いたい」「コード全体を確認したい」
そんな方にぴったりの構成になっています。
まとめ
今回は、OpenAI API と Next.js を使って
シンプルな LP(ランディングページ)自動生成アプリを構築する方法をご紹介しました。
ポイントを振り返ると:
- Chat Completions API を使えば、わずかなプロンプトで高品質な HTML を生成可能
- Next.js App Router + Tailwind CSS により、構造がシンプルでカスタマイズしやすい
- テンプレートを活用すれば、環境構築の手間を省き、すぐに試せる状態からスタート可能
このテンプレートは、
プロダクトの紹介LPを素早く試作したい場合や、
LPの自動化を体験してみたい開発者・デザイナーの方に特におすすめです。
プロンプトやデザインを調整して、
自分だけのLPジェネレーターに進化させるベースとして、ぜひ活用してみてください。だけでなく、独自の機能追加やUIカスタマイズを行うベースとしてもおすすめです。
本記事で紹介しているテンプレートを販売中!
このチャットボットUIテンプレートは、複数のプラットフォームで販売中です。
「まずは動くものを試したい」「環境構築なしですぐに使いたい」「コード全体を確認したい」
そんな方にぴったりの構成になっています。