3Dアプリ開発で避けて通れないのが オブジェクトの「位置 (Position)」「回転 (Rotation)」「スケール (Scale)」の操作 です。
React Three Fiber(R3F)を使えば、React のコンポーネントベースの仕組みを活かしながら、直感的に 3D シーンを構築できます。
本記事では、React Three Fiber × TypeScript を使って、3Dオブジェクトの Transform を自在に操る方法を徹底解説!
実際のコードとともに 「Position, Rotation, Scale」の基礎から応用まで を学んでいきます。
これを読めば、3Dオブジェクトの制御をスムーズに理解し、実装に活かせる はずです!
それでは、さっそく Transform の基本概念 から見ていきましょう! 🚀
TypeScript x React Three Fiberのレッスンや作品は、今後もどんどん作成していきます!
YouTubeで告知致しますので、ぜひYouTubeのチャンネル登録をして通知をお待ちください!
📺 YouTubeを見る:こちらのリンクから視聴できます。

React Three Fiberで何ができるのか知りたい方は、下記を参考にしてみてください!
簡単にできる作品を用意しております!
- 静電容量無接点方式ならではのスコスコとした打鍵感!
- REALFORCE初のワイヤレス対応!有線接続も可能!
- HHKBと違って、日本語配列に癖がなく誰でも使いやすい!
- サムホイールが搭載、横スクロールがかなり楽に!
- 静音性能も高く、静かで快適!
- スクロールは、高速モードとラチェットモードを使い分け可能!
技術要素の紹介:このプロジェクトで使うツールとライブラリ
利用するツールやライブラリは、ご自身の使いやすいものに変更しても良いですが、このプロジェクトではこちらを前提に説明をしていきます。
また、環境構築は、「ViteでTypeScript x React Three Fiberの3D環境を構築」で解説しておりますので、そちらをご確認いただければと思います。

- VSCode
-
- Microsoftが提供する無料のコードエディタです。
- VSCodeでなくても良いですが、多くの拡張機能がありますので、おすすめです。
- ESLintやPrettierを入れるのもおすすめです。
- Node.js
-
- ChromeのV8 JavaScriptエンジン上に構築されたJavaScriptランタイムです。
- ブラウザの外でJavaScriptコードを実行することができます。
- こちらは既にインストールされている前提で説明しますので、「https://nodejs.org/ja」からダウンロードしておいてください。
※長期安定版であるLTSバージョンをダウンロードすることをお勧めします。
- Vite
-
- モダンなウェブプロジェクトのためのビルドツールです。 速く、軽量という特徴があります。
- 以前まで使われていた「CRA(create-react-app)」は、公式HPでも記載がなく、古い技術になってしまいました。
- これからは、Reactでアプリを作る際は、Viteが最良の選択肢となるはずです。
- React
-
- UI(ユーザーインターフェース)を構築するためのJavaScriptライブラリです。Facebookが開発し、現在も多くのウェブアプリで使われています。
- Three.js
-
- 3Dグラフィックスを簡単に作成するためのJavaScriptライブラリです。WebGLの複雑な操作を抽象化し、直感的な3D開発を可能にします。
- 3Dグラフィックスを簡単に作成でき、WebGLの直接操作よりも扱いやすいです。
- React Three Fiber
-
- Three.jsをReactで扱えるようにするためのライブラリです。Reactのコンポーネント構造とThree.jsの3Dエンジンを融合します。
- Reactの開発スタイルでThree.jsを扱えるため、直感的かつ効率的な開発が可能になります。
- React Three Drei
-
- React Three Fiberのための便利なユーティリティコンポーネント集です。よく使われるThree.jsの機能を簡単に追加できます。
- 複雑なThree.jsの機能を短いコードで実現できるため、学習コストを削減できます。
🚀 AxesHelperで3D空間の基準軸を可視化しよう
2Dとは違い3D空間には、x,y,zの3つの軸があるというのが重要なポイントになります。
- x:右方向
- y:上方向
- z:前方向(自分に向かう方向)
3Dオブジェクトを配置・移動・回転させる際、座標の基準が分からなくなることはよくあります。
そのようなときに便利なのが AxesHelper です。
✅ AxesHelperとは?
AxesHelper は、3Dシーン内の座標軸を視覚的に表示するヘルパーオブジェクト です。
3D空間における X軸(赤), Y軸(緑), Z軸(青) を色分けして描画し、オブジェクトの向きを直感的に把握できます。
「オブジェクトの向きを確認したいとき」や「回転させる方法を把握したいとき」などに役に立ちます!
🎯 React Three Fiberでの利用方法!!
React Three Fiber では、axesHelper コンポーネントを Canvas 内に直接配置するだけで簡単に使用できます。
meshの中にaxesHelper コンポーネントを入れることもできて、その場合はmeshの向きなどがわかるようになります。
import { OrbitControls } from "@react-three/drei";
import { Canvas } from "@react-three/fiber";

// === メインアプリコンポーネント ===
const App = () => {
  return (
    <>
      <Canvas>
        <ambientLight intensity={1} />
        <directionalLight position={[10, 10, 10]} intensity={0.5} />
        <OrbitControls />
        {/* ヘルパー */}
        <axesHelper />
      </Canvas>
    </>
  );
};

export default App;
このコードを実行すると、以下のように ワールド座標の基準軸 が表示されます:
- X軸(赤) → 水平方向(左右)
- Y軸(緑) → 垂直方向(上下)
- Z軸(青) → 奥行き方向(前後)
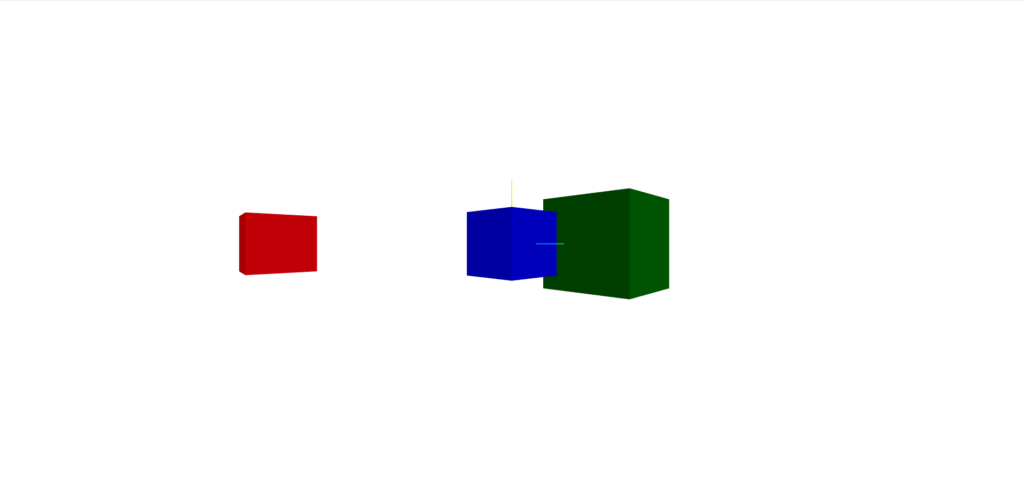
🚀 Position(座標)を使って3Dオブジェクトを移動させよう
3D空間では、オブジェクトの位置を制御するために position プロパティを使用します。position を設定することで、オブジェクトを X・Y・Z軸上の好きな場所に配置 することができます。
positionは、本来3Dベクトルですが、React Three Fiberのおかげで数値の配列として渡すことが可能になっています。
内部的には、React Three Fiberが配列をVector3オブジェクトに変換して動作している形です。
✅ position とは?
position={[x, y, z]} で、オブジェクトのワールド座標を指定 できます。
この座標は Three.jsに基づいているため、下記となります。
基本の座標系
- X軸 (赤) → 左 (-) / 右 (+)
- Y軸 (緑) → 下 (-) / 上 (+)
- Z軸 (青) → 手前 (+) / 奥 (-)
🎯 React Three Fiberでの利用方法!!
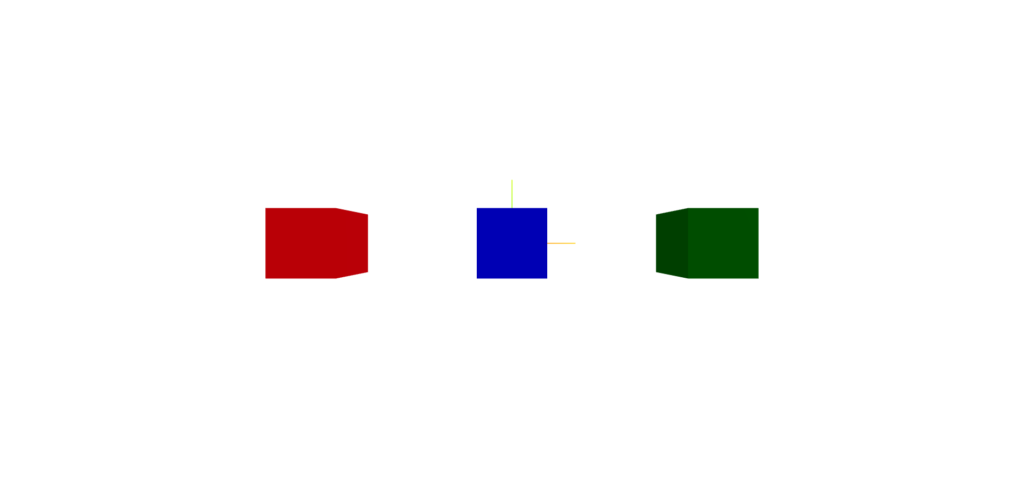
x軸で移動させる
例えば、下記のようにpositionを設定すると、オブジェクトが横並びになります。
「X軸 (赤) → 左 (-) / 右 (+)」なので、左に赤、右に緑が表示されていると思います。
import { OrbitControls } from "@react-three/drei";
import { Canvas } from "@react-three/fiber";

// === メインアプリコンポーネント ===
const App = () => {
  return (
    <>
      <Canvas>
        <ambientLight intensity={1} />
        <directionalLight position={[10, 10, 10]} intensity={0.5} />
        {/* ヘルパー */}
        <axesHelper />
        <OrbitControls />

        <mesh position={[0, 0, 0]}>
          <boxGeometry />
          <meshStandardMaterial color="blue" />
        </mesh>

        <mesh position={[-3, 0, 0]}>
          <boxGeometry />
          <meshStandardMaterial color="red" />
        </mesh>

        <mesh position={[3, 0, 0]}>
          <boxGeometry />
          <meshStandardMaterial color="green" />
        </mesh>
      </Canvas>
    </>
  );
};

export default App;
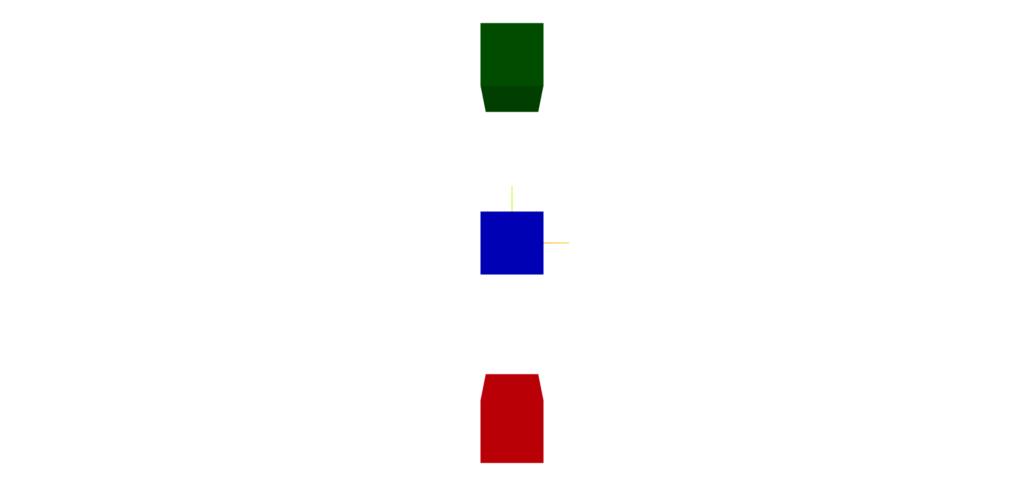
y軸で移動させる
下記のようにpositionを設定すると、オブジェクトが縦並びになります。
「Y軸 (緑) → 下 (-) / 上 (+)」なので、下に赤、上に緑が表示されていると思います。
import { OrbitControls } from "@react-three/drei";
import { Canvas } from "@react-three/fiber";

// === メインアプリコンポーネント ===
const App = () => {
  return (
    <>
      <Canvas>
        <ambientLight intensity={1} />
        <directionalLight position={[10, 10, 10]} intensity={0.5} />
        {/* ヘルパー */}
        <axesHelper />
        <OrbitControls />

        <mesh position={[0, 0, 0]}>
          <boxGeometry />
          <meshStandardMaterial color="blue" />
        </mesh>

        <mesh position={[0, -3, 0]}>
          <boxGeometry />
          <meshStandardMaterial color="red" />
        </mesh>

        <mesh position={[0, 3, 0]}>
          <boxGeometry />
          <meshStandardMaterial color="green" />
        </mesh>
      </Canvas>
    </>
  );
};

export default App;
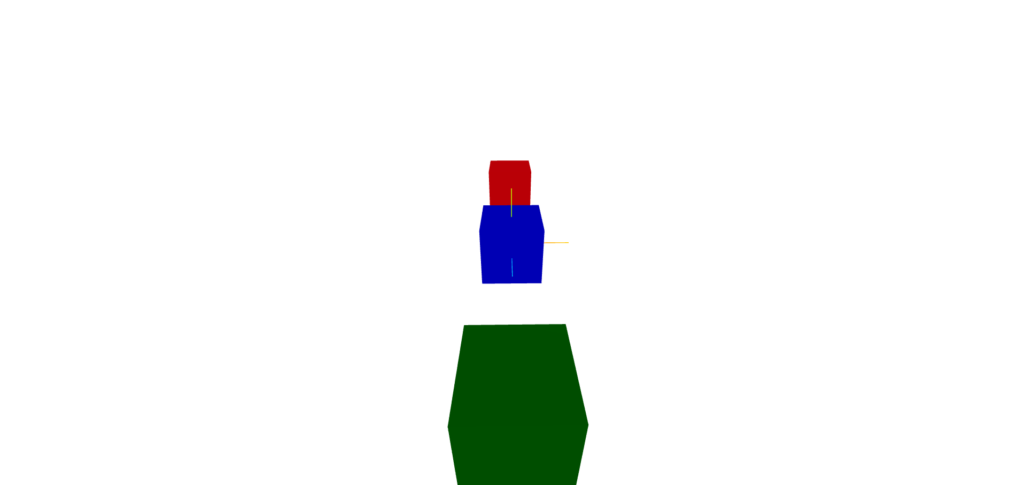
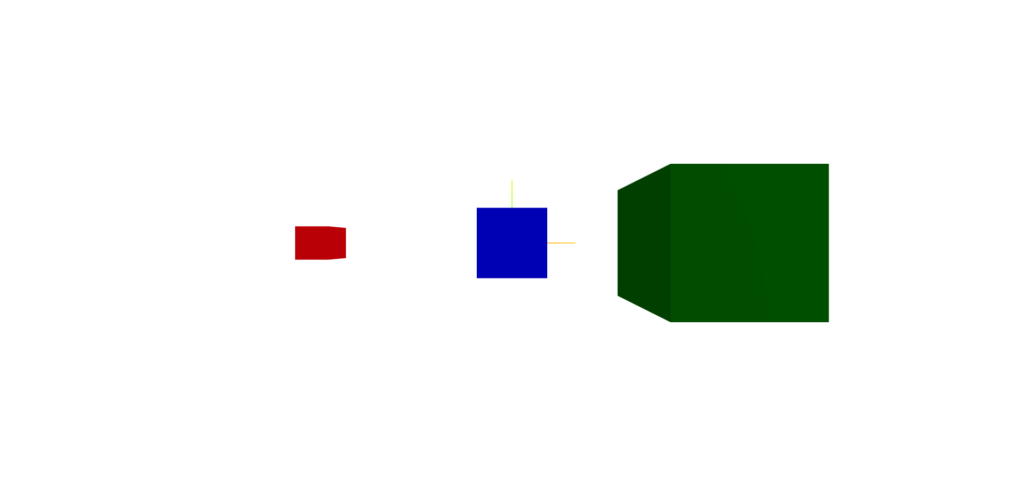
z軸で移動させる
下記のようにpositionを設定すると、オブジェクトが奥に表示されるようになります。
「Z軸 (青) → 手前 (+) / 奥 (-)」なので、手前に緑、奥に赤が表示されるはずですね。
import { OrbitControls } from "@react-three/drei";
import { Canvas } from "@react-three/fiber";

// === メインアプリコンポーネント ===
const App = () => {
  return (
    <>
      <Canvas>
        <ambientLight intensity={1} />
        <directionalLight position={[10, 10, 10]} intensity={0.5} />
        {/* ヘルパー */}
        <axesHelper />
        <OrbitControls />

        <mesh position={[0, 0, 0]}>
          <boxGeometry />
          <meshStandardMaterial color="blue" />
        </mesh>

        <mesh position={[0, 0, -3]}>
          <boxGeometry />
          <meshStandardMaterial color="red" />
        </mesh>

        <mesh position={[0, 0, 3]}>
          <boxGeometry />
          <meshStandardMaterial color="green" />
        </mesh>
      </Canvas>
    </>
  );
};

export default App;
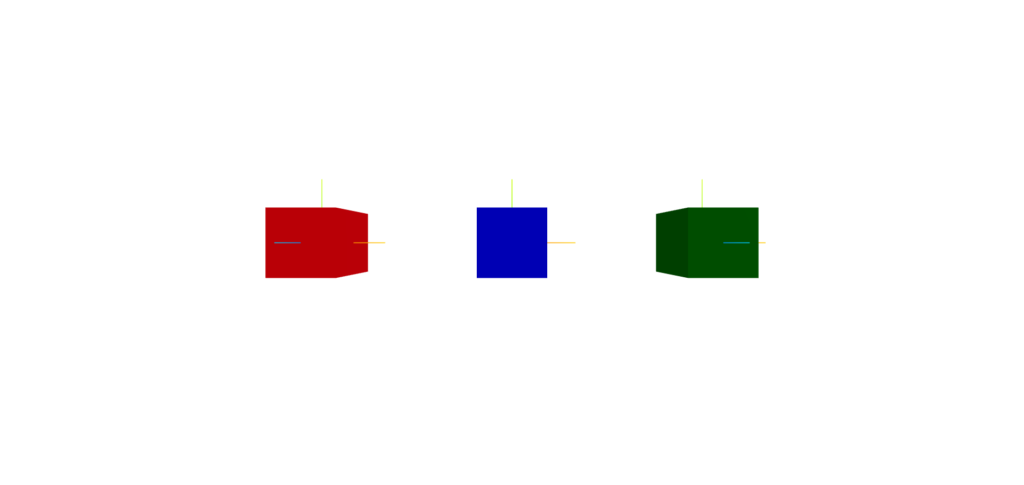
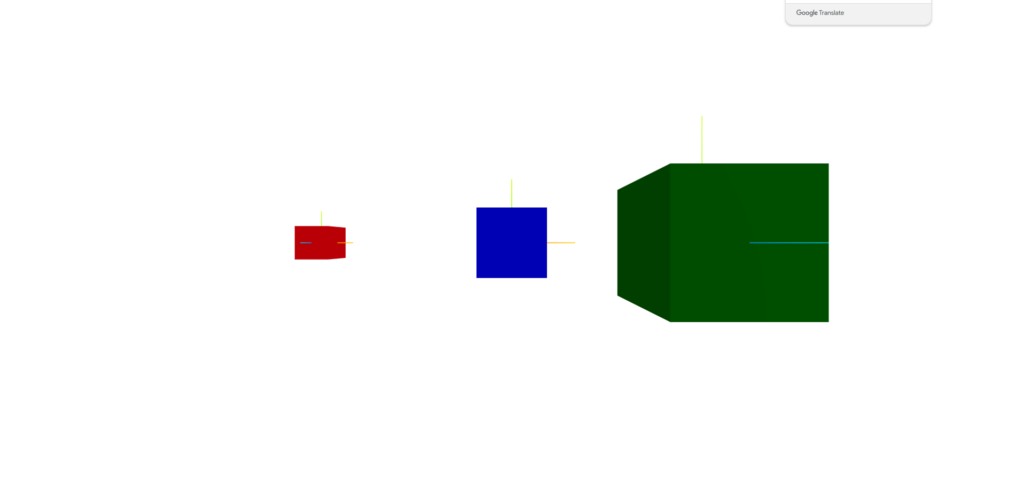
🚀Scale(スケール)を使って3Dオブジェクトのサイズを変更しよう
3Dオブジェクトの大きさを変更したい場合、scale プロパティを使います。scale={[x, y, z]} を指定すると、オブジェクトの各軸(X, Y, Z)の拡大・縮小を個別に制御できます。
✅ scale とは?
scale は オブジェクトの各軸の拡大・縮小比を設定するプロパティ です。
初期値は [1, 1, 1] で、これがオブジェクトのデフォルトのサイズになります。
scale={[1, 1, 1]}→ 等倍(デフォルトの大きさ)scale={[2, 2, 2]}→ 2倍に拡大scale={[0.5, 0.5, 0.5]}→ 半分の大きさscale={[1, 2, 1]}→ Y軸方向だけ2倍に拡大(縦に伸びる)
🎯 React Three Fiberでの利用方法!!
scale={[x, y, z]}でサイズを変える
以下のコードでは、異なる scale を設定したボックスを配置しています。
赤=青/2のサイズになるはずです。緑=青*2のサイズになります。
import { OrbitControls } from "@react-three/drei";
import { Canvas } from "@react-three/fiber";

// === メインアプリコンポーネント ===
const App = () => {
  return (
    <>
      <Canvas>
        <ambientLight intensity={1} />
        <directionalLight position={[10, 10, 10]} intensity={0.5} />
        {/* ヘルパー */}
        <axesHelper />
        <OrbitControls />

        <mesh position={[0, 0, 0]} scale={[1, 1, 1]}>
          <boxGeometry />
          <meshStandardMaterial color="blue" />
        </mesh>

        <mesh position={[-3, 0, 0]} scale={[0.5, 0.5, 0.5]}>
          <boxGeometry />
          <meshStandardMaterial color="red" />
        </mesh>

        <mesh position={[3, 0, 0]} scale={[2, 2, 2]}>
          <boxGeometry />
          <meshStandardMaterial color="green" />
        </mesh>
      </Canvas>
    </>
  );
};

export default App;
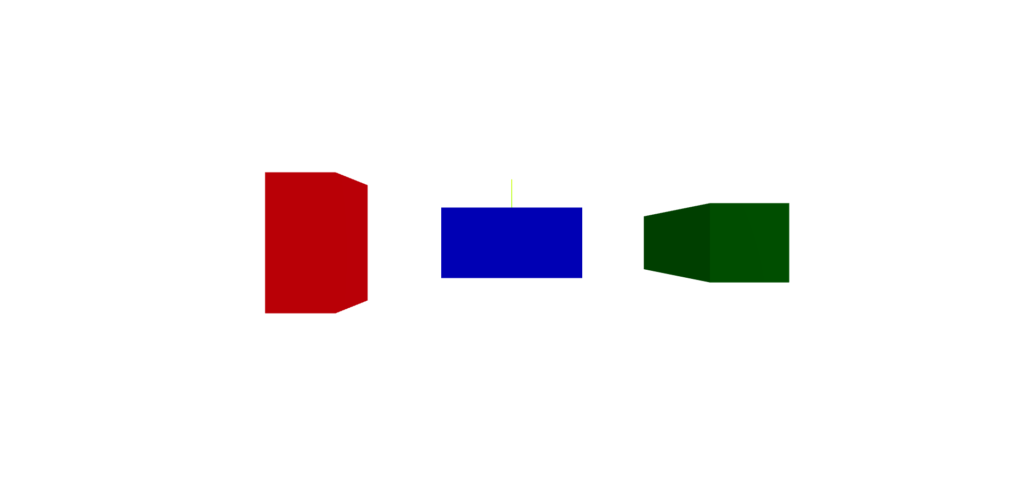
scale-[x, y, z]でサイズを変える
React Three Fiberは、scale-xなどでもサイズを変えることが可能です。
青は横幅、赤は縦幅、緑は奥行を変えてみます。
import { OrbitControls } from "@react-three/drei";
import { Canvas } from "@react-three/fiber";

// === メインアプリコンポーネント ===
const App = () => {
  return (
    <>
      <Canvas>
        <ambientLight intensity={1} />
        <directionalLight position={[10, 10, 10]} intensity={0.5} />
        {/* ヘルパー */}
        <axesHelper />
        <OrbitControls />

        <mesh position={[0, 0, 0]} scale-x={2}>
          <boxGeometry />
          <meshStandardMaterial color="blue" />
        </mesh>

        <mesh position={[-3, 0, 0]} scale-y={2}>
          <boxGeometry />
          <meshStandardMaterial color="red" />
        </mesh>

        <mesh position={[3, 0, 0]} scale-z={2}>
          <boxGeometry />
          <meshStandardMaterial color="green" />
        </mesh>
      </Canvas>
    </>
  );
};

export default App;
🚀Rotation(回転)を使って3Dオブジェクトを回転させよう
3D空間では、オブジェクトを回転させることで、さまざまな角度から表示したり、動的な演出を加えたりできます。
React Three Fiber では、rotation={[x, y, z]} を指定することで、オブジェクトの X・Y・Z軸それぞれの回転角度 を設定できます。
✅ rotation とは?
rotation={[x, y, z]} は、オブジェクトの回転角度をラジアン単位で指定するプロパティ です。
回転の基準となるのは、オブジェクトのローカル座標軸 です。
- X軸回転 (
rotation={[Math.PI / 4, 0, 0]}) → 前後に傾く - Y軸回転 (
rotation={[0, Math.PI / 4, 0]}) → 左右に回転 - Z軸回転 (
rotation={[0, 0, Math.PI / 4]}) → 時計回り / 反時計回りに傾く
👉 回転角度はデフォルトでラジアン単位で指定する必要があります。
1ラジアン = 約 57.3度(Math.PI = 180度)
React Three Fiberは、Math.PI以外にもTHREE.MathUtils.degToRadでも定義が可能です。
Math.PI / 4→ 45°THREE.MathUtils.degToRad(45)→ 45°
🎯 React Three Fiberでの利用方法!!
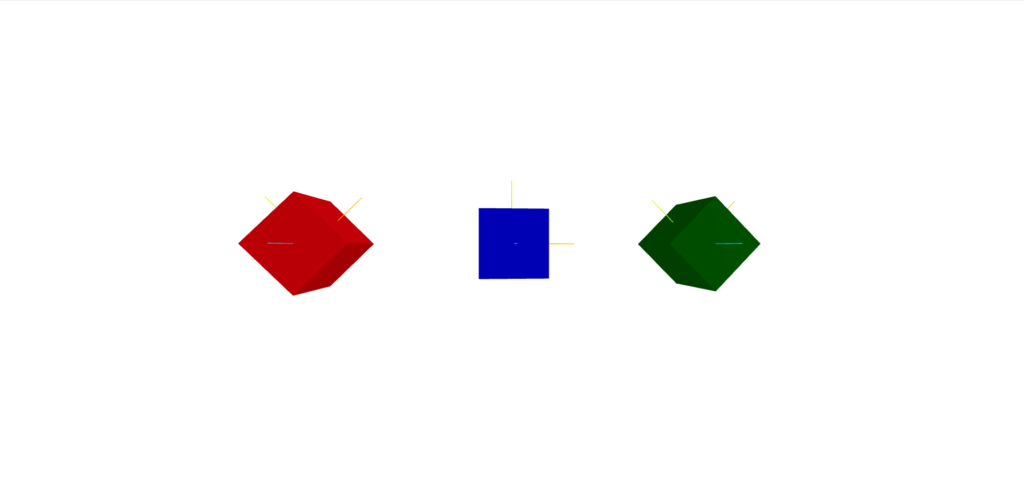
回転なし
まず回転無しの状態を表示しておきます。
[0, 0, 0]を設定しておけば、デフォルト状態となります。
import { OrbitControls } from "@react-three/drei";
import { Canvas } from "@react-three/fiber";
import * as THREE from "three";

// === メインアプリコンポーネント ===
const App = () => {
  return (
    <>
      <Canvas>
        <ambientLight intensity={1} />
        <directionalLight position={[10, 10, 10]} intensity={0.5} />
        <OrbitControls />

        <mesh position={[0, 0, 0]} rotation={[0, 0, 0]}>
          <boxGeometry />
          <meshStandardMaterial color="blue" />
          <axesHelper />
        </mesh>

        <mesh position={[-3, 0, 0]} rotation={[0, 0, 0]}>
          <boxGeometry />
          <meshStandardMaterial color="red" />
          <axesHelper />
        </mesh>

        <mesh position={[3, 0, 0]} rotation={[0, 0, 0]}>
          <boxGeometry />
          <meshStandardMaterial color="green" />
          <axesHelper />
        </mesh>
      </Canvas>
    </>
  );
};

export default App;
x軸で回転させる
例えば、下記のようにrotationを設定すると、オブジェクトが前後に傾きます。
import { OrbitControls } from "@react-three/drei";
import { Canvas } from "@react-three/fiber";
import * as THREE from "three";

// === メインアプリコンポーネント ===
const App = () => {
  return (
    <>
      <Canvas>
        <ambientLight intensity={1} />
        <directionalLight position={[10, 10, 10]} intensity={0.5} />
        <OrbitControls />

        <mesh position={[0, 0, 0]} rotation={[0, 0, 0]}>
          <boxGeometry />
          <meshStandardMaterial color="blue" />
          <axesHelper />
        </mesh>

        <mesh
          position={[-3, 0, 0]}
          rotation={[THREE.MathUtils.degToRad(45), 0, 0]}
        >
          <boxGeometry />
          <meshStandardMaterial color="red" />
          <axesHelper />
        </mesh>

        <mesh position={[3, 0, 0]} rotation={[Math.PI / 4, 0, 0]}>
          <boxGeometry />
          <meshStandardMaterial color="green" />
          <axesHelper />
        </mesh>
      </Canvas>
    </>
  );
};

export default App;
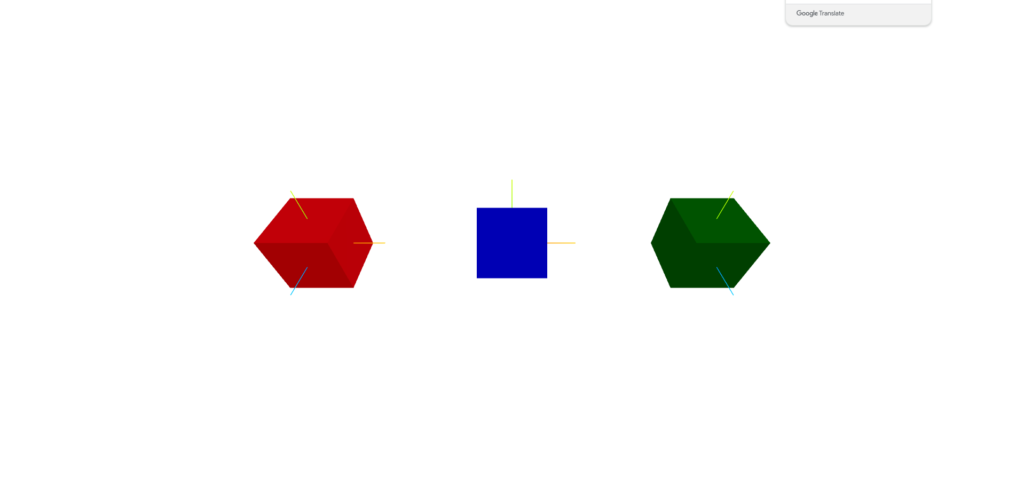
y軸で回転させる
例えば、下記のようにrotationを設定すると、オブジェクトが左右に回転します。
import { OrbitControls } from "@react-three/drei";
import { Canvas } from "@react-three/fiber";
import * as THREE from "three";

// === メインアプリコンポーネント ===
const App = () => {
  return (
    <>
      <Canvas>
        <ambientLight intensity={1} />
        <directionalLight position={[10, 10, 10]} intensity={0.5} />
        <OrbitControls />

        <mesh position={[0, 0, 0]} rotation={[0, 0, 0]}>
          <boxGeometry />
          <meshStandardMaterial color="blue" />
          <axesHelper />
        </mesh>

        <mesh
          position={[-3, 0, 0]}
          rotation={[0, THREE.MathUtils.degToRad(45), 0]}
        >
          <boxGeometry />
          <meshStandardMaterial color="red" />
          <axesHelper />
        </mesh>

        <mesh position={[3, 0, 0]} rotation={[0, Math.PI / 4, 0]}>
          <boxGeometry />
          <meshStandardMaterial color="green" />
          <axesHelper />
        </mesh>
      </Canvas>
    </>
  );
};

export default App;
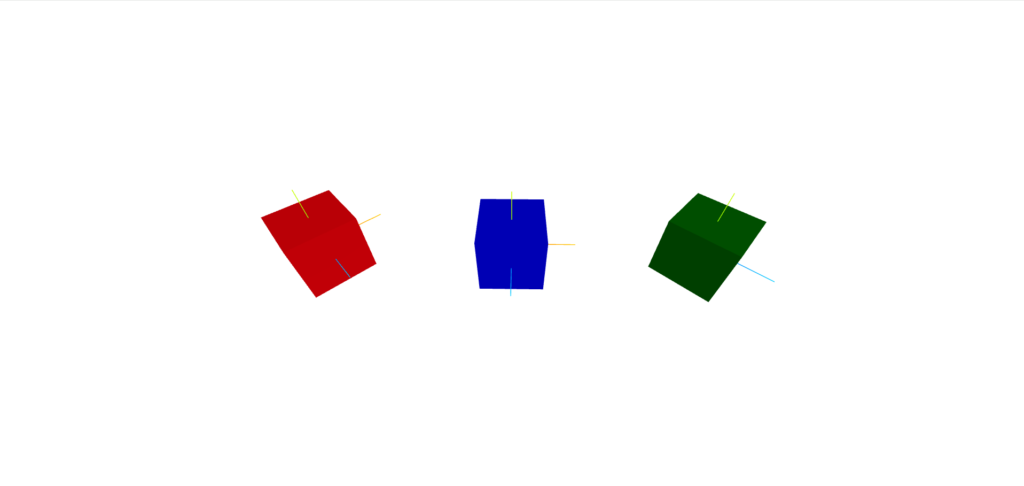
z軸で回転させる
例えば、下記のようにrotationを設定すると、オブジェクトが時計周りに回転します。
import { OrbitControls } from "@react-three/drei";
import { Canvas } from "@react-three/fiber";
import * as THREE from "three";

// === メインアプリコンポーネント ===
const App = () => {
  return (
    <>
      <Canvas>
        <ambientLight intensity={1} />
        <directionalLight position={[10, 10, 10]} intensity={0.5} />
        <OrbitControls />

        <mesh position={[0, 0, 0]} rotation={[0, 0, 0]}>
          <boxGeometry />
          <meshStandardMaterial color="blue" />
          <axesHelper />
        </mesh>

        <mesh
          position={[-3, 0, 0]}
          rotation={[0, 0, THREE.MathUtils.degToRad(45)]}
        >
          <boxGeometry />
          <meshStandardMaterial color="red" />
          <axesHelper />
        </mesh>

        <mesh position={[3, 0, 0]} rotation={[0, 0, Math.PI / 4]}>
          <boxGeometry />
          <meshStandardMaterial color="green" />
          <axesHelper />
        </mesh>
      </Canvas>
    </>
  );
};

export default App;
🚀 Group を使って複数のオブジェクトをまとめて制御しよう
3Dシーンを作るとき、複数のオブジェクトをグループ化して、一括で移動・回転・スケール変更したい ことがあります。
React Three Fiber では、<group> コンポーネントを使うことで、複数のオブジェクトを1つのまとまりとして管理 できます。
✅ group とは?
<group> は Three.js の THREE.Group をラップしたコンポーネント で、子要素の位置 (position)、回転 (rotation)、スケール (scale) をまとめて制御 できます。
📌 グループの特徴
<group>にpositionを設定すると、すべての子要素の基準点が変わる<group>にrotationを設定すると、すべての子要素が一緒に回転する<group>にscaleを設定すると、すべての子要素のサイズが変わる
🎯 React Three Fiberでの利用方法!!
デフォルト状態
groupでscaleを[1, 1, 1]としています。これは、子要素のデフォルトのままとなります。
- 青
- position:[0, 0, 0]
- scale:[1, 1, 1]
- rotation:[0, 0, 0]
- 赤
- position:[-3, 0, 0]
- scale:[0.5, 0.5, 0.5]
- rotation:[0, 0, 0]
- 緑
- position:[3, 0, 0]
- scale:[2, 2, 2]
- rotation:[0, 0, 0]
import { OrbitControls } from "@react-three/drei";
import { Canvas } from "@react-three/fiber";
// === メインアプリコンポーネント ===
const App = () => {
  return (
    <>
      <Canvas>
        <ambientLight intensity={1} rotation={[0, 0, 0]} />
        <directionalLight position={[10, 10, 10]} intensity={0.5} />
        <OrbitControls />
        <group scale={[1, 1, 1]}>
          <mesh position={[0, 0, 0]} scale={[1, 1, 1]} rotation={[0, 0, 0]}>
            <boxGeometry />
            <meshStandardMaterial color="blue" />
            <axesHelper />
          </mesh>

          <mesh
            position={[-3, 0, 0]}
            scale={[0.5, 0.5, 0.5]}
            rotation={[0, 0, 0]}
          >
            <boxGeometry />
            <meshStandardMaterial color="red" />
            <axesHelper />
          </mesh>

          <mesh position={[3, 0, 0]} scale={[2, 2, 2]} rotation={[0, 0, 0]}>
            <boxGeometry />
            <meshStandardMaterial color="green" />
            <axesHelper />
          </mesh>
        </group>
      </Canvas>
    </>
  );
};

export default App;
scale={[3, 3, 3]}に変更
グループに scale={[3, 3, 3]} を適用すると、下記のようになります。
- すべてのオブジェクトのスケールが 3 倍に拡大 される
- 各オブジェクトの
positionも 3 倍される(相対的な距離が拡大)
つまり、下記と同様なイメージです。
- 青
- position:[0, 0, 0] * 3 = [0, 0, 0]
- scale:[1, 1, 1] * 3 = [3, 3, 3]
- rotation:[0, 0, 0] * 3 = [0, 0, 0]
- 赤
- position:[-3, 0, 0] * 3 = [-9, 0, 0]
- scale:[0.5, 0.5, 0.5] * 3 = [1.5, 1.5, 1.5]
- rotation:[0, 0, 0] * 3 = [0, 0, 0]
- 緑
- position:[3, 0, 0] * 3 = [9, 0, 0]
- scale:[2, 2, 2] * 3 = [6, 6, 6]
- rotation:[0, 0, 0] * 3 = [0, 0, 0]
import { OrbitControls } from "@react-three/drei";
import { Canvas } from "@react-three/fiber";
// === メインアプリコンポーネント ===
const App = () => {
  return (
    <>
      <Canvas>
        <ambientLight intensity={1} rotation={[0, 0, 0]} />
        <directionalLight position={[10, 10, 10]} intensity={0.5} />
        <OrbitControls />
        <group scale={[3, 3, 3]}>
          <mesh position={[0, 0, 0]} scale={[1, 1, 1]} rotation={[0, 0, 0]}>
            <boxGeometry />
            <meshStandardMaterial color="blue" />
            <axesHelper />
          </mesh>

          <mesh
            position={[-3, 0, 0]}
            scale={[0.5, 0.5, 0.5]}
            rotation={[0, 0, 0]}
          >
            <boxGeometry />
            <meshStandardMaterial color="red" />
            <axesHelper />
          </mesh>

          <mesh position={[3, 0, 0]} scale={[2, 2, 2]} rotation={[0, 0, 0]}>
            <boxGeometry />
            <meshStandardMaterial color="green" />
            <axesHelper />
          </mesh>
        </group>
      </Canvas>
    </>
  );
};

export default App;

rotation={[0, THREE.MathUtils.degToRad(45), 0]}に変更
グループに rotation={[0, THREE.MathUtils.degToRad(45), 0]} を適用すると、グループ内のすべてのオブジェクトが、Y 軸を中心に 45 度回転 します。positionも回転に従って移動します。
groupに属するすべてのオブジェクトが、一緒に回転する- 各オブジェクトの
positionは、回転後の座標系に沿って配置される - 各
meshのrotationはそのまま適用されるが、見た目はgroupの影響を受ける
import { OrbitControls } from "@react-three/drei";
import { Canvas } from "@react-three/fiber";
import * as THREE from "three";
// === メインアプリコンポーネント ===
const App = () => {
  return (
    <>
      <Canvas>
        <ambientLight intensity={1} rotation={[0, 0, 0]} />
        <directionalLight position={[10, 10, 10]} intensity={0.5} />
        <OrbitControls />
        <group
          scale={[1, 1, 1]}
          rotation={[0, THREE.MathUtils.degToRad(45), 0]}
        >
          <axesHelper />
          <mesh position={[0, 0, 0]} scale={[1, 1, 1]} rotation={[0, 0, 0]}>
            <boxGeometry />
            <meshStandardMaterial color="blue" />
          </mesh>

          <mesh
            position={[-3, 0, 0]}
            scale={[0.5, 0.5, 0.5]}
            rotation={[0, 0, 0]}
          >
            <boxGeometry />
            <meshStandardMaterial color="red" />
          </mesh>

          <mesh position={[3, 0, 0]} scale={[2, 2, 2]} rotation={[0, 0, 0]}>
            <boxGeometry />
            <meshStandardMaterial color="green" />
          </mesh>
        </group>
      </Canvas>
    </>
  );
};

export default App;
Transform(Position, Rotation, Scale)を利用して、3Dコンテンツの作成
React Three FiberとReact Three DreiのTransform(Position, Rotation, Scale)を活用して、シンプルかつ面白いインタラクティブな3Dコンテンツを作ってみましょう。
※準備中
参考になった方は、是非チャンネル登録をお願いします!
TypeScript x React Three Fiberのレッスンや作品は、今後もどんどん作成していきます!
YouTubeで告知致しますので、ぜひYouTubeのチャンネル登録をして通知をお待ちください!
📺 YouTubeを見る:こちらのリンクから視聴できます。
React Three Fiberで何ができるのか知りたい方は、下記を参考にしてみてください!
簡単にできる作品を用意しております!