
![[超级简单]介绍三个光纤X DREI X打字稿!用标准对象制造的oke oke样式3D背景!](https://hack-lab-256.com/wp-content/uploads/2025/02/hack-lab-256-samnail-14.jpg)
最近,在Web应用程序开发中使用了3D图形的特别是,反应三个光纤(R3F)允许您轻松处理三个。JS作为反应组件。
这次,我们还将利用drei 使用React + Typecript实现彩色的“ Pokepoke” 3D背景
📌更重要的是,这次我们不会使用任何特殊的3D型号!
这就是只使用基本对象(框,平面等)作为标准的三分之二我们会让您体验到这一点。
💡完成图像
👇创建3D背景👇
📺在YouTube上观看演示:链接中观看
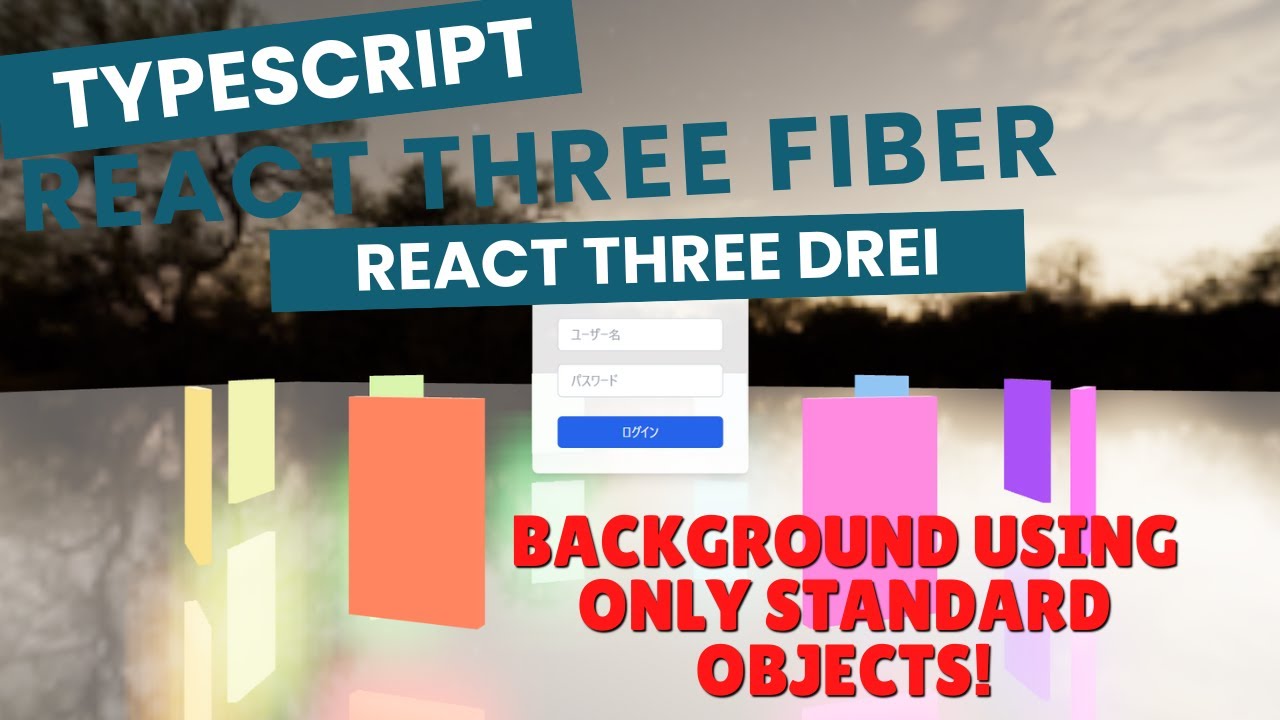
✅3D
,带有圆形的彩色卡片✅利用镜面反射
的✅将HTML/CSS结合在一起
🚀让我们看一下“不需要特殊的3D型号!您可以使用标准对象进行此操作!”
现在,让我们写一些代码!
将来,我们将继续创建课程,并从打字稿x进行三个反应三个光纤!
我们将在YouTube上发布公告,因此请订阅我们的YouTube频道并等待通知!
📺观看YouTube :您可以从此链接

如果您想知道三个纤维可以做什么反应,请参考以下内容!
我们有易于使用的作品!
- 电容式非接触式系统独有的清脆打字感觉!
- REALFORCE首款无线兼容设备!有线连接也可用!
- 与 HHKB 不同,日语键盘布局没有任何怪癖,任何人都可以轻松使用!
- 配有拇指轮,水平滚动非常容易!
- 还拥有出色的降噪性能,安静舒适!
- 滚动可以在高速模式和棘轮模式之间切换!
🚀对技术元素的介绍:在此项目中使用的工具和库
您可以将使用的工具和库更改为易于使用的工具和库,但是该项目将解释这一假设。
- VSCODE
-
- Microsoft提供的免费代码编辑器。
- 它不需要Vscode,但是有很多扩展名,因此我建议它。
- 还建议包括Eslint或更漂亮的。
- node.js
-
- JavaScript建立在Chrome的V8 JavaScript引擎上。
- 您可以在浏览器之外运行JavaScript代码。
- 这是基于已经安装的假设来解释的,因此 https://nodejs.org/ja 下载它
*我们建议下载长期稳定版本的LTS。
- Vite
-
- 现代网络项目的构建工具。它的特征是它的快速和轻巧的
- 先前使用的“ CRA(CREATE-REACT-APP)”未在官方网站上列出,并且已成为旧技术。
- 从现在开始,VITE应该是使用React创建应用程序时的最佳选择。
- 反应
-
- 这是用于构建UI(用户界面)的JavaScript库。它是由Facebook开发的,目前仍在许多Web应用程序中使用。
- 三
-
- JavaScript库,可轻松创建3D图形。它抽象了WebGL的复杂操作,并启用了直观的3D开发。
- 与Direct WebGL操作相比,创建3D图形很容易使用,并且更易于使用。
- 反应三个纤维
-
- 这是一个允许将三个.js用于React的库。它将React的组件结构与三个JS的3D发动机相结合。
- 三个JS可以在反应开发方式中使用,从而可以进行直观有效的发展。
- 反应三个drei
-
- 用于三个纤维的有用实用程序组件的集合。添加常用的三个JS功能很容易。
- 可以通过简短的代码来实现复杂的3.JS功能,从而降低学习成本。
🚀使用React三个Fiber×DREI×打字稿创建一个“ Pokepoke风格的3D背景”!
本文中解释了环境构建
📌这段时间,我们不会使用任何特殊的3D模型,而只使用React三纤维中可用的标准对象并进行了三个DREI。
如果您想了解有关标准对象的更多信息,请参考本文
请检查GitHub以获取您这次创建的完整源代码。
💾github存储库:此链接中检查源代码

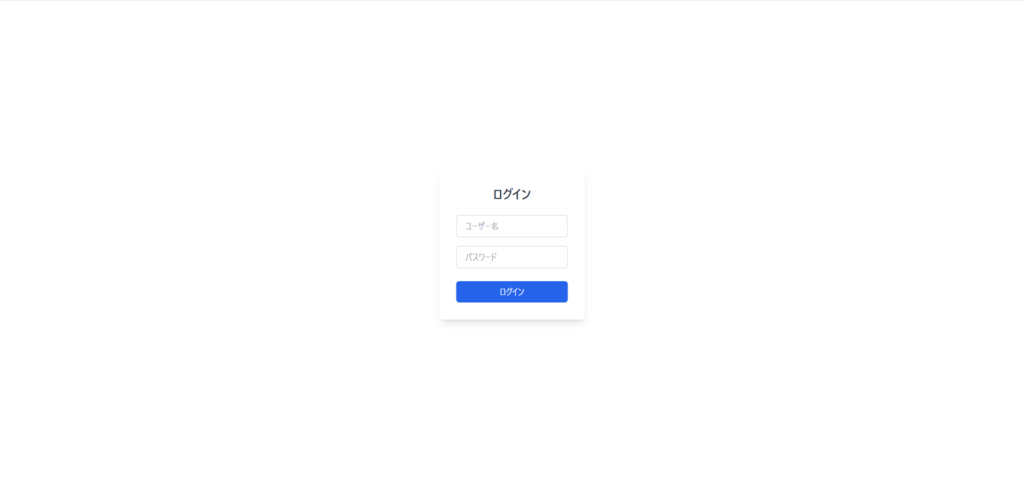
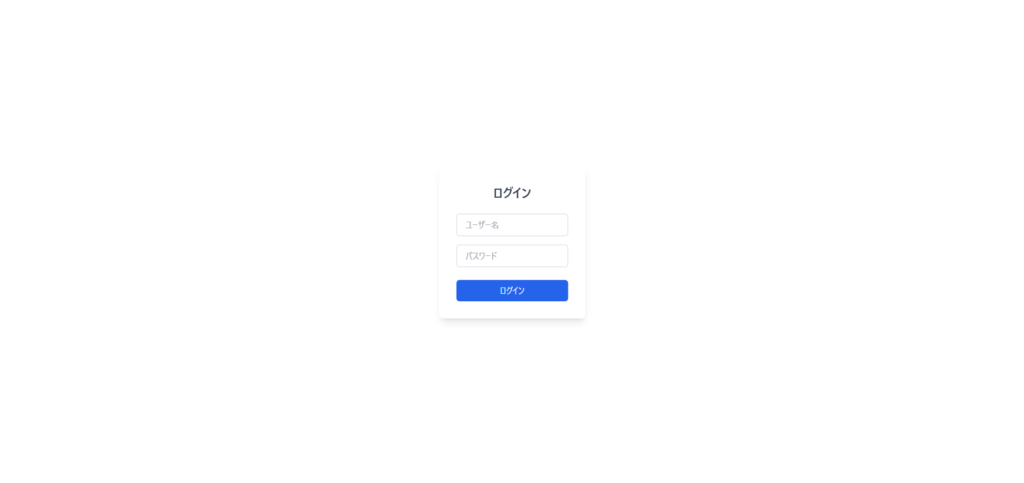
💡创建登录表格!
首先,只需使用React创建登录表单即可。
我们将tailwind-CSS用作CSS库。
// ===主应用程序=== const loginscreen =()=> {return(<> {/ * loginform */} <div className="absolute top-1/2 left-1/2 transform -translate-x-1/2 -translate-y-1/2 bg-white/90 rounded-lg p-8 shadow-lg text-center"><h2 className="text-2xl font-semibold text-gray-700 mb-6">登录</h2><form><div className="mb-4"><input type="text" placeholder="ユーザー名" className="w-full px-4 py-2 border border-gray-300 rounded-md focus:outline-none focus:ring-2 focus:ring-blue-500" /></div><div className="mb-6"><input type="password" placeholder="パスワード" className="w-full px-4 py-2 border border-gray-300 rounded-md focus:outline-none focus:ring-2 focus:ring-blue-500" /></div> <button type="submit" className="w-full bg-blue-600 text-white py-2 px-4 rounded-md hover:bg-blue-700 transition" >登录</button></form></div></>); };导出默认登录屏幕;
💡在背景中展示帆布!
首先放置画布,准备好相机并准备好照明。
从“@react-three/fiber”导入{canvas};从“@react-three/drei”中导入{orbitControls,}; // === MAIN APP组件=== const loginscreen =()=> {return(<> {/ * canvas in three.js */}<Canvas camera={{ position: [0, 0, 10], fov: 50 }}><color attach="background" args={["white"]} /> {/ *写作 */}<ambientLight intensity={10} /><directionalLight position={[0, 5, 0]} intensity={15} /> {/ *相机操作 */} <OrbitControls enablePan={false} enableZoom={false} minPolarAngle={Math.PI / 2} maxPolarAngle={Math.PI / 2} /></Canvas> {/ *使用html/css */}创建的登录表单<div className="absolute top-1/2 left-1/2 transform -translate-x-1/2 -translate-y-1/2 bg-white/90 rounded-lg p-8 shadow-lg text-center"><h2 className="text-2xl font-semibold text-gray-700 mb-6">登录</h2><form><div className="mb-4"><input type="text" placeholder="ユーザー名" className="w-full px-4 py-2 border border-gray-300 rounded-md focus:outline-none focus:ring-2 focus:ring-blue-500" /></div><div className="mb-6"><input type="password" placeholder="パスワード" className="w-full px-4 py-2 border border-gray-300 rounded-md focus:outline-none focus:ring-2 focus:ring-blue-500" /></div> <button type="submit" className="w-full bg-blue-600 text-white py-2 px-4 rounded-md hover:bg-blue-700 transition" >登录</button></form></div></>); };导出默认登录屏幕;
💡卡片对象的位置!!
接下来,将看起来像oke oke卡片包的对象放在后台。
仅凭这个,选择一个oke poke pack看起来不像屏幕吗? (哈哈)
从“@react-three/fiber”导入{canvas};导入{meshreflectormaterial,orbitControls,}来自“@react-three/drei”; // ===将一个圆形启发的盒子放在一个圆圈中,围绕[0,0,0] === const const cound cignularcardpack =({radius = 5,count = 10,cardsize = [1,1.5,0.1],// width,// width,width,/ width,// width,height,depth} size})=> {const cards = array.from({长度:count}); //创建数组返回(<group> {cards.map(((_,i)=> {const Angle =(i / count) * MATH.PI * 2; // const x = radius x = radius * math.cos(angle); // x坐标const z = radius * radius * math.sin.sin(angle); // z coortion const; <mesh key={i} position={[x, -1, z]} // カードの位置 rotation={[0, rotationY, 0]} // カードの向き ><boxGeometry args={cardSize} /><meshStandardMaterial color={`hsl(${(i / count) * 360}, 70%, 50%)`} /></mesh> ); })}}</group> ); }; // === MAIN APP组件=== const loginscreen =()=> {return(<> {/ * canvas in three.js */}<Canvas camera={{ position: [0, 0, 10], fov: 50 }}><color attach="background" args={["white"]} /> {/ *写作 */}<ambientLight intensity={10} /><directionalLight position={[0, 5, 0]} intensity={15} /> {/ *相机操作 */} <OrbitControls enablePan={false} enableZoom={false} minPolarAngle={Math.PI / 2} maxPolarAngle={Math.PI / 2} /> {/ *卡对象 */}<CircularCardPack /></Canvas> {/ *使用html/css */}创建的登录表单<div className="absolute top-1/2 left-1/2 transform -translate-x-1/2 -translate-y-1/2 bg-white/90 rounded-lg p-8 shadow-lg text-center"><h2 className="text-2xl font-semibold text-gray-700 mb-6">登录</h2><form><div className="mb-4"><input type="text" placeholder="ユーザー名" className="w-full px-4 py-2 border border-gray-300 rounded-md focus:outline-none focus:ring-2 focus:ring-blue-500" /></div><div className="mb-6"><input type="password" placeholder="パスワード" className="w-full px-4 py-2 border border-gray-300 rounded-md focus:outline-none focus:ring-2 focus:ring-blue-500" /></div> <button type="submit" className="w-full bg-blue-600 text-white py-2 px-4 rounded-md hover:bg-blue-700 transition" >登录</button></form></div></>); };导出默认登录屏幕;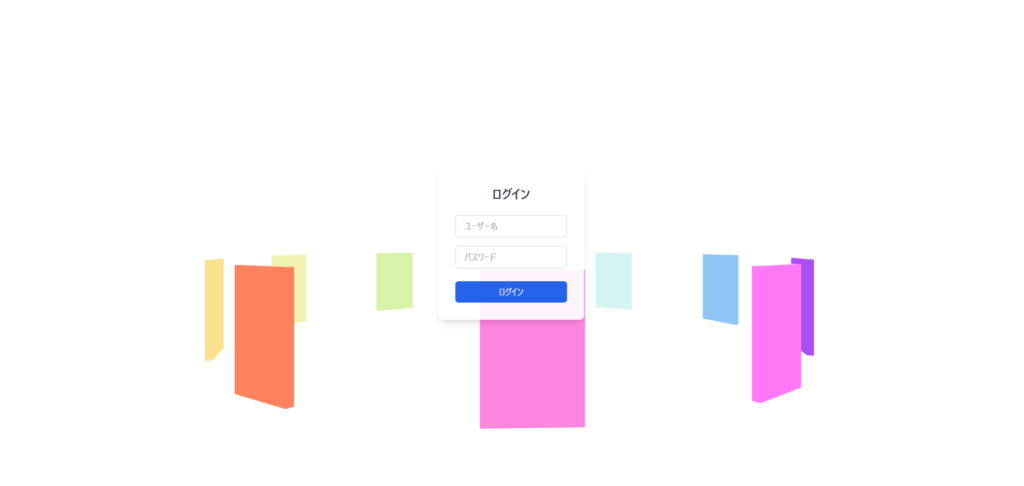
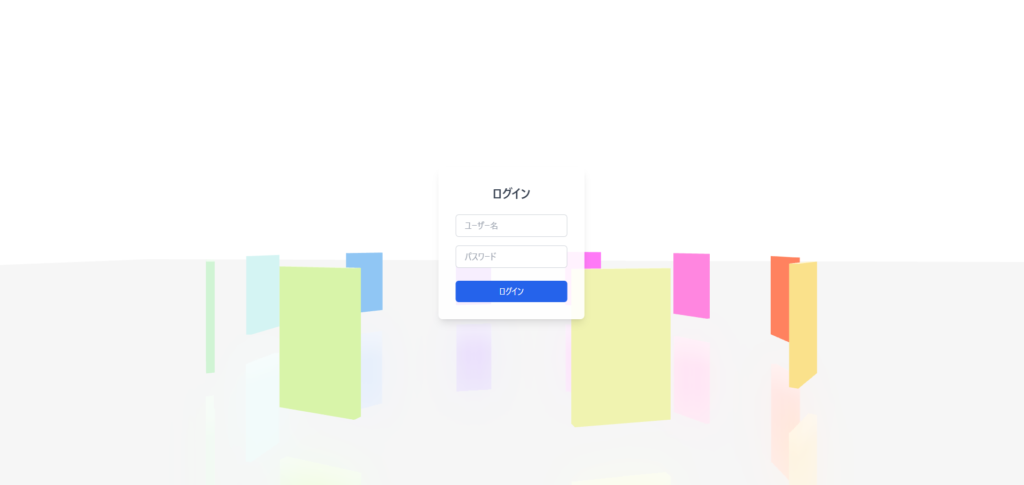
💡将镜面放在背包下!!
当我检查了选择oke poke包装的位置时,这些包似乎是反光的,因此我尝试以相同的方式在包装下添加镜面。
从“@react-three/fiber”导入{canvas};导入{meshreflectormaterial,orbitControls,}来自“@react-three/drei”; // ===镜像组件=== const reflectivePlane =()=> {return(<>)<mesh rotation-x={-Math.PI / 2} position={[0, -2, 0]}><planeGeometry args={[100, 100]} /> {/ *较大的镜子覆盖整个背景 */} <MeshReflectorMaterial blur={[200, 100]} mixBlur={0.7} mixStrength={1} mixContrast={1} resolution={1024} mirror={1} depthScale={0.1} reflectorOffset={0.2} /></mesh></> ); }; // ===将受卡片启发的盒子放入圆圈中,中心为[0,0,0] === const const cound circularCardpack =({radius = 5,count = 10,cardsize = [1,1.5,0.1],//宽度,宽度,高度,depth,depth} })=> {const cards = array.from({长度:count}); //创建一个数组返回(<group> {cards.map(((_,i)=> {const Angle =(i / count) * MATH.PI * 2; // const x = radius x = radius * math.cos(angle); // x坐标const z = radius * radius * math.sin.sin(angle); // z coortion const; <mesh key={i} position={[x, -1, z]} // カードの位置 rotation={[0, rotationY, 0]} // カードの向き ><boxGeometry args={cardSize} /><meshStandardMaterial color={`hsl(${(i / count) * 360}, 70%, 50%)`} /></mesh> ); })}}</group> ); }; // === MAIN APP组件=== const loginscreen =()=> {return(<> {/ * canvas in three.js */}<Canvas camera={{ position: [0, 0, 10], fov: 50 }}><color attach="background" args={["white"]} /> {/ *写作 */}<ambientLight intensity={10} /><directionalLight position={[0, 5, 0]} intensity={15} /> {/ *相机操作 */} <OrbitControls enablePan={false} enableZoom={false} minPolarAngle={Math.PI / 2} maxPolarAngle={Math.PI / 2} /> {/ * cardpack对象 */}<CircularCardPack /> {/ *镜像 */}<ReflectivePlane /></Canvas> {/ *使用html/css */}创建的登录表单<div className="absolute top-1/2 left-1/2 transform -translate-x-1/2 -translate-y-1/2 bg-white/90 rounded-lg p-8 shadow-lg text-center"><h2 className="text-2xl font-semibold text-gray-700 mb-6">登录</h2><form><div className="mb-4"><input type="text" placeholder="ユーザー名" className="w-full px-4 py-2 border border-gray-300 rounded-md focus:outline-none focus:ring-2 focus:ring-blue-500" /></div><div className="mb-6"><input type="password" placeholder="パスワード" className="w-full px-4 py-2 border border-gray-300 rounded-md focus:outline-none focus:ring-2 focus:ring-blue-500" /></div> <button type="submit" className="w-full bg-blue-600 text-white py-2 px-4 rounded-md hover:bg-blue-700 transition" >登录</button></form></div></>); };导出默认登录屏幕;
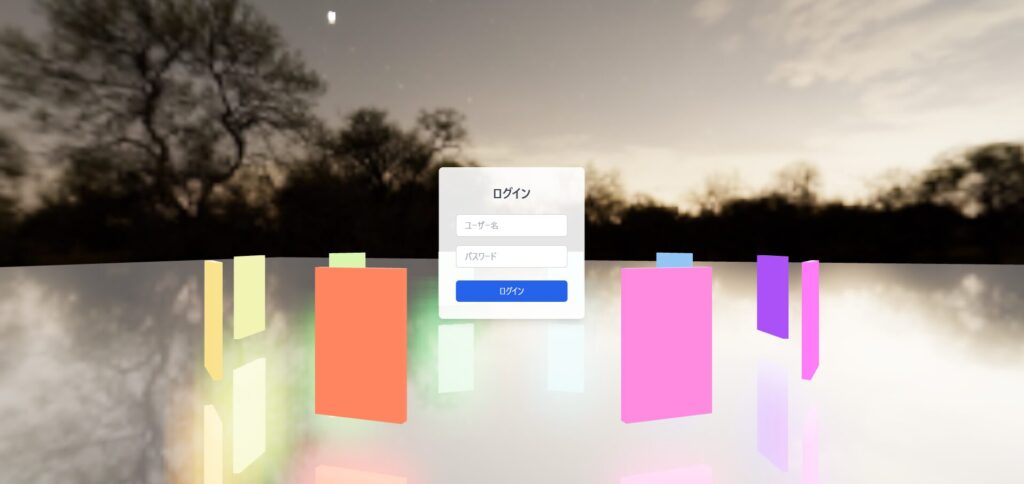
添加了背景!
这不需要它,但是我有点寂寞,所以我也会添加背景。
背景也是React Three Drei的标准配置。
从“@react-three/fiber”导入{canvas};导入{环境,meshreflectormaterial,orbitControls,}来自“@react-three/drei”; // === const reflectivePlane =()=> {return(<>)<mesh rotation-x={-Math.PI / 2} position={[0, -2, 0]}><planeGeometry args={[100, 100]} /> {/ *较大的镜子覆盖整个背景 */} <MeshReflectorMaterial blur={[200, 100]} mixBlur={0.7} mixStrength={1} mixContrast={1} resolution={1024} mirror={1} depthScale={0.1} reflectorOffset={0.2} /></mesh></> ); }; // ===将受卡片启发的盒子放入圆圈中,中心为[0,0,0] === const const cound circularCardpack =({radius = 5,count = 10,cardsize = [1,1.5,0.1],//宽度,宽度,高度,depth,depth} })=> {const cards = array.from({长度:count}); //创建一个数组返回(<group> {cards.map(((_,i)=> {const Angle =(i / count) * MATH.PI * 2; // const x = radius x = radius * math.cos(angle); // x坐标const z = radius * radius * math.sin.sin(angle); // z coortion const; <mesh key={i} position={[x, -1, z]} // カードの位置 rotation={[0, rotationY, 0]} // カードの向き ><boxGeometry args={cardSize} /><meshStandardMaterial color={`hsl(${(i / count) * 360}, 70%, 50%)`} /></mesh> ); })}}</group> ); }; // === MAIN APP组件=== const loginscreen =()=> {return(<> {/ * canvas in three.js */}<Canvas camera={{ position: [0, 0, 10], fov: 50 }}><color attach="background" args={["white"]} /> {/ *写作 */}<ambientLight intensity={10} /><directionalLight position={[0, 5, 0]} intensity={15} /> {/ *相机操作 */} <OrbitControls enablePan={false} enableZoom={false} minPolarAngle={Math.PI / 2} maxPolarAngle={Math.PI / 2} /> {/ * cardpack对象 */}<CircularCardPack /> {/ *镜像 */}<ReflectivePlane /> {/* 背景 */}<Environment preset="night" background /></Canvas> {/ *使用html/css */}创建的登录表单<div className="absolute top-1/2 left-1/2 transform -translate-x-1/2 -translate-y-1/2 bg-white/90 rounded-lg p-8 shadow-lg text-center"><h2 className="text-2xl font-semibold text-gray-700 mb-6">登录</h2><form><div className="mb-4"><input type="text" placeholder="ユーザー名" className="w-full px-4 py-2 border border-gray-300 rounded-md focus:outline-none focus:ring-2 focus:ring-blue-500" /></div><div className="mb-6"><input type="password" placeholder="パスワード" className="w-full px-4 py-2 border border-gray-300 rounded-md focus:outline-none focus:ring-2 focus:ring-blue-500" /></div> <button type="submit" className="w-full bg-blue-600 text-white py-2 px-4 rounded-md hover:bg-blue-700 transition" >登录</button></form></div></>); };导出默认登录屏幕;
最后
这次,我们仅使用标准对象复制了Pokepoke Pack选择屏幕,作为“由标准对象制成的Pokepoke样式3D背景!”
您可以通过观看下面的YouTube来详细了解实际动作!
📺在YouTube上观看演示:链接中观看
📌我这次创建的代码发布在GitHub上,因此也请查看!
💾github存储库:此链接中检查源代码
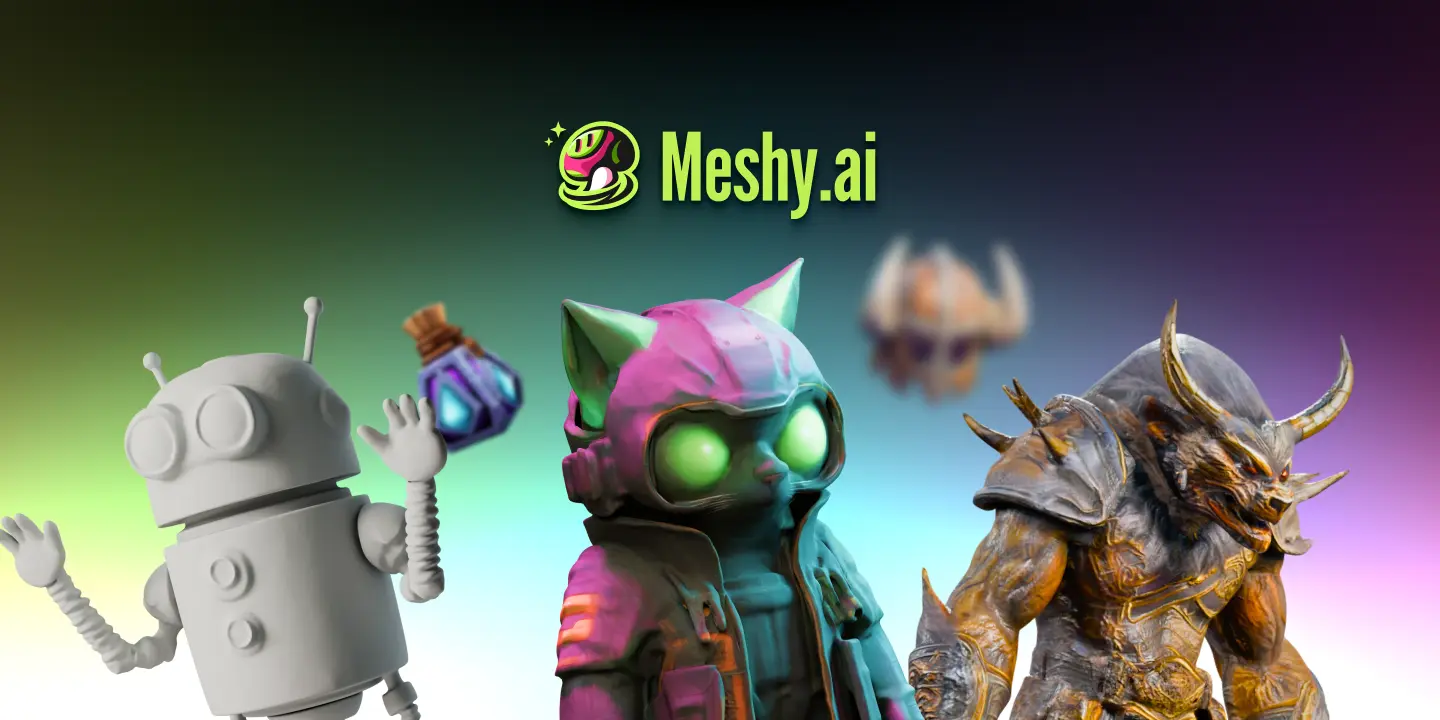
📌如果您使用网格并将其替换为3D对象,那么您甚至可以更接近理想!!
Meshy是一项服务,可让您使用AI轻松生成3D对象。
通过使用此功能,您可以轻松地创建理想的3D对象,因此我认为您可以更接近理想!
📺检查网格:此链接的官方页面上检查它
如果您发现这有用,请订阅我们的频道!
将来,我们将继续创建课程,并从打字稿x进行三个反应三个光纤!
我们将在YouTube上发布公告,因此请订阅我们的YouTube频道并等待通知!
📺观看YouTube :您可以从此链接
如果您想知道三个纤维可以做什么反应,请参考以下内容!
我们有易于使用的作品!
![如何构建一个自动在Chatgpt + Next.js [OpenAI API + NEXT.JS + Tailwind CSS]中自动生成LP的Web应用程序]](https://hack-lab-256.com/wp-content/uploads/2025/07/hack-lab-256-samnail-27-300x169.jpg)

![我尝试使用OpenAI API [Next.js + Tailwind CSS]创建聊天机器人](https://hack-lab-256.com/wp-content/uploads/2025/07/hack-lab-256-samnail-25-300x169.jpg)

![[对于初学者]介绍三个光纤X DREI X打字稿!从图像创建像素艺术和动态动画](https://hack-lab-256.com/wp-content/uploads/2025/02/hack-lab-256-samnail-16-300x169.jpg)
![[完整说明]用React三个光纤×打字稿学习! 3D对象转换(位置,旋转,比例)的实用指南](https://hack-lab-256.com/wp-content/uploads/2025/02/hack-lab-256-samnail-15-300x169.png)